
Administrators can uniformly configure the signing experience within a workspace in [Signing Preferences], including the signing methods available to recipients, identity verification retry rules, default country/region, default ID type, signature style, and seal/stamping rules. After saving, the settings will take effect as the default preference configuration for the current workspace.
I. Setting the Signing Methods Available to Recipients
1. Feature Overview
In Nota Sign, administrators can control the signing methods recipients can use when signing documents. By uniformly configuring signing methods, the signing process within the workspace can better align with internal corporate policies and prevent recipients from using non-compliant signature methods.
2. How to Configure
(1) Log in to the Nota Sign workspace; (2) Click [Manage] in the top navigation bar to enter the management console; (3) Click [Signing Preferences] in the left menu; (4) In the [Allow recipients to sign using the following methods] section, check the signing methods you want to allow as needed;
The following signing methods are currently supported:
- Type Name: Recipients can generate a signature by typing their name.
- Draw Signature: Recipients can draw their signature on the signing page.
- Upload Signature Image: Recipients can upload a local signature image as their signature.
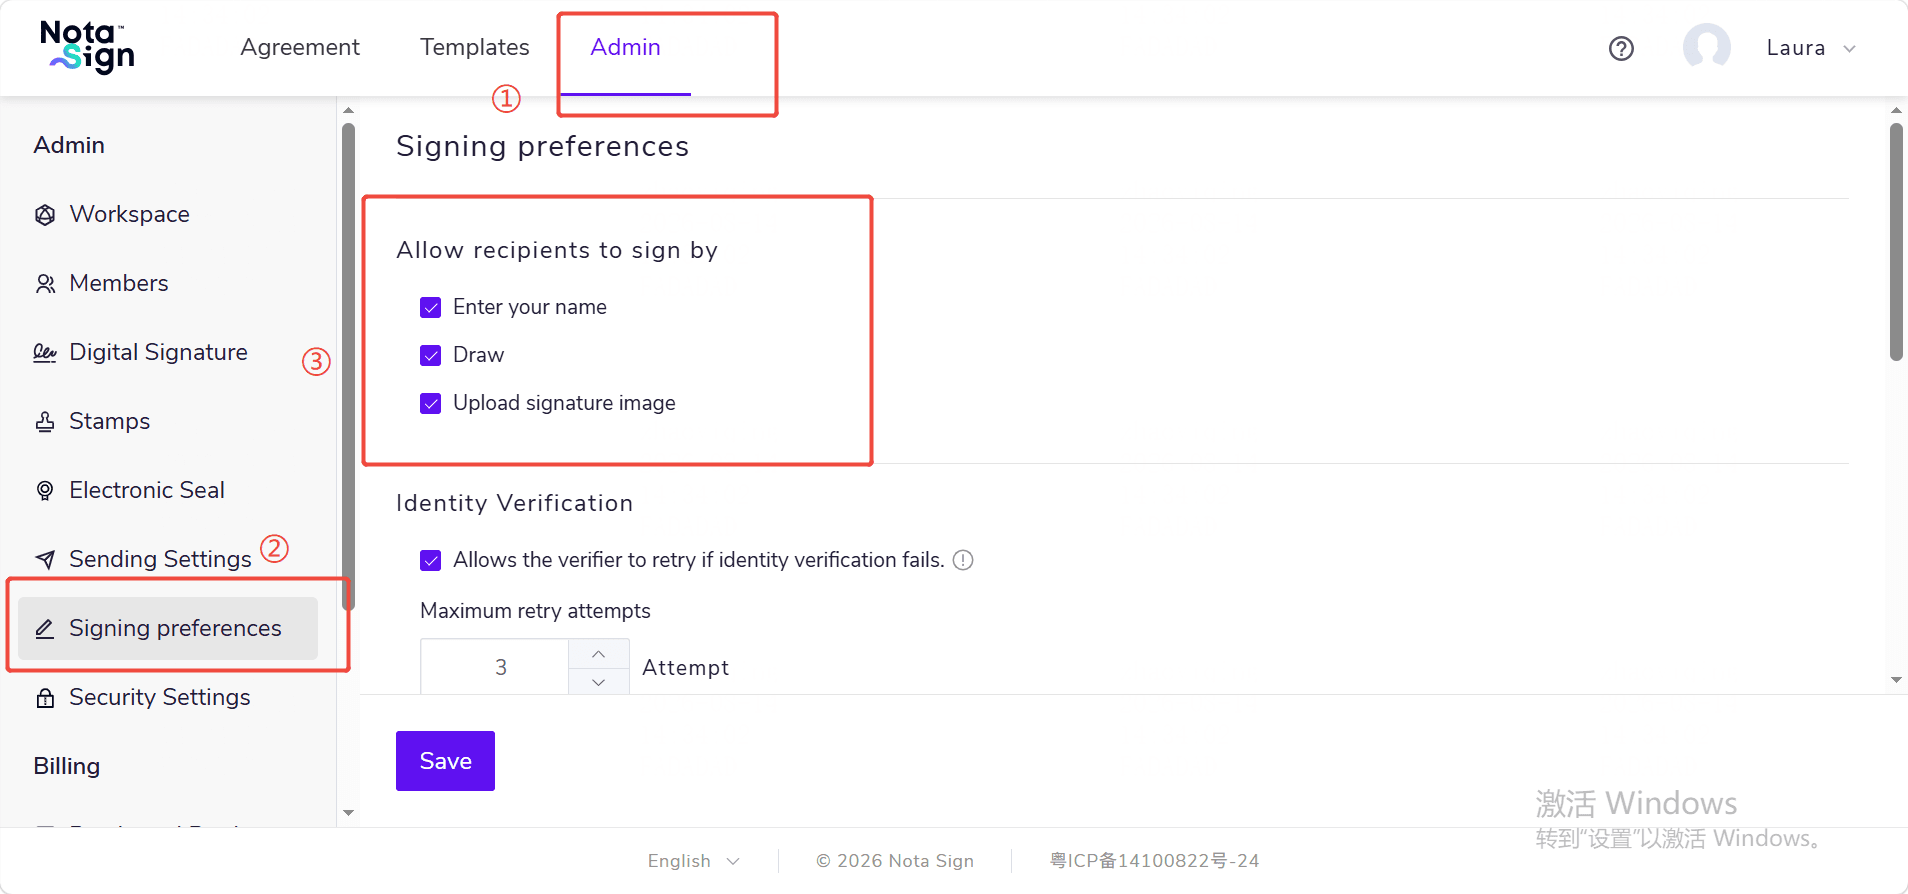
(5) Click [Save] to complete the settings.
If you uncheck a signing method, recipients will not be able to use that method to complete their signature in subsequent signing processes. It is recommended to keep at least one signing method available to avoid impacting recipients’ ability to complete signing.
II. Setting Retry Rules After Identity Verification Failure
1. Feature Overview
When an envelope requires recipients to complete identity verification, administrators can set whether to allow reviewers to retry after verification failure, as well as the number of retry attempts allowed. This setting helps administrators balance security and signing completion rates.
2. Allowing Reviewers to Retry
(1) Click [Manage] - [Signing Preferences]; (2) In the [Identity Verification] section, check [Allow reviewers to retry when identity verification fails]; (3) Set the [Allowed Retry Attempts]; after setting, the system will limit the reviewer’s retry opportunities according to this number when identity verification fails.
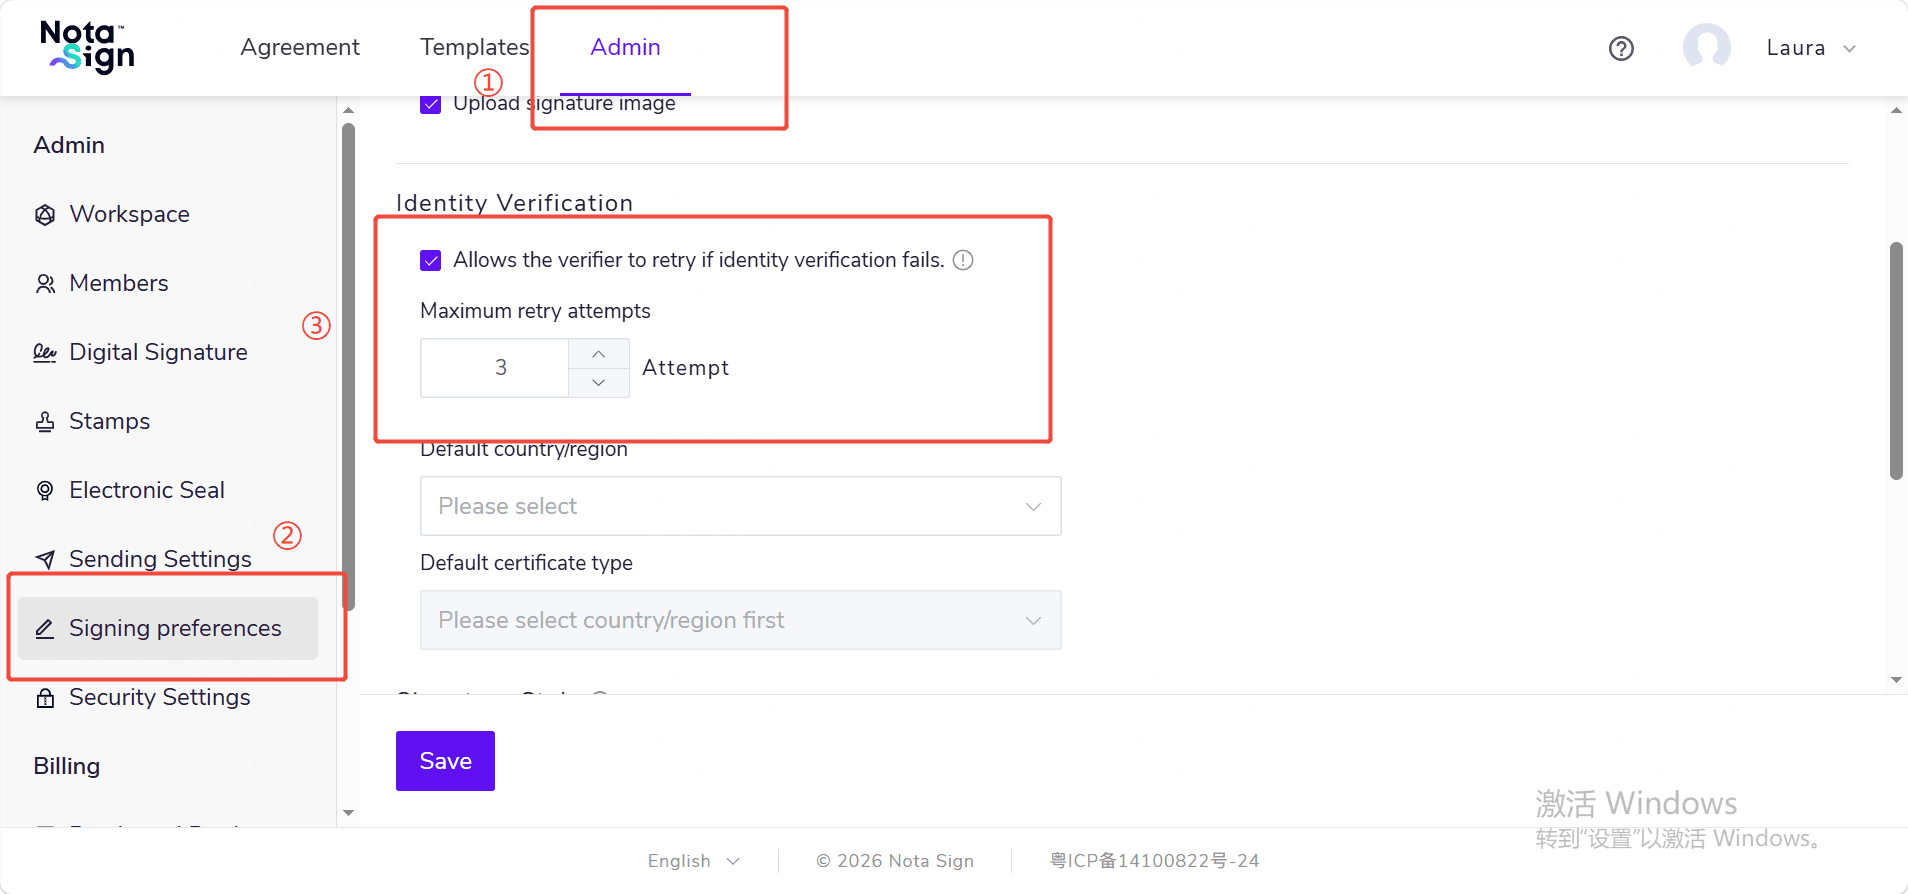
Each time a reviewer initiates a retry, the sender is responsible for the associated single charge. Please set the allowed retry attempts reasonably based on your business scenario.
(4) Click [Save] to complete the settings.
- When checked: If a reviewer’s identity verification fails, they can re-initiate verification within the allowed retry limit.
- When unchecked: After identity verification fails, the reviewer cannot retry, and the sender may need to restart the signing process.
III. Setting the Default Country/Region
1. Feature Overview
Administrators can set a default country/region for identity verification. Once set, the system will prioritize using that country/region as the default option in signing processes that involve identity verification, reducing repeated selections by senders or recipients.
2. How to Configure
(1) Click [Manage] - [Signing Preferences]; (2) In the [Identity Verification] section, find [Default Country/Region]; (3) Select the country or region you want to use as the default from the dropdown;
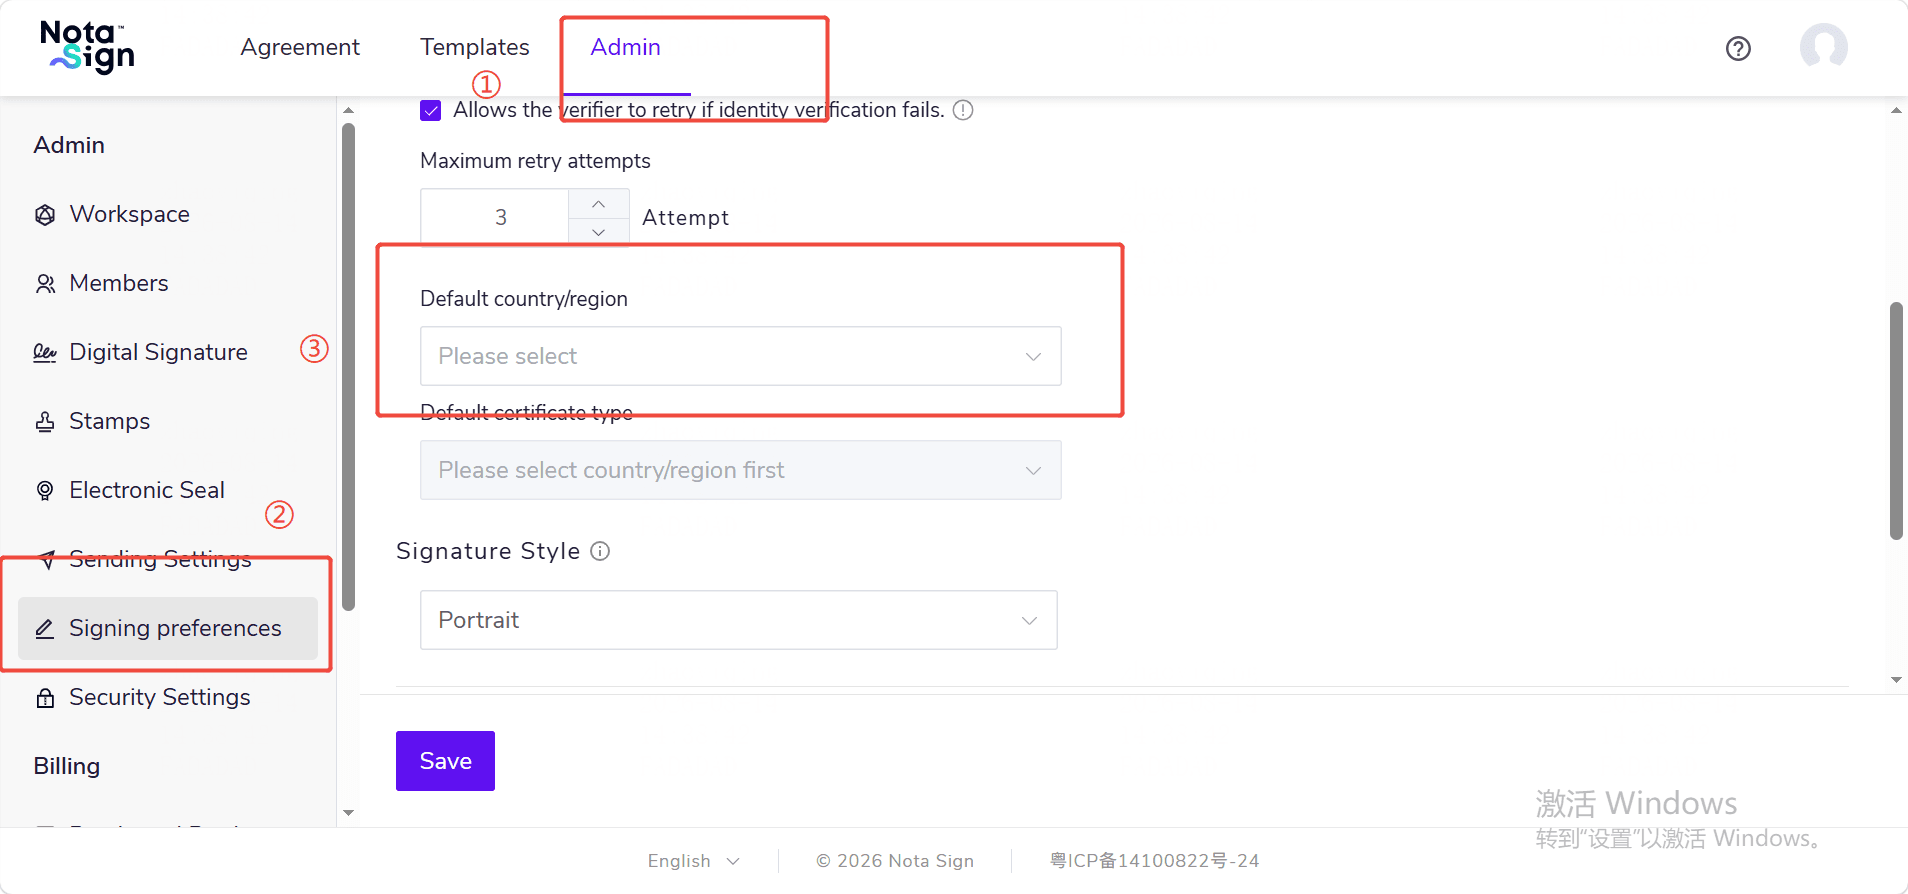
(4) Click [Save] to complete the settings.
The default country/region affects the available options for subsequent identity verification-related configurations. If you need to configure the default ID type, please select the default country/region first.
IV. Setting the Default ID Type
1. Feature Overview
Based on the selected default country/region, administrators can set the default ID type to be used for identity verification. This setting reduces the need for senders to repeatedly select an ID type when creating envelopes, improving efficiency.
2. How to Configure
(1) Click [Manage] - [Signing Preferences]; (2) First, select a country or region in [Default Country/Region]; (3) Select the corresponding ID type from the [Default ID Type] dropdown;
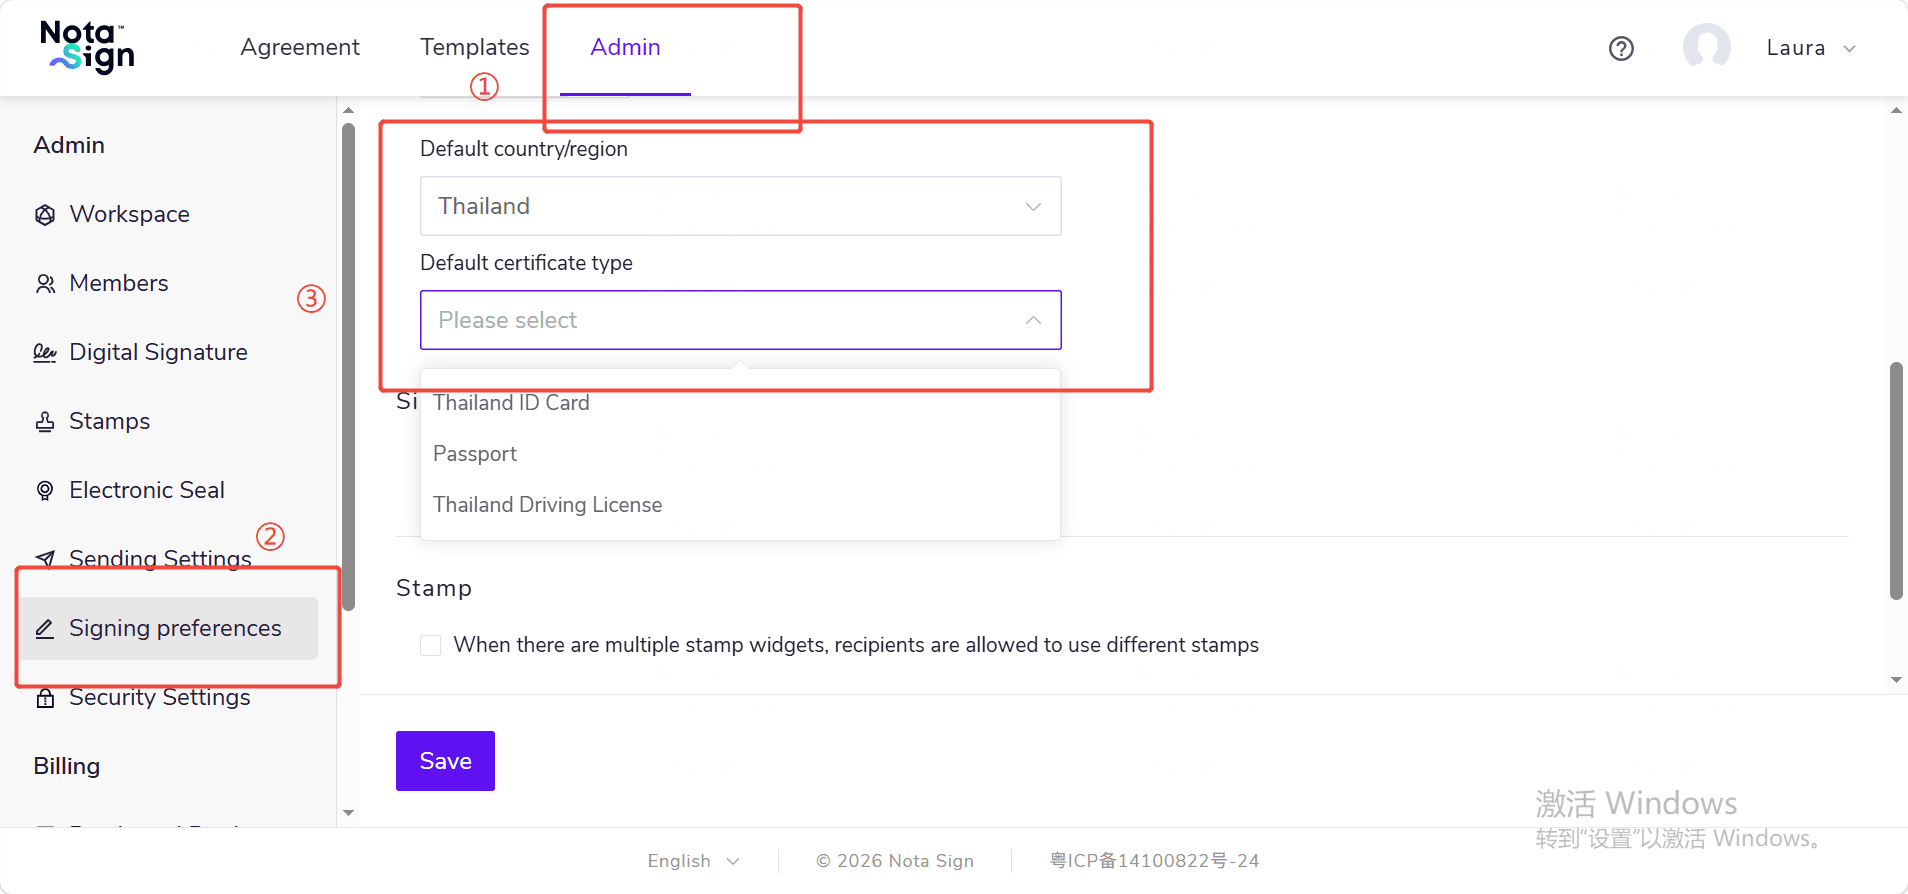
(4) Click [Save] to complete the settings.
The default ID type can only be configured after selecting the default country/region. The supported ID types may vary by country/region; please refer to the page display for details.
V. Setting the Signature Style
1. Feature Overview
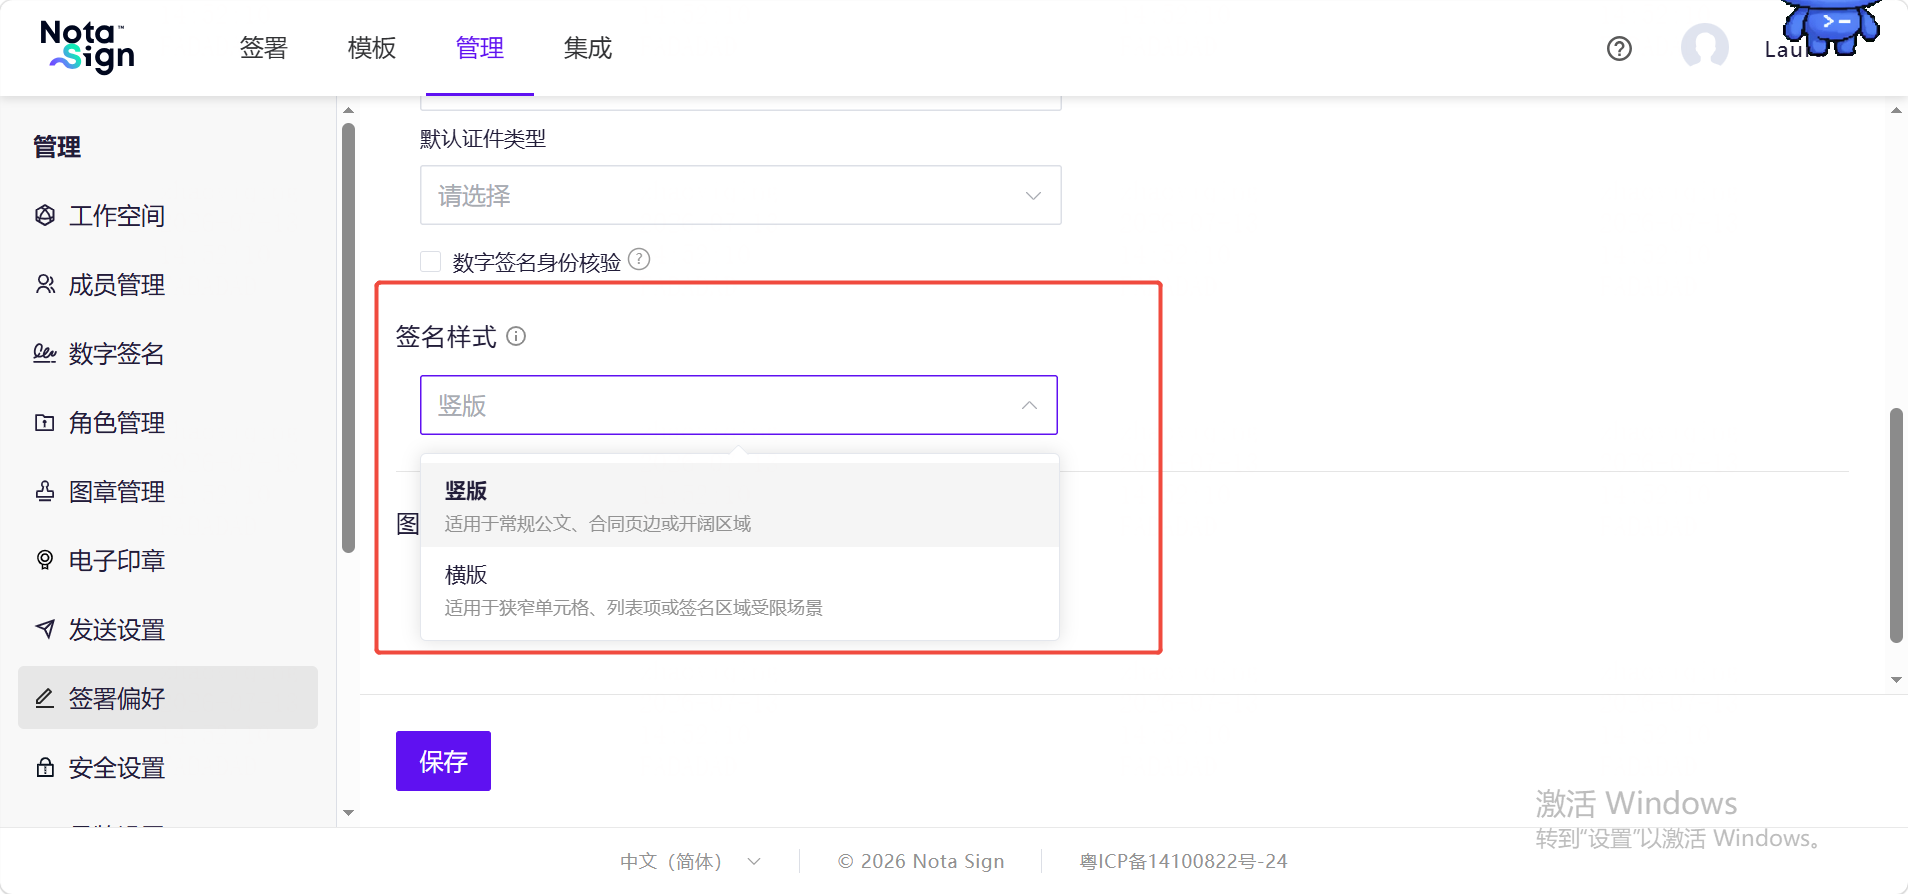
Administrators can set the default display style of signatures in documents. Currently, [Vertical] or [Horizontal] styles are supported. This setting affects the default display orientation of signatures in signed documents, helping to unify the visual standards of signed documents across the enterprise.
2. How to Configure
(1) Click [Manage] - [Signing Preferences];
(2) In the [Signature Style] section, select the default style you want to use;
VI. Setting Seal/Stamping Rules
1. Feature Overview
When senders add multiple seal controls to a document, administrators can set whether to allow recipients to use different seals for different seal controls. This setting is applicable to business scenarios that require distinguishing different stamping purposes, different stamping positions, or different seal types.
2. How to Configure
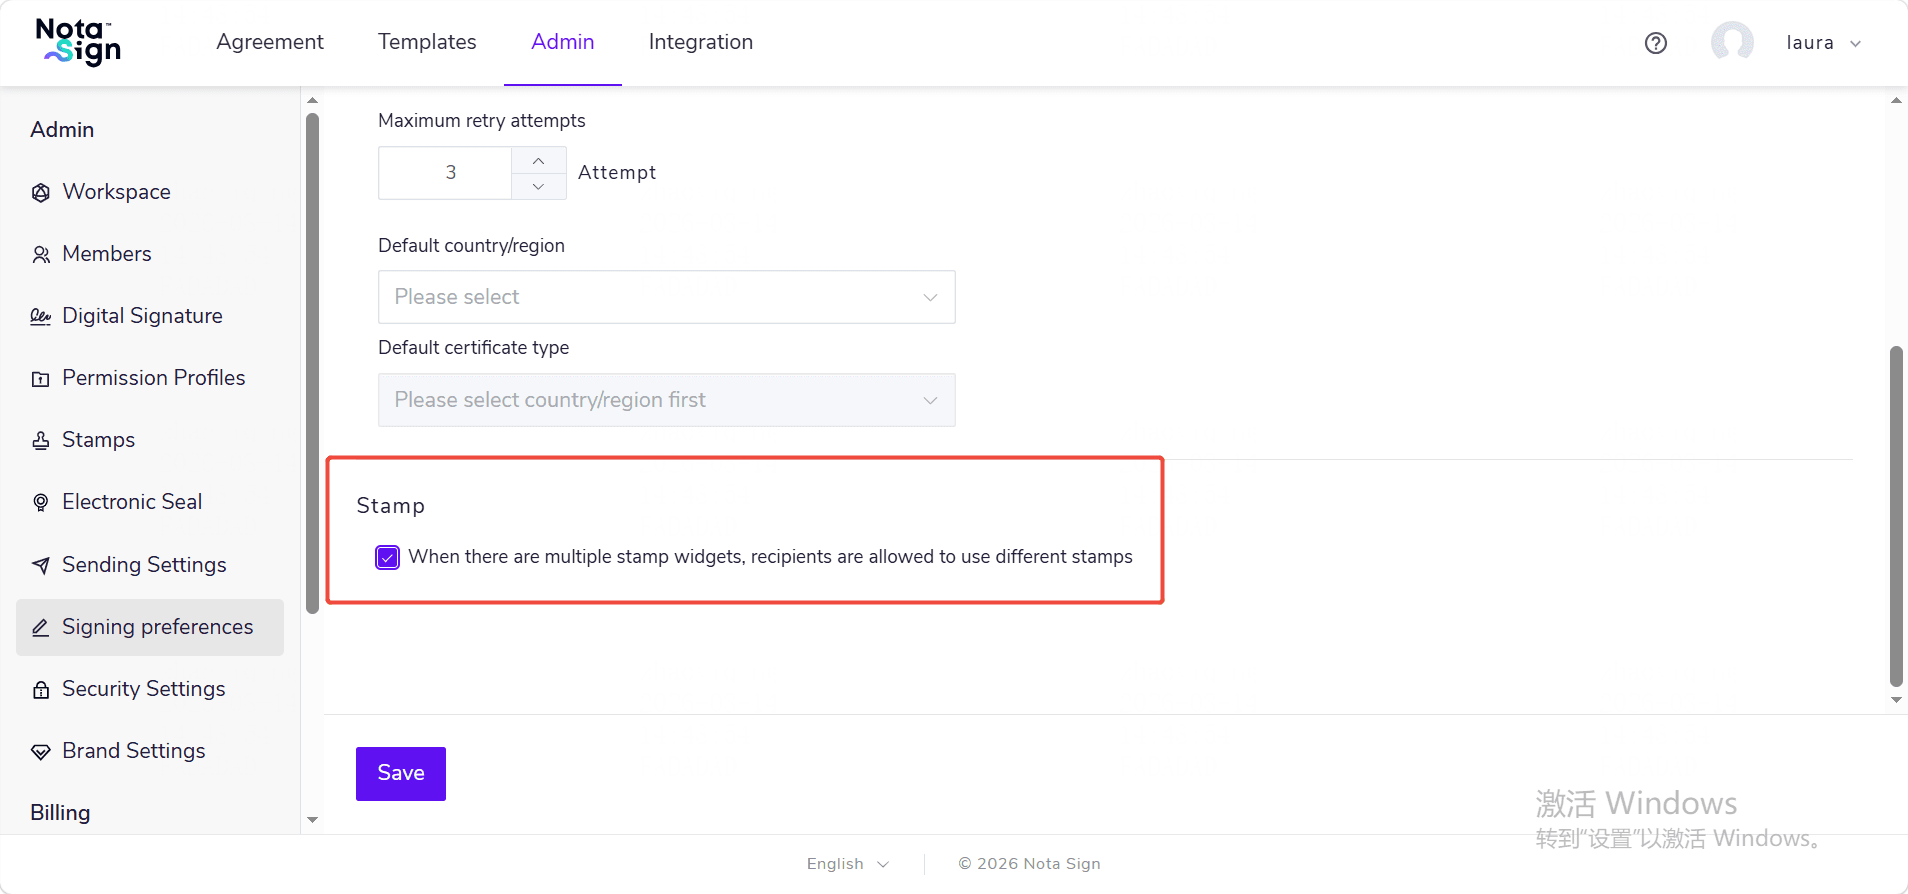
(1) Click [Manage] - [Signing Preferences]; (2) In the [Seal/Stamping] section, find [When there are multiple seal controls, allow recipients to use different seals for stamping], and check or uncheck the option as needed;
- When checked: If multiple seal controls exist in a document, recipients can select different seals for different seal controls.
- When unchecked: When recipients use seals across multiple seal controls, they will be subject to unified seal usage rules.
If the enterprise has strict requirements for seal consistency, it is recommended to enable this setting with caution. If different stamping positions require different seals, you can enable this setting to increase signing flexibility.
VII. Allowing Recipients to Apply for Electronic Seals During the Signing Process
1. Feature Overview
When recipients need to use corporate electronic seals to complete signing but have not yet obtained authorized electronic seals, administrators can allow recipients to apply for new electronic seals during the signing process.
After enabling, eligible recipients can perform the following operations on the PC/Web signing page:
- Apply for a corporate electronic seal;
- Select an allowed certificate service provider;
- Check the certificate application progress;
- Complete the new seal’s image, seal usage reason, and seal user information;
- Return to the signing page and use the newly applied electronic seal.
Administrators can also set which certificate service providers recipients are allowed to select when applying. After a recipient initiates an application, the corporate certificate usage is borne by the sending workspace; the application records and the electronic seals generated upon successful application are attributed to the workspace selected by the recipient.
💡 Notes:
- This feature is disabled by default.
- Currently, only the PC/Web signing page is supported; H5 signing pages do not support electronic seal applications.
- Only when the signing task contains corporate electronic seal controls will recipients see the application entry.
- Senders do not need to enable this feature separately for each envelope. The system will read the current signing preferences of the sending workspace when creating or sending envelopes.
2. Step-by-Step Instructions
(1) Log in to the Nota Sign workspace. (2) Go to [Manage] → [Signing Preferences] and find the [Seal/Stamping] settings area. (3) In the [Seal/Stamping] settings area, enable [Allow recipients to apply for electronic seals during the signing process].
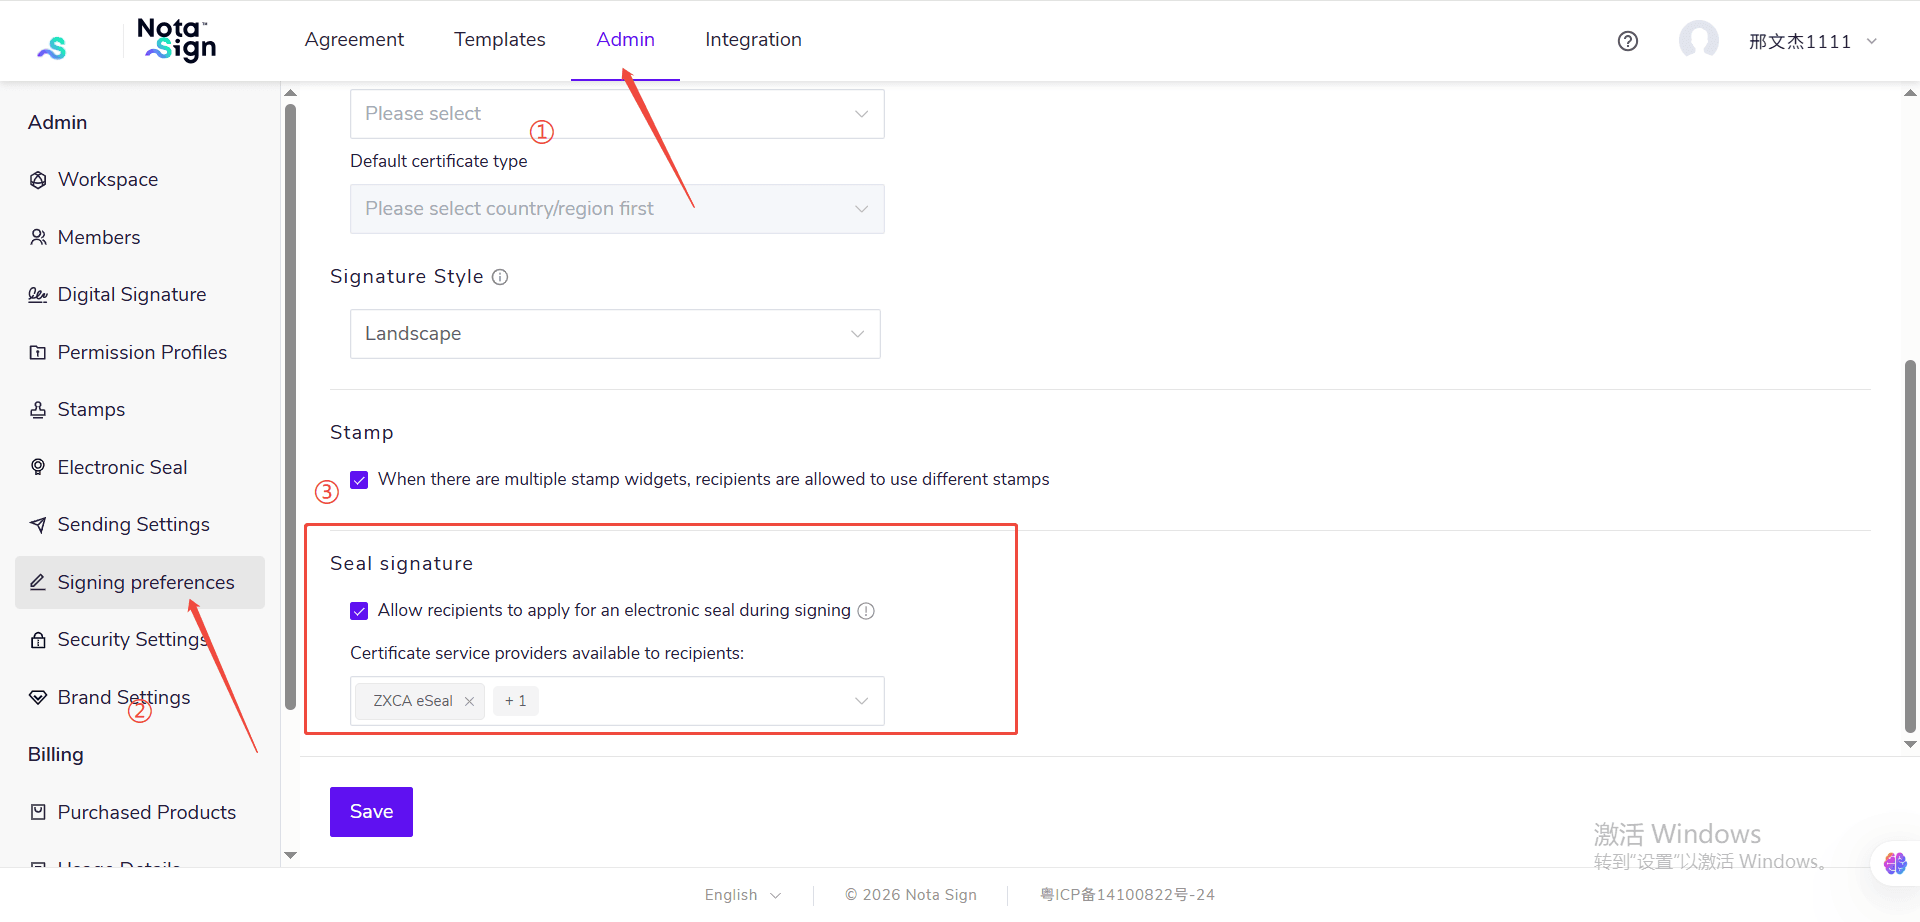
After enabling, the page will display the selectable certificate service providers. When enabling this feature for the first time, the system will select all available certificate service providers by default. Administrators can uncheck service providers that are not intended for recipient use.
(4) Check [Allow recipients to use the following certificate service providers] as needed.
The selectable certificate service providers come from the corporate certificate applications already installed in the sending workspace’s [Extension Center]. If the page displays “No certificate service providers available,” please go to the [Extension Center] to install the corresponding corporate certificate applications first, then return to Signing Preferences to make your selection.
(5) Click [Save].
After saving, the system will save the following configurations to the envelope when creating or sending subsequent envelopes:
- Whether recipients are allowed to apply for electronic seals during the signing process;
- The certificate service providers that recipients are allowed to select.
The following conditions must all be met for a recipient to apply for an electronic seal on the PC/Web signing page:
- The current envelope contains a corporate electronic seal control assigned to the recipient;
- The sending workspace allows recipients to apply for electronic seals during the signing process;
- At least one available certificate service provider has been configured;
- The recipient is signing via the PC/Web page.