
This document covers the various functional configurations of sending settings, including default signing order, signing validity period, automatic reminder frequency, reviewer renaming, seal control, attachment control, merged signing documents, forced reading, terms confirmation, and document order signing settings.
I. Seal Control Settings
1. Enabling Seal Control
After enabling the seal control, senders can set seal usage permissions for recipients. When “Only allow authorized seals” is checked, recipients cannot upload other seals on their own.
- Log in to the Nota Sign workspace;
- Click [Manage] in the top navigation bar to enter the management console;
- Click [Sending Settings] in the left menu to enter sending settings management;
- Check to enable seal control, and select according to requirements whether to use authorized seals or allow uploading other seals.
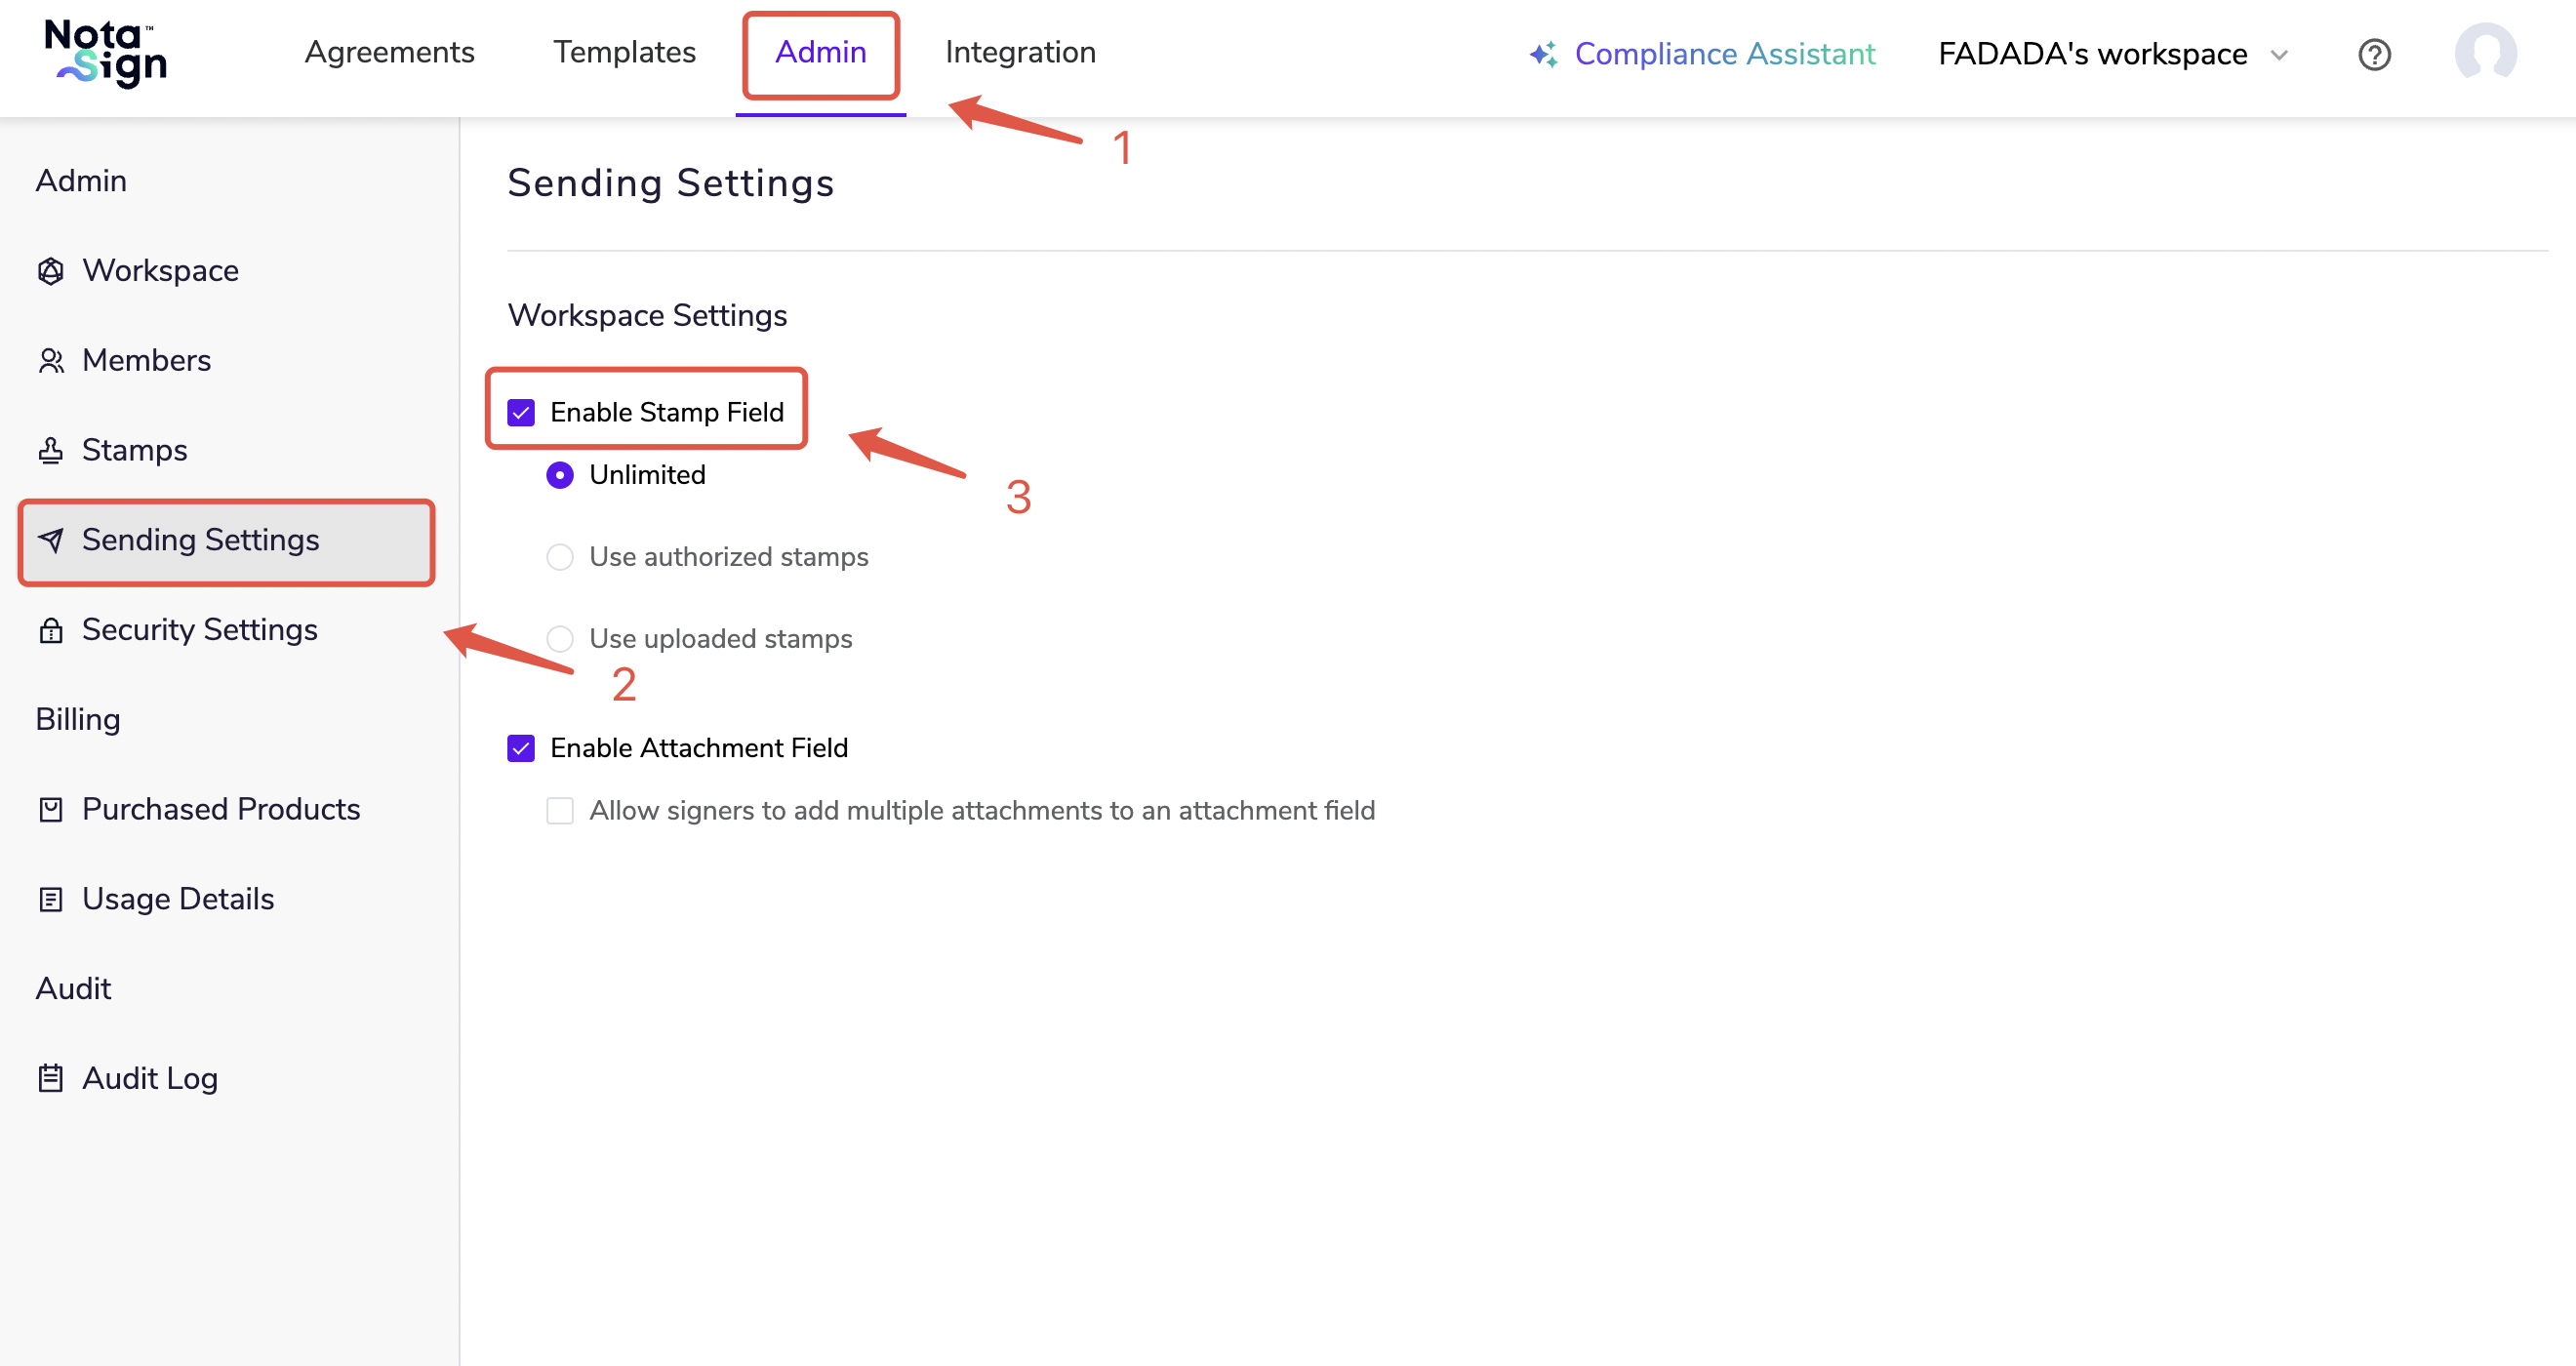
2. Setting Seal Controls During Envelope Creation
Drag the seal control during envelope creation to designate the recipient’s seal signing area.
- Initiate signing;
- Drag [Seal] to the signing area;
- In the [Scope of Use] section, you can adjust the recipient’s seal usage permissions for this envelope.
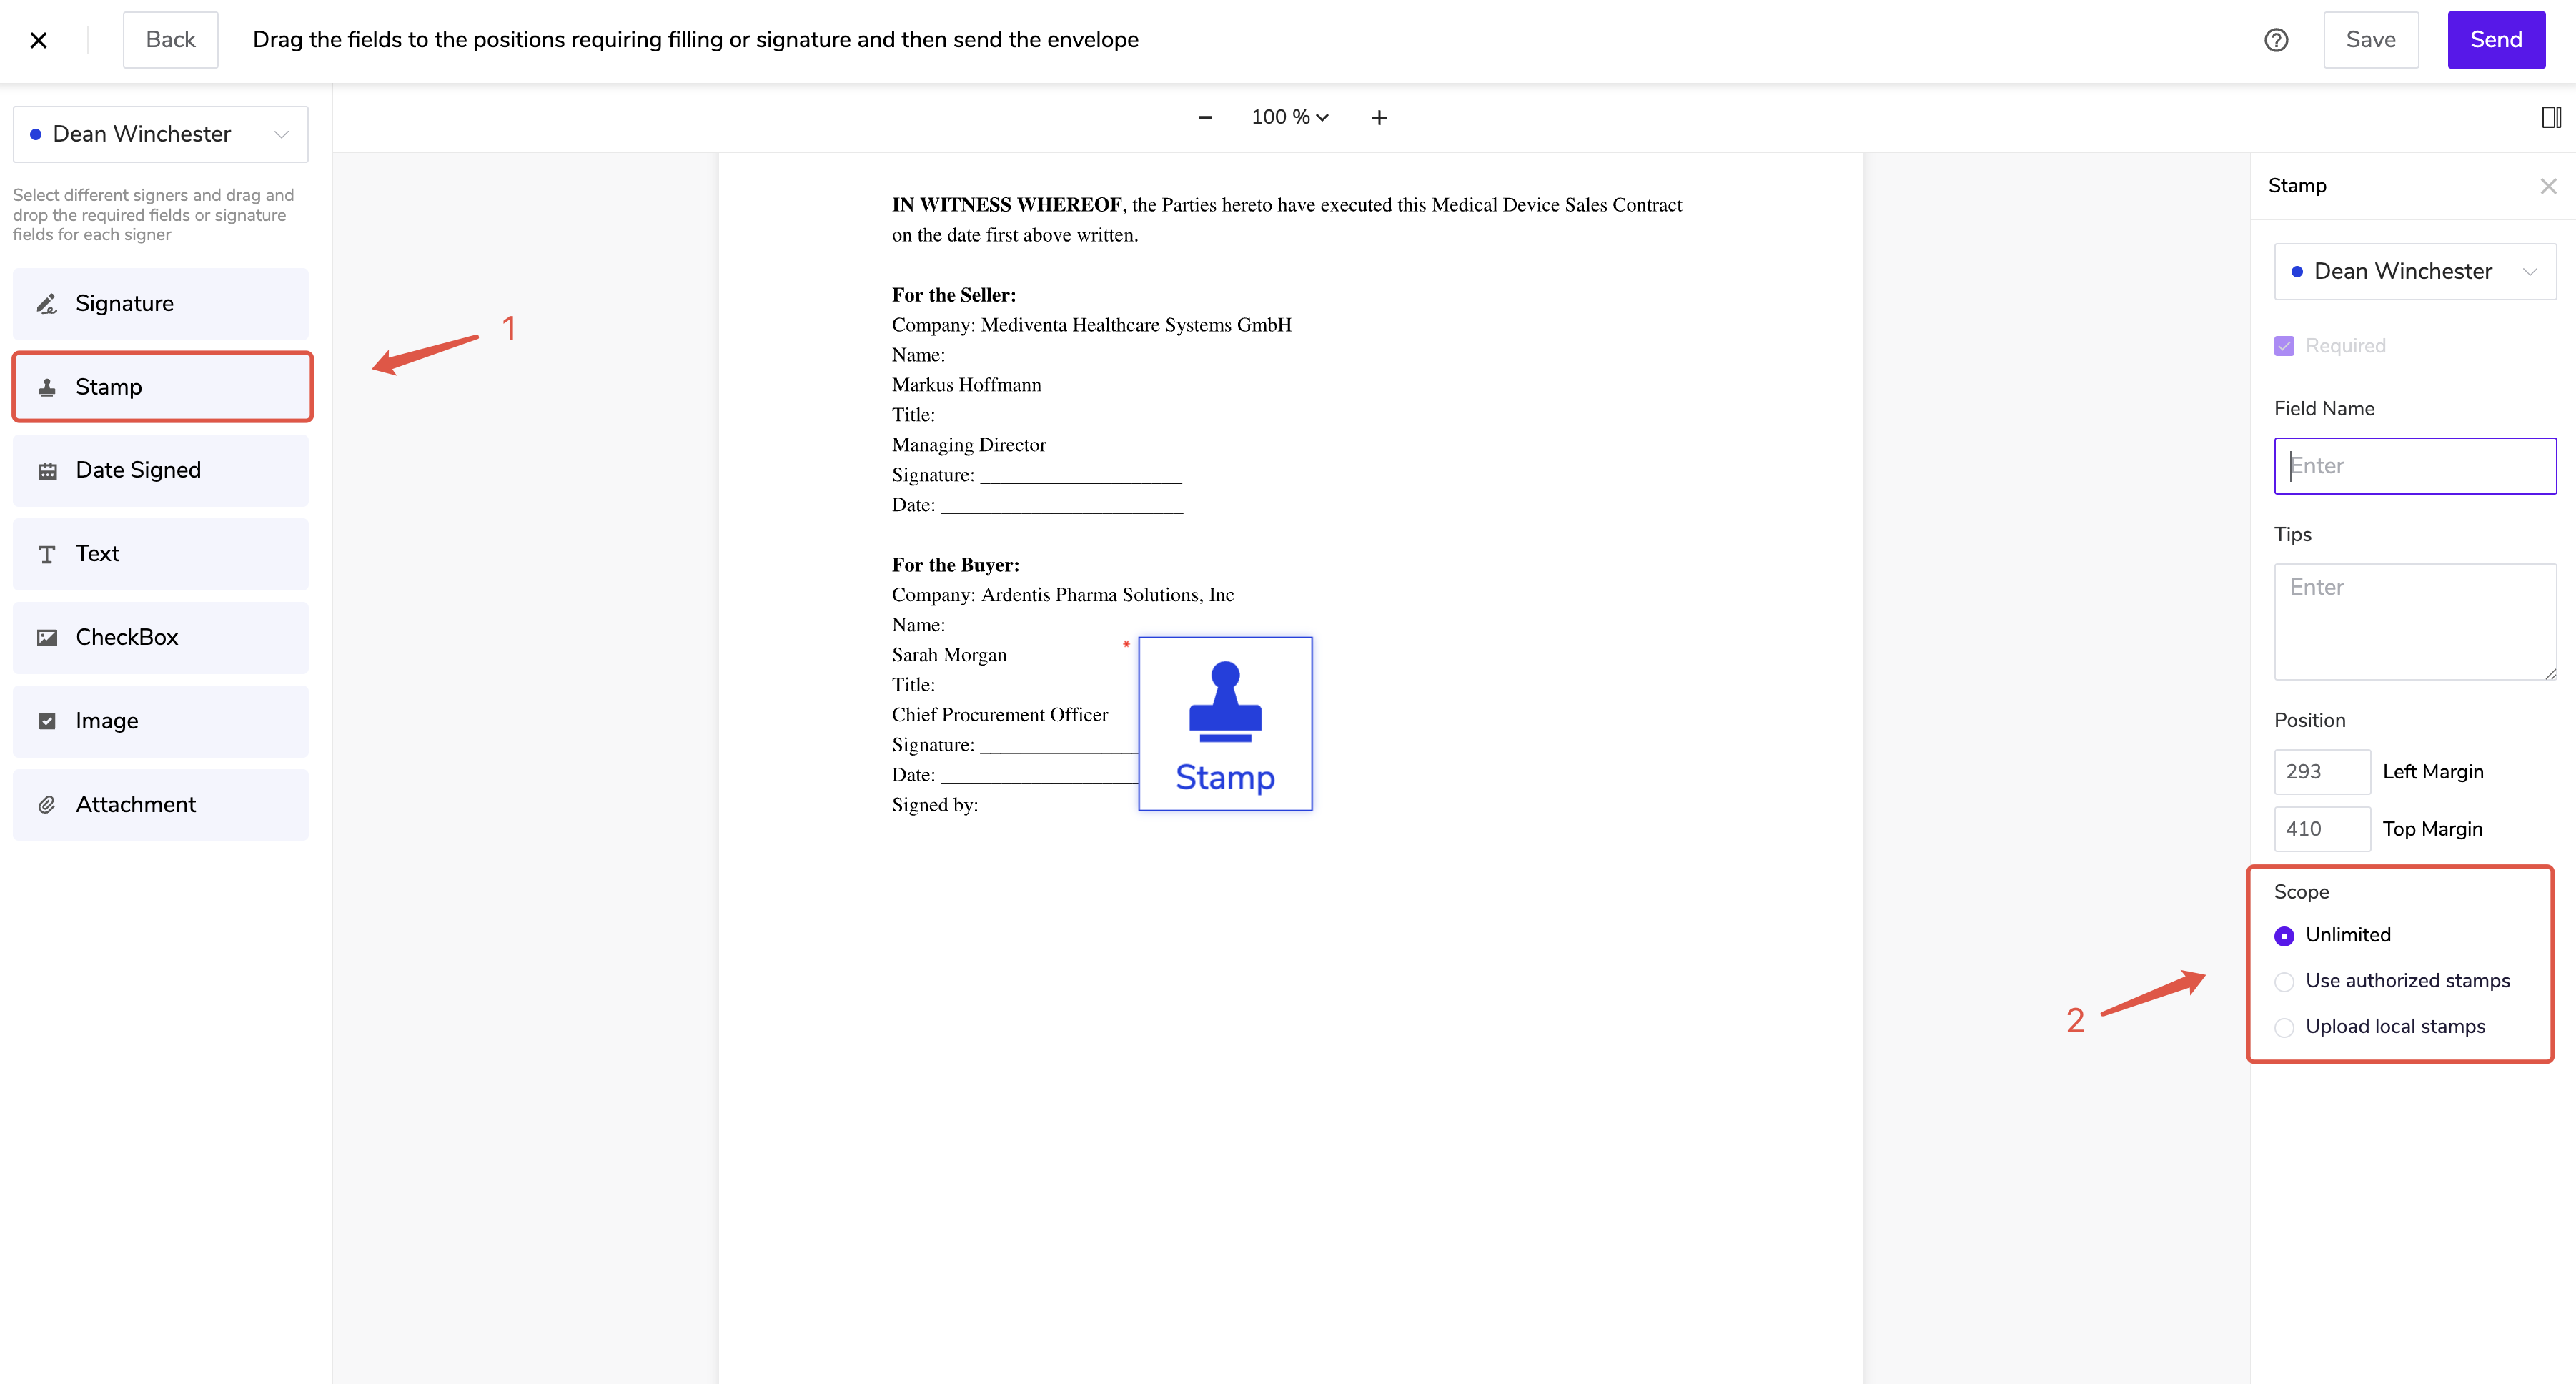
⚠️ Note: Once seal controls are set, they will take effect as the default configuration. You can also modify seal permissions for each recipient individually when creating a single envelope.
II. Attachment Control Settings
1. Enabling Attachment Control
- Log in to the Nota Sign workspace;
- Click [Manage] in the top navigation bar to enter the management console;
- Click [Sending Settings] in the left menu to enter sending settings management;
- Check to enable attachment control and authorize the number of attachments recipients are allowed to add.
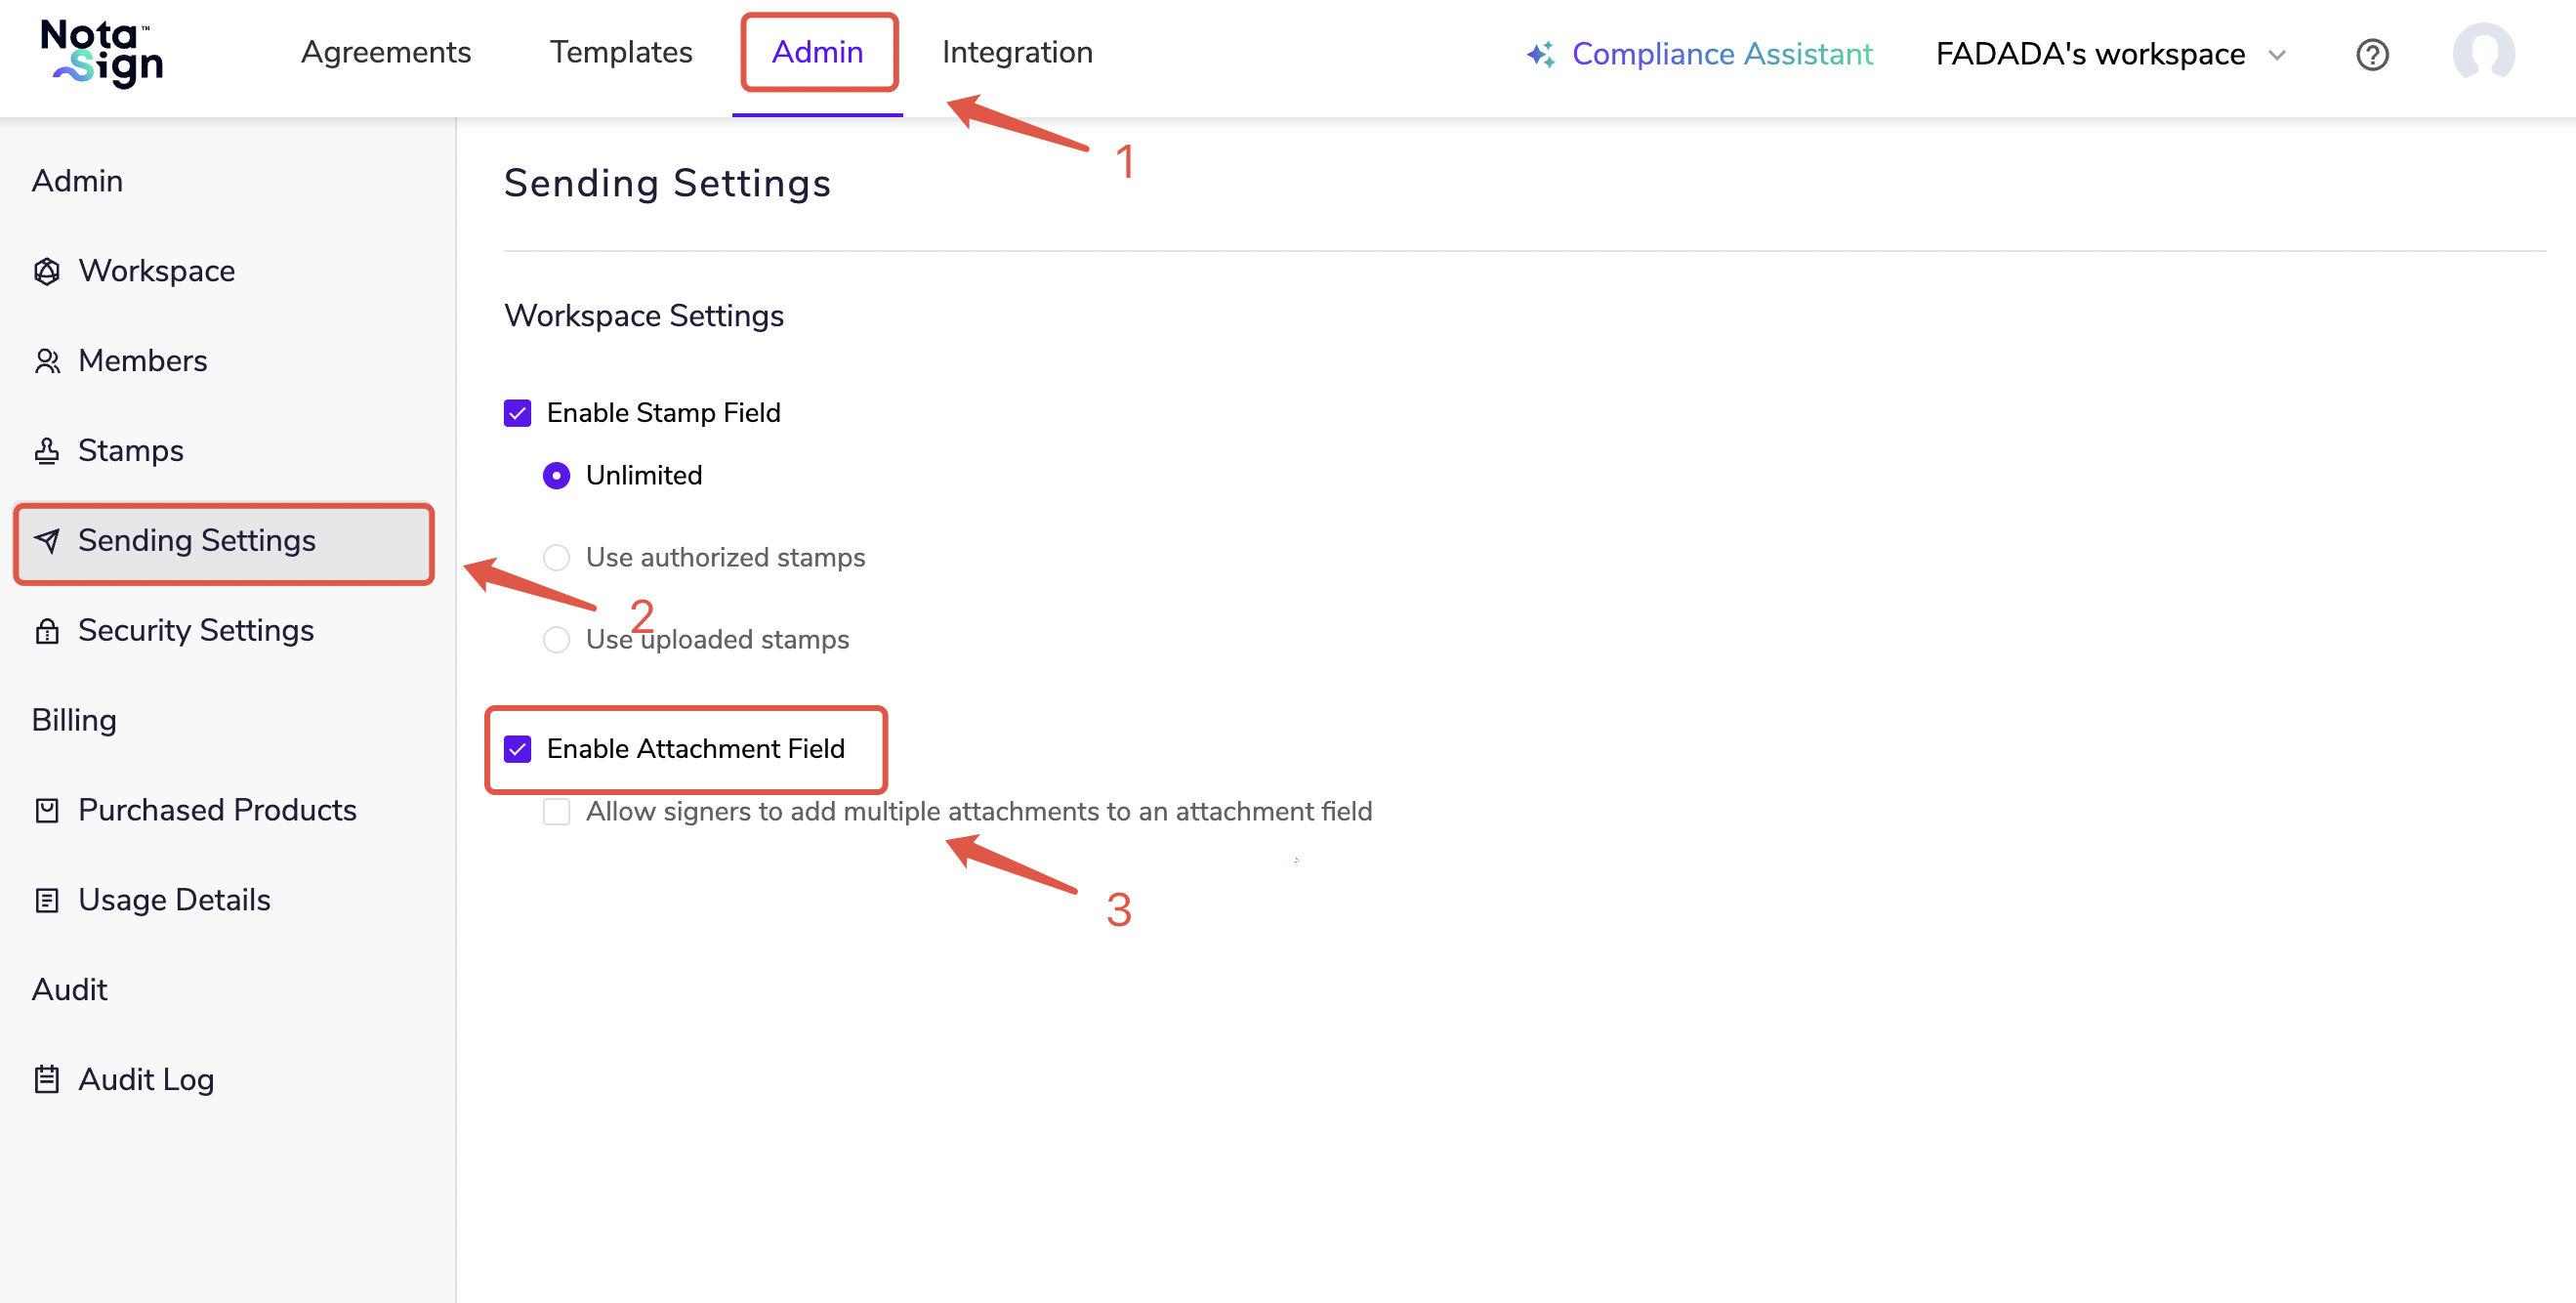
2. Setting Attachment Controls During Envelope Creation
- Initiate signing;
- Drag [Attachment] to the signing area;
- In the [Scope of Use] section, you can adjust the number of attachments recipients are allowed to upload in this envelope.
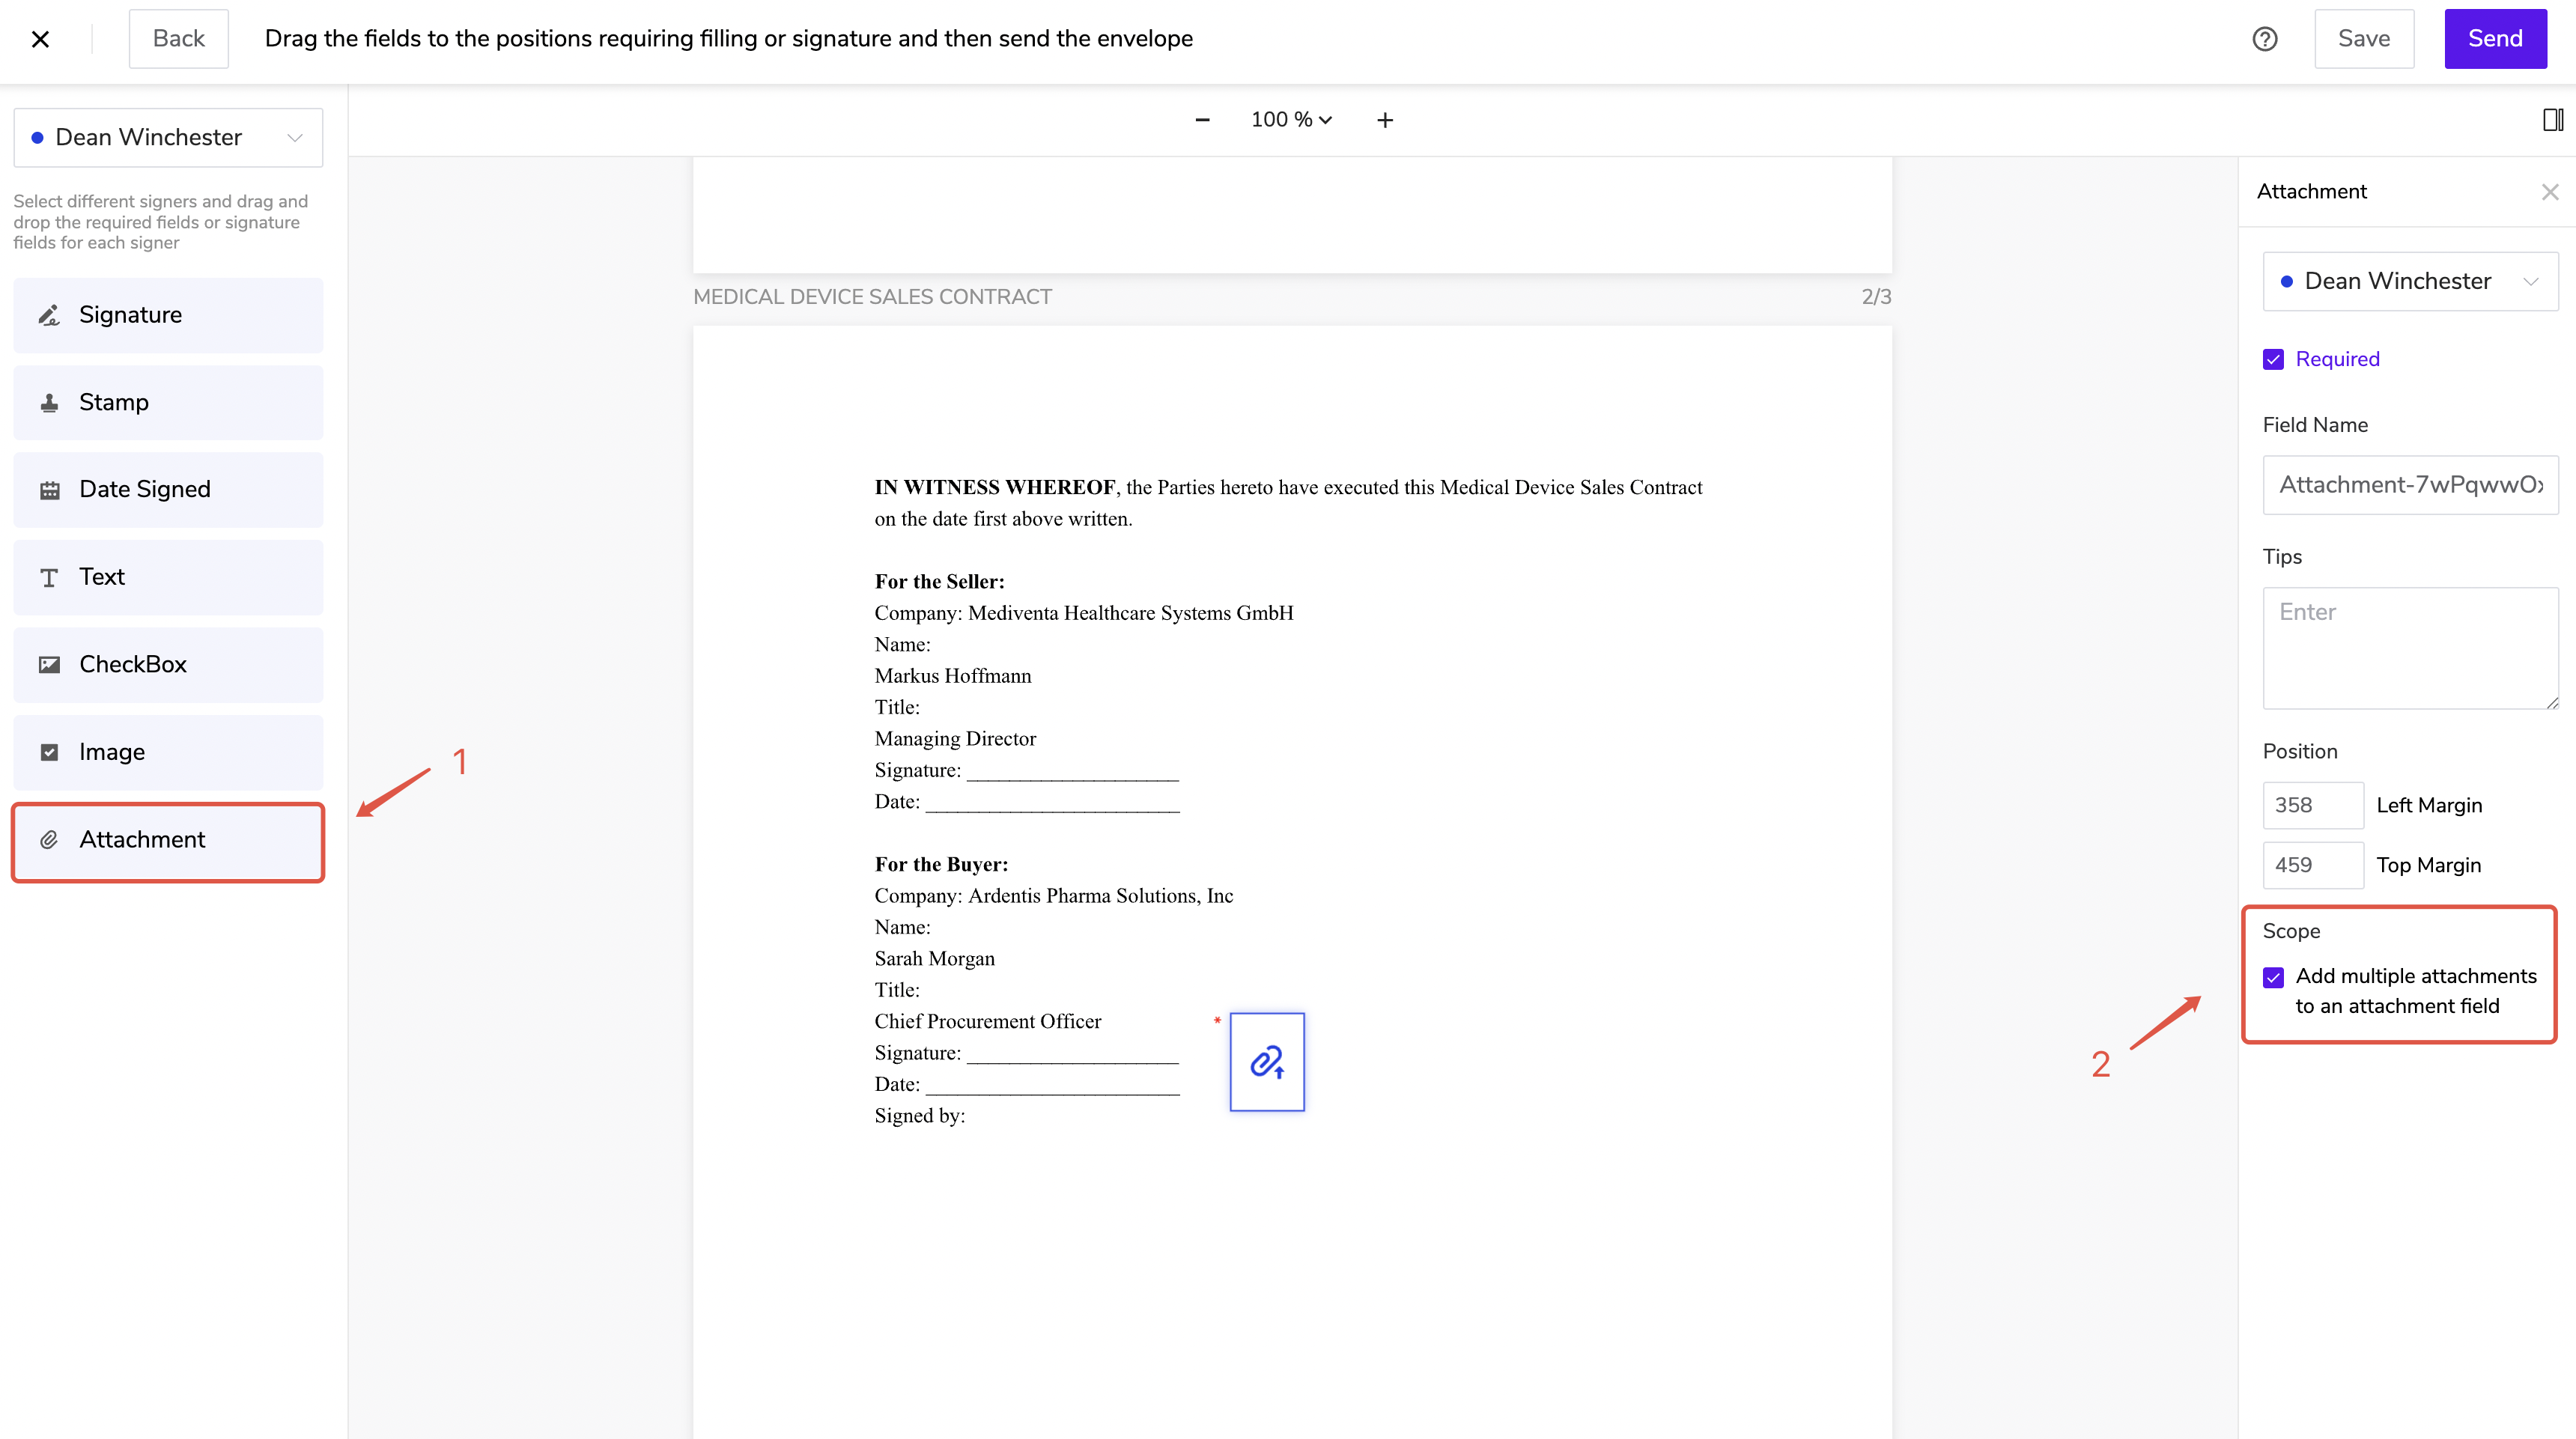
⚠️ Note: Once attachment controls are set, they will take effect as the default configuration. You can also modify the attachment quantity limit for recipients when creating a single envelope.
III. Enabling Electronic Seals
- Log in to the Nota Sign workspace, click [Manage] - [Sending Settings];
- Check [Enable Electronic Seal] and click [Save].
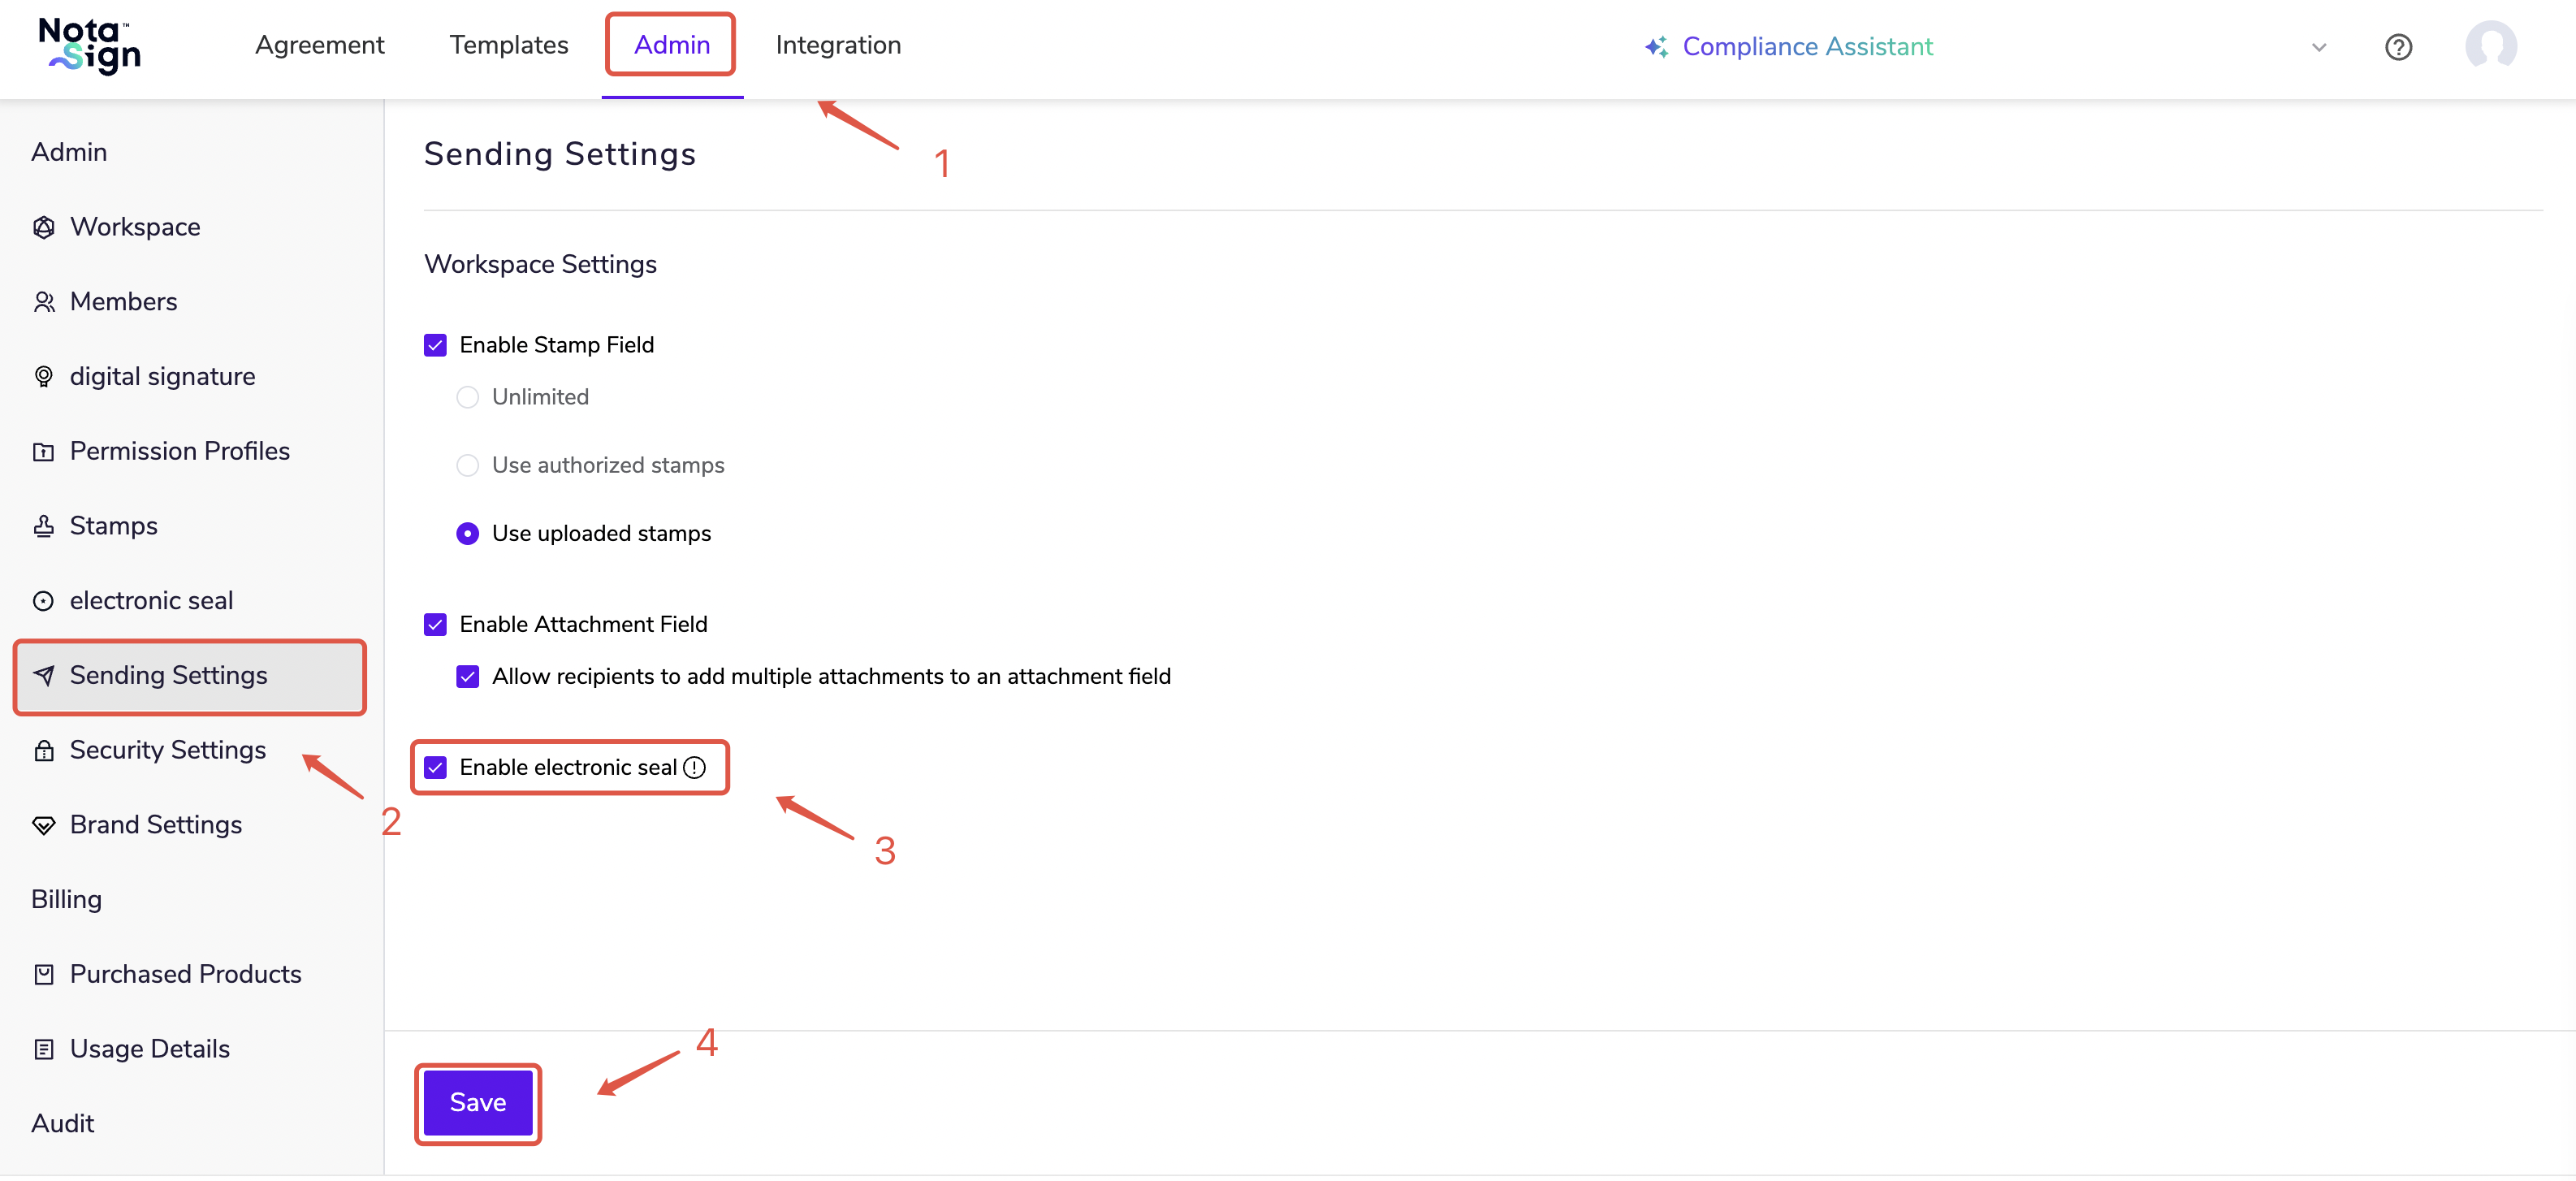
IV. Enabling Indonesian Electronic Stamp Duty
In the control settings section of Sending Settings, users can check [Enable Indonesian Electronic Stamp Duty].
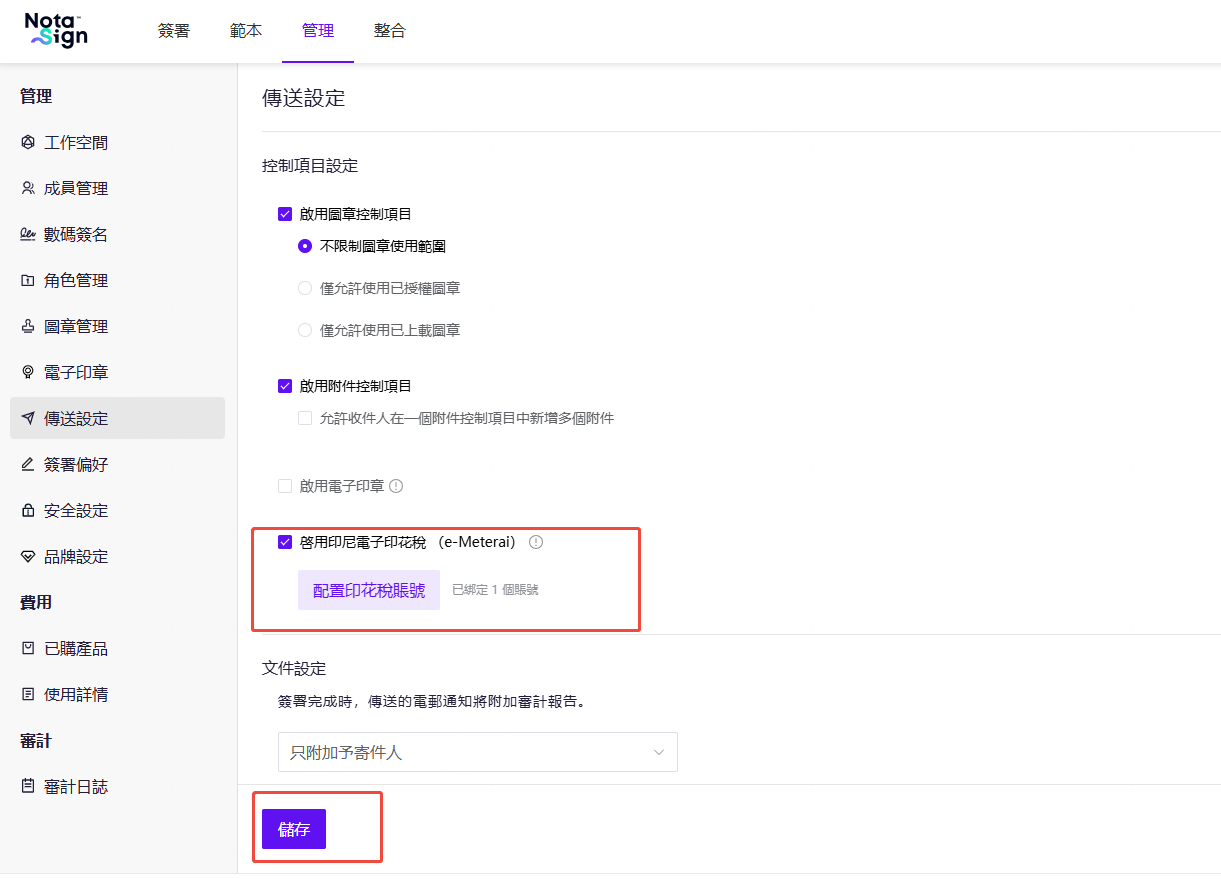
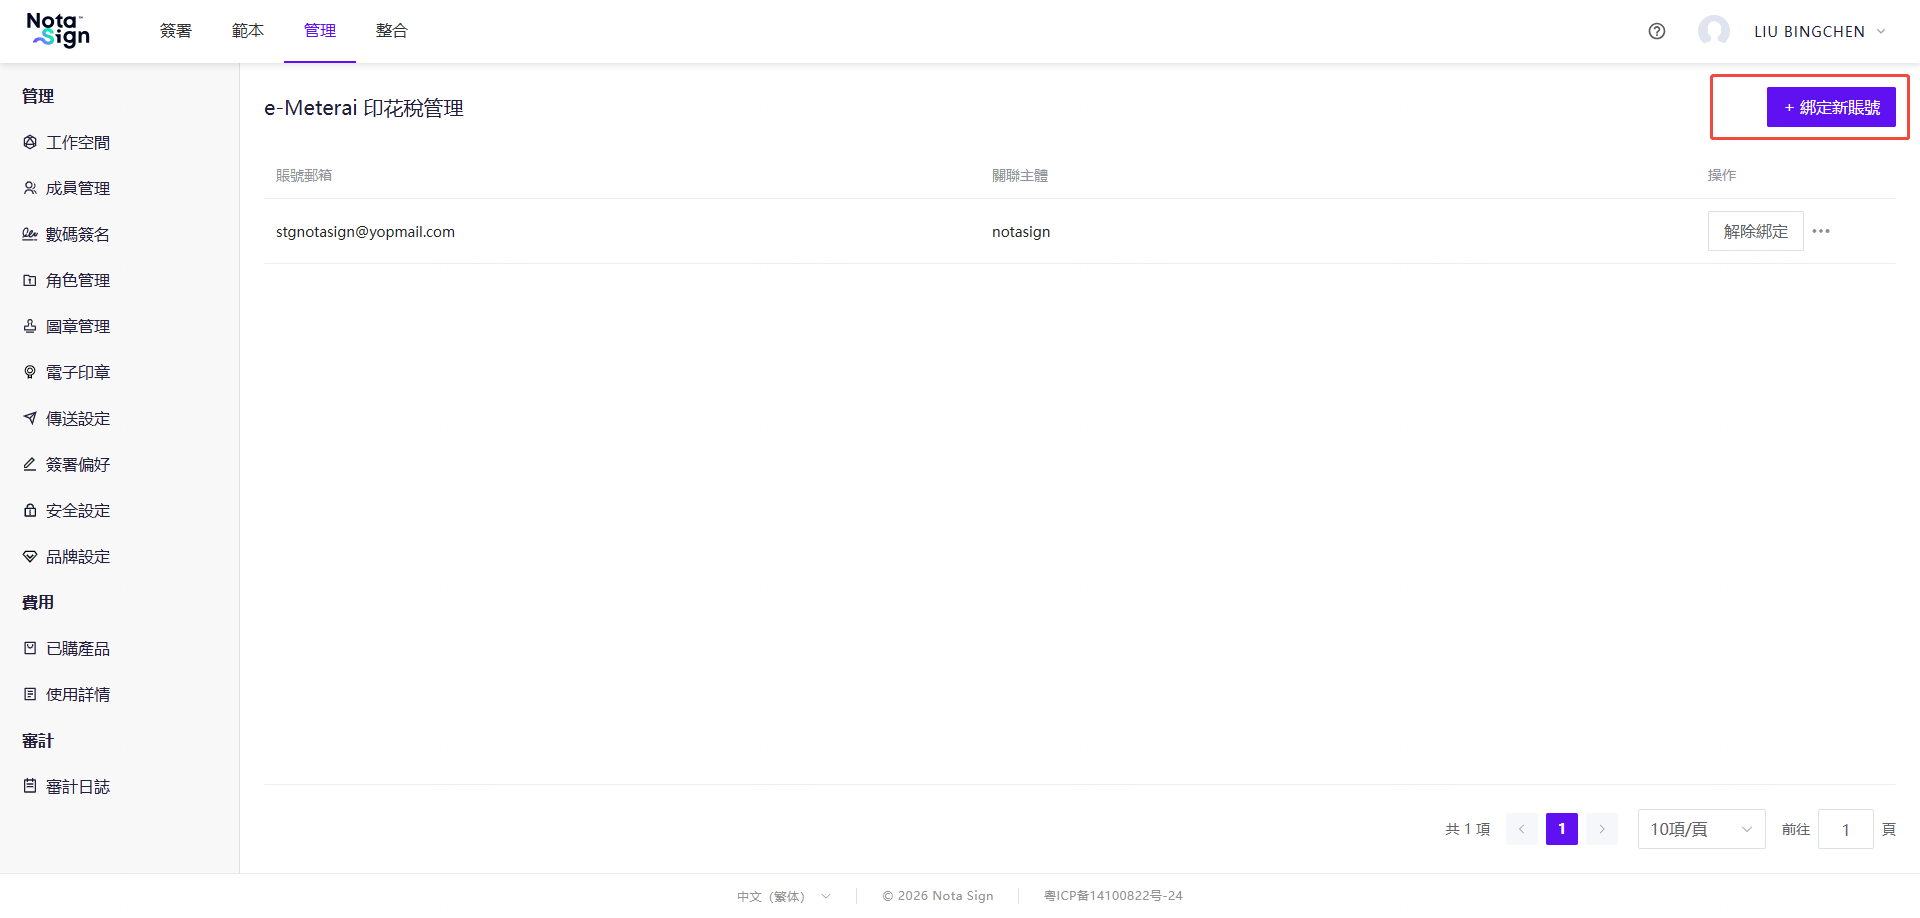
V. Setting Up Freehand Drawing Controls
1. Feature Overview
Administrators can control whether the current workspace enables freehand drawing controls in Sending Settings, and set the default content mode for newly created freehand controls. Administrators can configure the following:
- Enable Freehand Drawing Control: Controls whether senders can add freehand drawing controls on the control settings page;
- Default Content Mode: Controls the default content mode used by the system when senders add new freehand drawing controls.
Freehand drawing controls support two content modes:
- Background Drawing Mode: Recipients draw in the control area, and the system retains both the document background and the drawing content in the control area.
- Signature Only Fill Mode: After the recipient completes the drawing, the system retains only valid signatures, removes the PDF background, and centers the signatures within the control area.
After enabling, senders will see the [Freehand Drawing] control entry in the left control panel when creating envelopes, templates, or batch tasks.
2. How to Configure?
- Click [Manage] - [Sending Settings];
- Find [Enable Freehand Drawing Control] in the control settings area and check it;
- Select either [Background Drawing Mode] or [Signature Only Fill Mode] in [Default Content Mode];
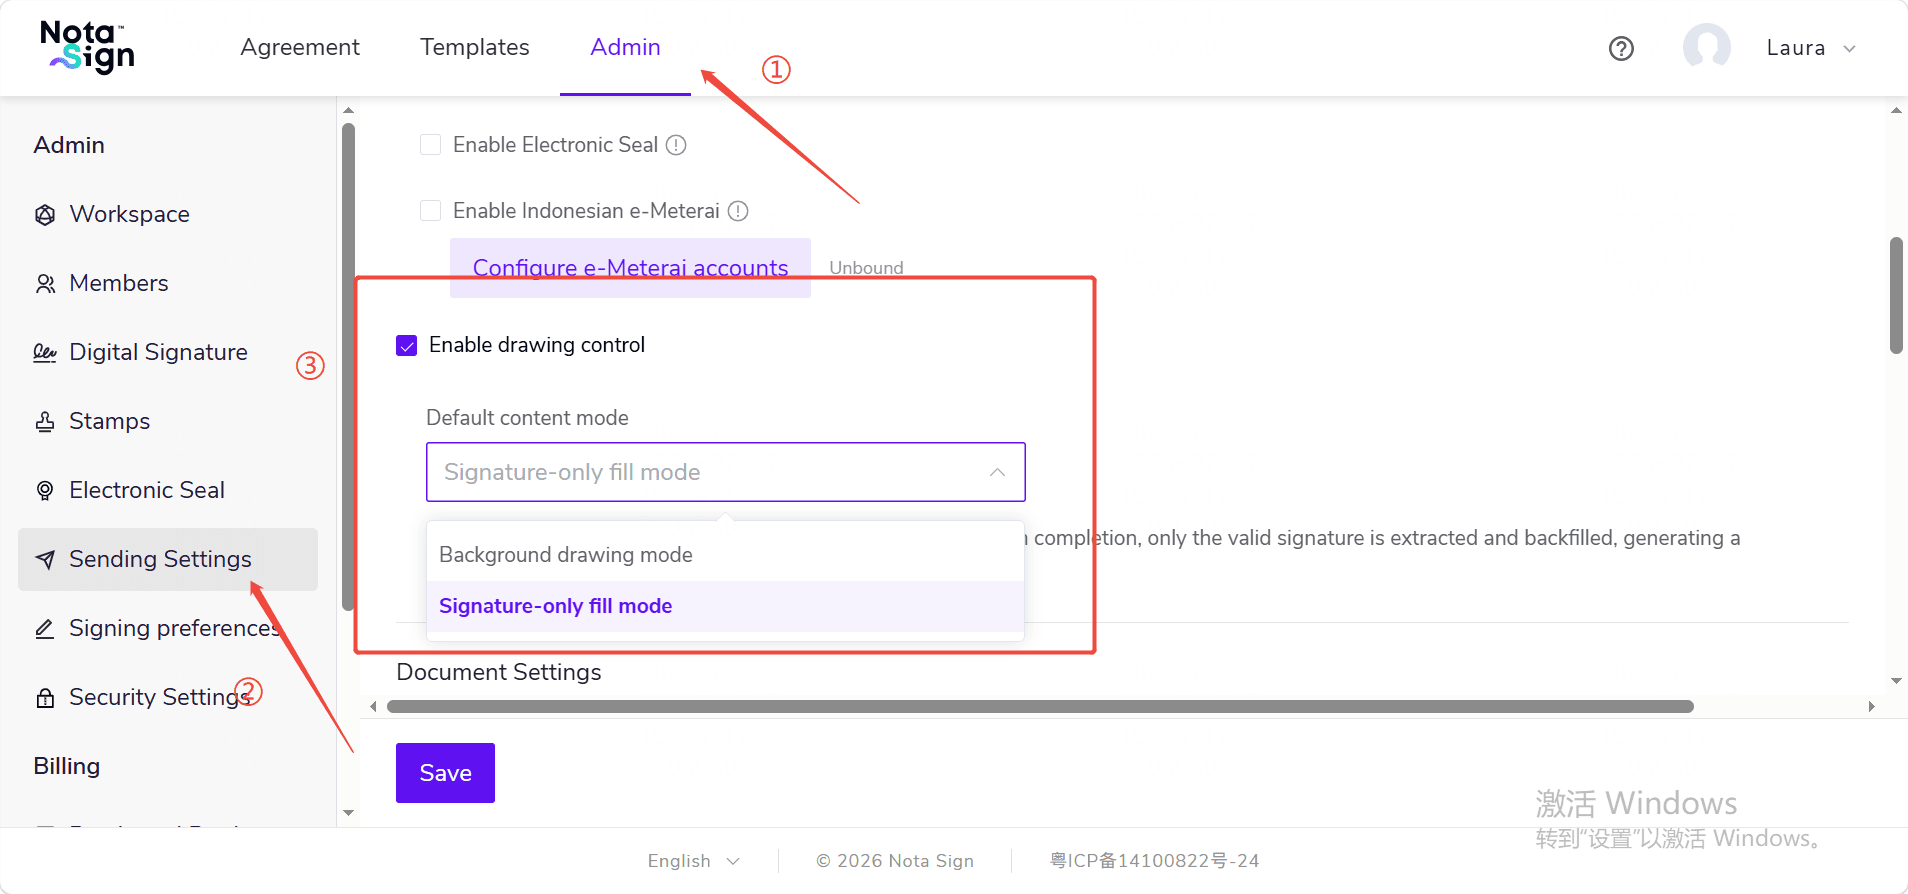
- Click [Save] to complete the settings.
VI. Enabling Cross-Page Seals
1. Feature Overview
Cross-page seals are used to generate continuous stamping effects along the right margin of multi-page documents. They are suitable for contracts, certification documents, and corporate sealing documents that require demonstrating the continuity and integrity of multi-page documents. Cross-page seals are disabled by default. Administrators must first enable this feature in the workspace’s Sending Settings before senders can add cross-page seals when sending envelopes or creating templates.
After enabling, documents that meet the following conditions will display the [Cross-Page Seal] entry on the control settings page:
- The document has at least two pages;
- The document belongs to an envelope or template that supports cross-page seals;
- The signer type supports the use of cross-page seals.
2. Step-by-Step Instructions
(1) Log in to the Nota Sign workspace. (2) Go to [Manage] → [Sending Settings]. (3) Find [Enable Cross-Page Seals] and check it. (4) Click [Save].
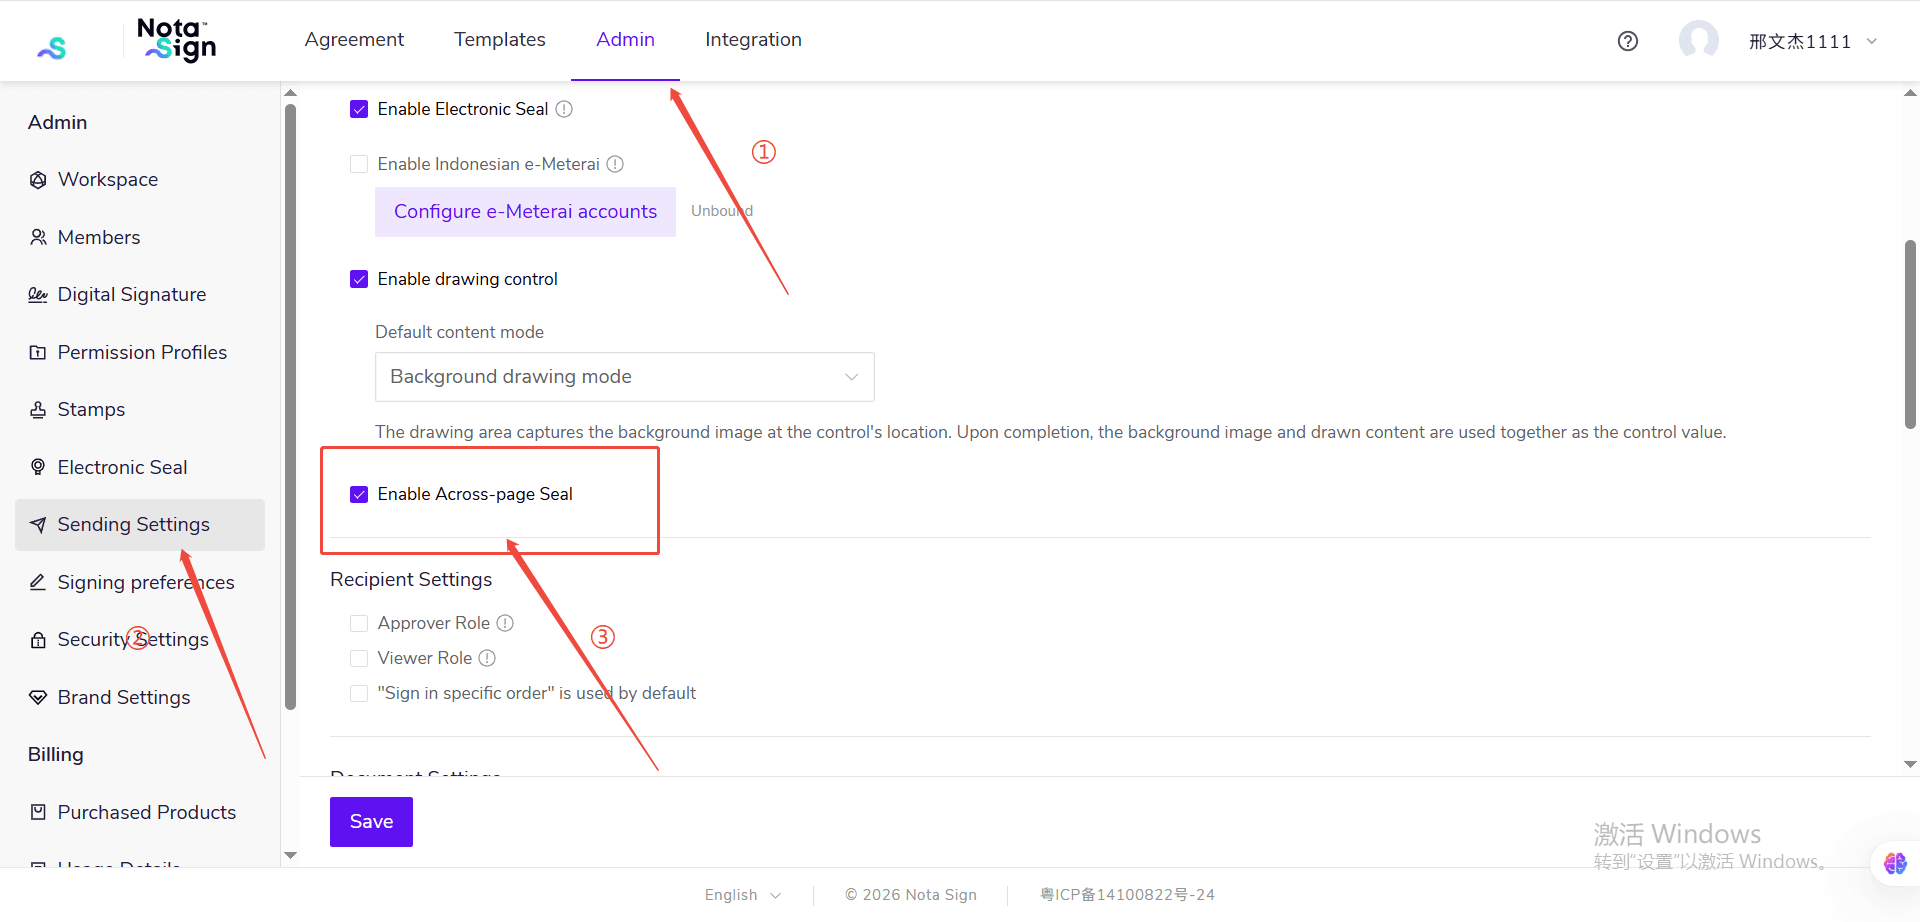
After the settings are saved, senders will see the [Cross-Page Seal] entry on the right side of multi-page documents when sending envelopes or creating templates and entering the control settings page.
💡 Notes:
- Single-page documents do not display the [Cross-Page Seal] entry.
- Cross-page seals only take effect within a single document and cannot be used across multiple files.
- Currently, cross-page seals can only be set on the right side of documents.
- GxP envelopes do not currently support cross-page seals.
- Singpass-type signers do not currently support cross-page seals.
- Batch sending and batch sending templates do not currently support cross-page seals.
VII. Enabling Approver and Viewer Roles
1. Feature Overview
Administrators can enable [Approver] and [Viewer] roles in Sending Settings. After enabling, senders can set recipients as Signers, Approvers, or Viewers based on business processes when creating envelopes or templates.
Approvers are used to review documents before they proceed to the next stage; Viewers are used to read and confirm that documents have been viewed. Both roles do not require signatures or filling in content within the documents.
2. How to Configure?
2.1 Log in to the Nota Sign workspace.
2.2 Click [Manage] > [Sending Settings].
2.3 Find the [Approver Role] and [Viewer Role] options in the [Recipient Settings] section. Enable the corresponding roles as needed:
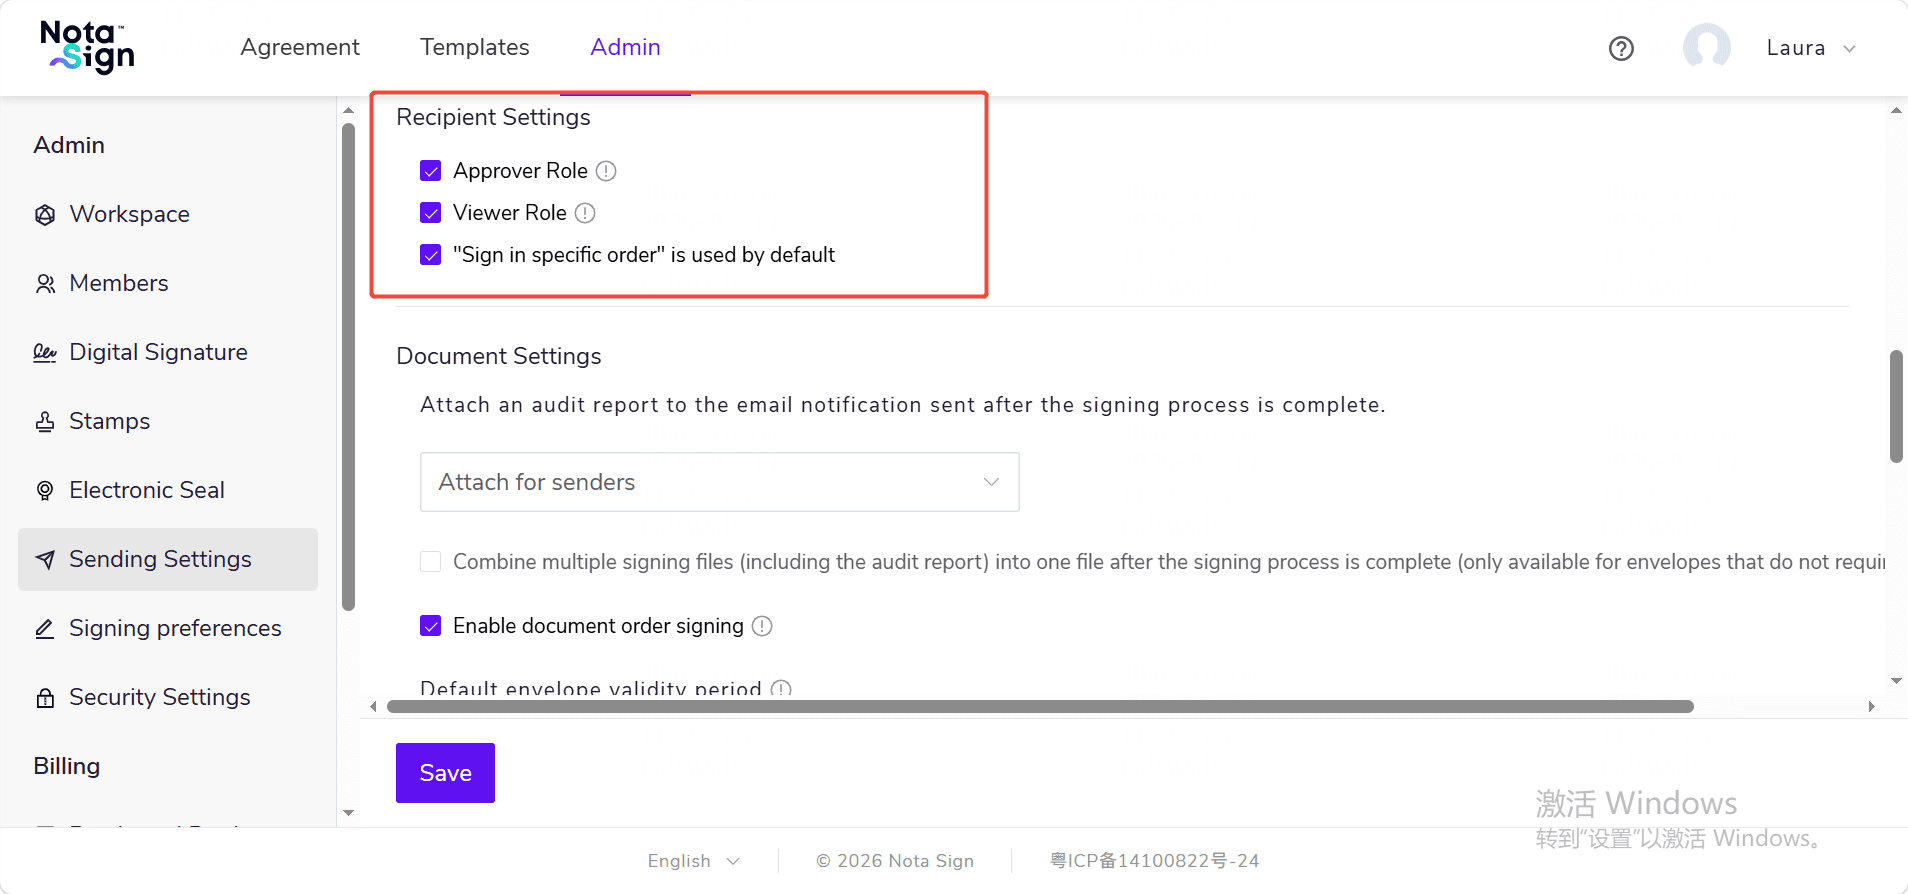
- After enabling [Approver Role], senders can set recipients as approvers when creating regular envelopes or templates;
- After enabling [Viewer Role], senders can set recipients as viewers when creating regular envelopes or templates.
- Click [Save]. After successful saving, role settings will be applied to new envelopes, unsent drafts, and templates.
💡 Note: The two switches are independent and disabled by default. You can enable only one role or both roles simultaneously.
3. Important Notes
- [Viewer Role] is available for both Standard and Professional editions; [Approver Role] is only available for Professional edition. The Standard edition will display a non-operable approver switch with a Professional edition badge.
- CFR Part 11 workspaces currently do not support Approvers and Viewers, so the corresponding role switches will not be displayed.
- After turning off a role switch, senders cannot add that role in new envelopes, templates, or envelope corrections.
- Turning off a role switch or downgrading the workspace plan will not affect the processing flow, envelope details, history, or audit reports for Approvers and Viewers in already sent envelopes.
- If unsent drafts or templates already contain roles that have been turned off or are not supported by the current plan, senders must delete those recipients or change them to available roles before saving or sending.
VIII. Merging Signed Documents Settings
If users want to obtain both signed documents and audit reports after completing signing, they can configure document merging in Sending Settings.
1. Click [Manage] and find [Sending Settings] in the left menu.
2. Find the [Document Settings] section at the bottom of the page.
3. Configure [Merge multiple signed documents into one file upon signing completion].
- Not checked: Documents remain independent. Signed documents and audit reports will exist as separate files.
- Checked: Merge for archiving. The system will automatically merge all signed documents and audit reports into a single PDF document.
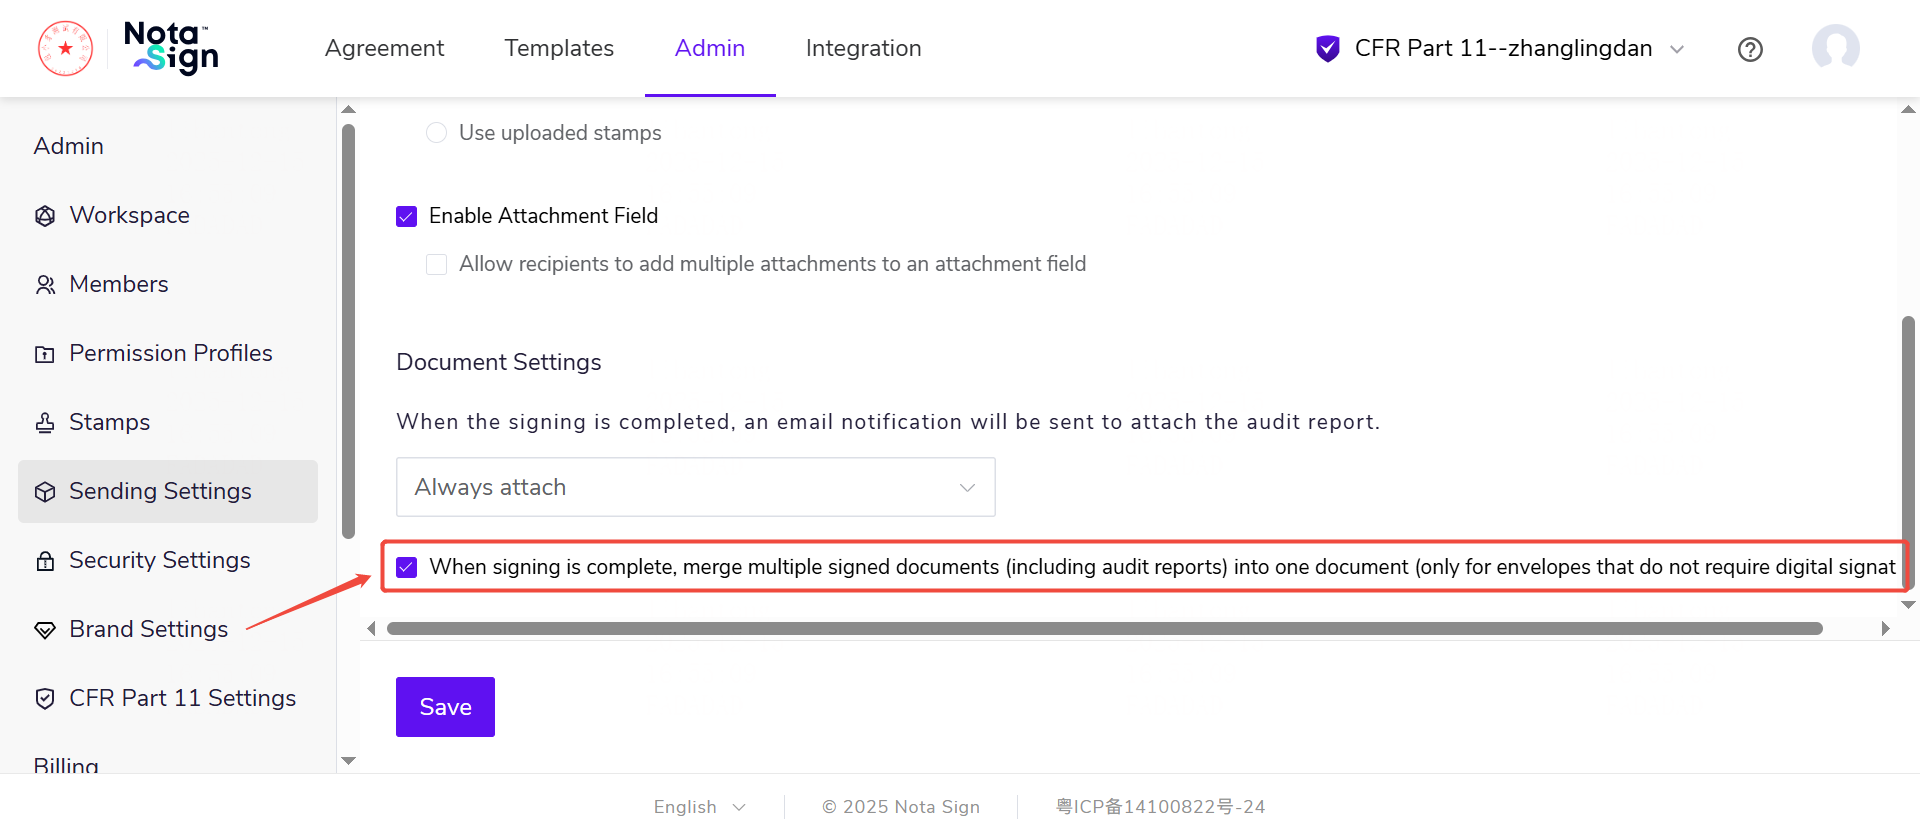
Note: This feature only applies to envelopes that do not require digital signatures.
IX. Document Order Signing
You can configure sequential signing for multiple documents in an envelope. Recipients must complete signing on each document in order, i.e., complete all signing controls in Document 1 first, then proceed to Document 2, and so on until all documents are completed before the envelope can be submitted.
1. Enabling Document Order Signing
1.1 In Manage -> Sending Settings, enable the [Enable Document Order Signing] toggle;
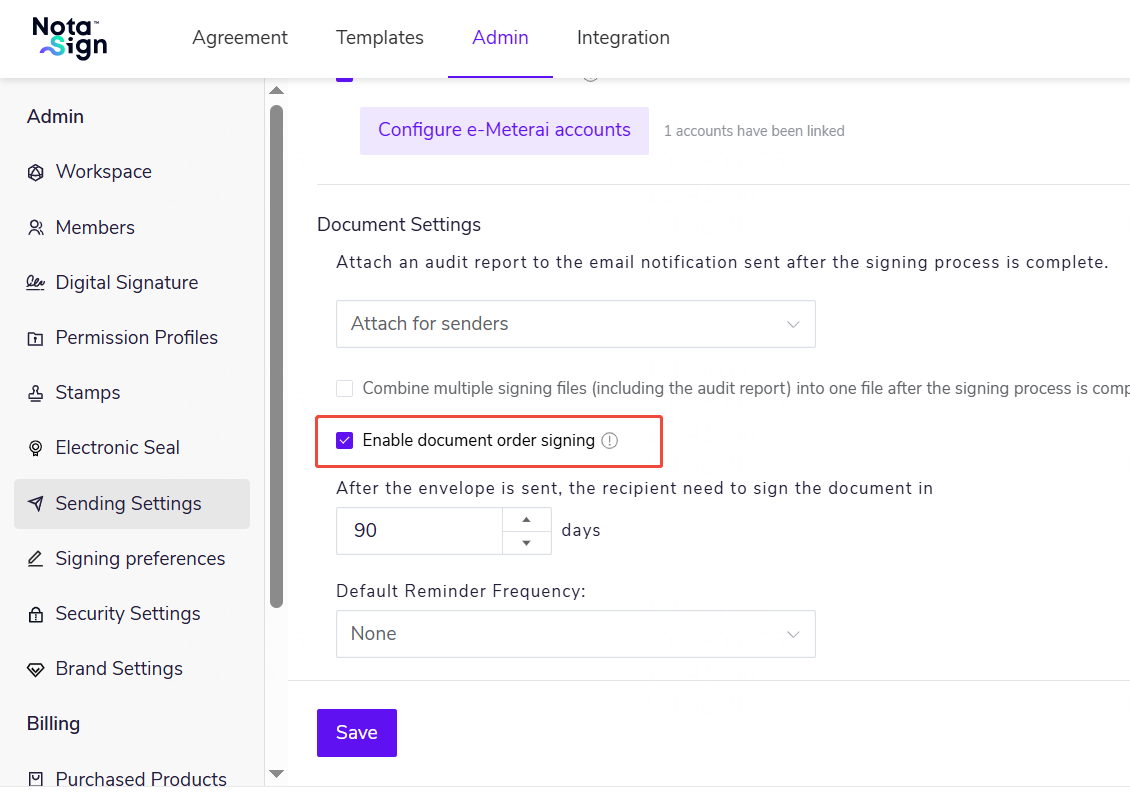
1.2 After enabling, the document upload area for creating envelopes and templates will display the [Sign in Order] toggle;
1.3 After disabling, newly created envelopes and templates will no longer display the toggle, but configurations in envelopes that have already been initiated will not be affected.
💡 Note: Document order signing does not support FDA envelopes and Singpass-specific signing processes.
2. Configuring Document Order
2.1 In the document upload area when creating an envelope, check [Sign in Order];
2.2 After checking, document cards display signing order numbers (e.g., 1, 2), generated by default in upload order;
2.3 Drag document cards left or right to adjust the signing order, and order numbers will update accordingly;
2.4 This order is at the document dimension and does not affect party signing order.
💡 Note: Document order signing can be configured simultaneously with party signing order; both order controls take effect concurrently without conflict.
X. Customizing Default Signing Order
1. Feature Overview
In Nota Sign, users can choose whether to default to sequential signing based on team or personal signing habits. After enabling this feature, the system will automatically enable the “Sign in Order” option when creating new envelopes, eliminating the need for manual configuration each time and improving consistency and efficiency of the signing process.
2. How to Configure
2.1 Click [Manage] → [Sending Settings].
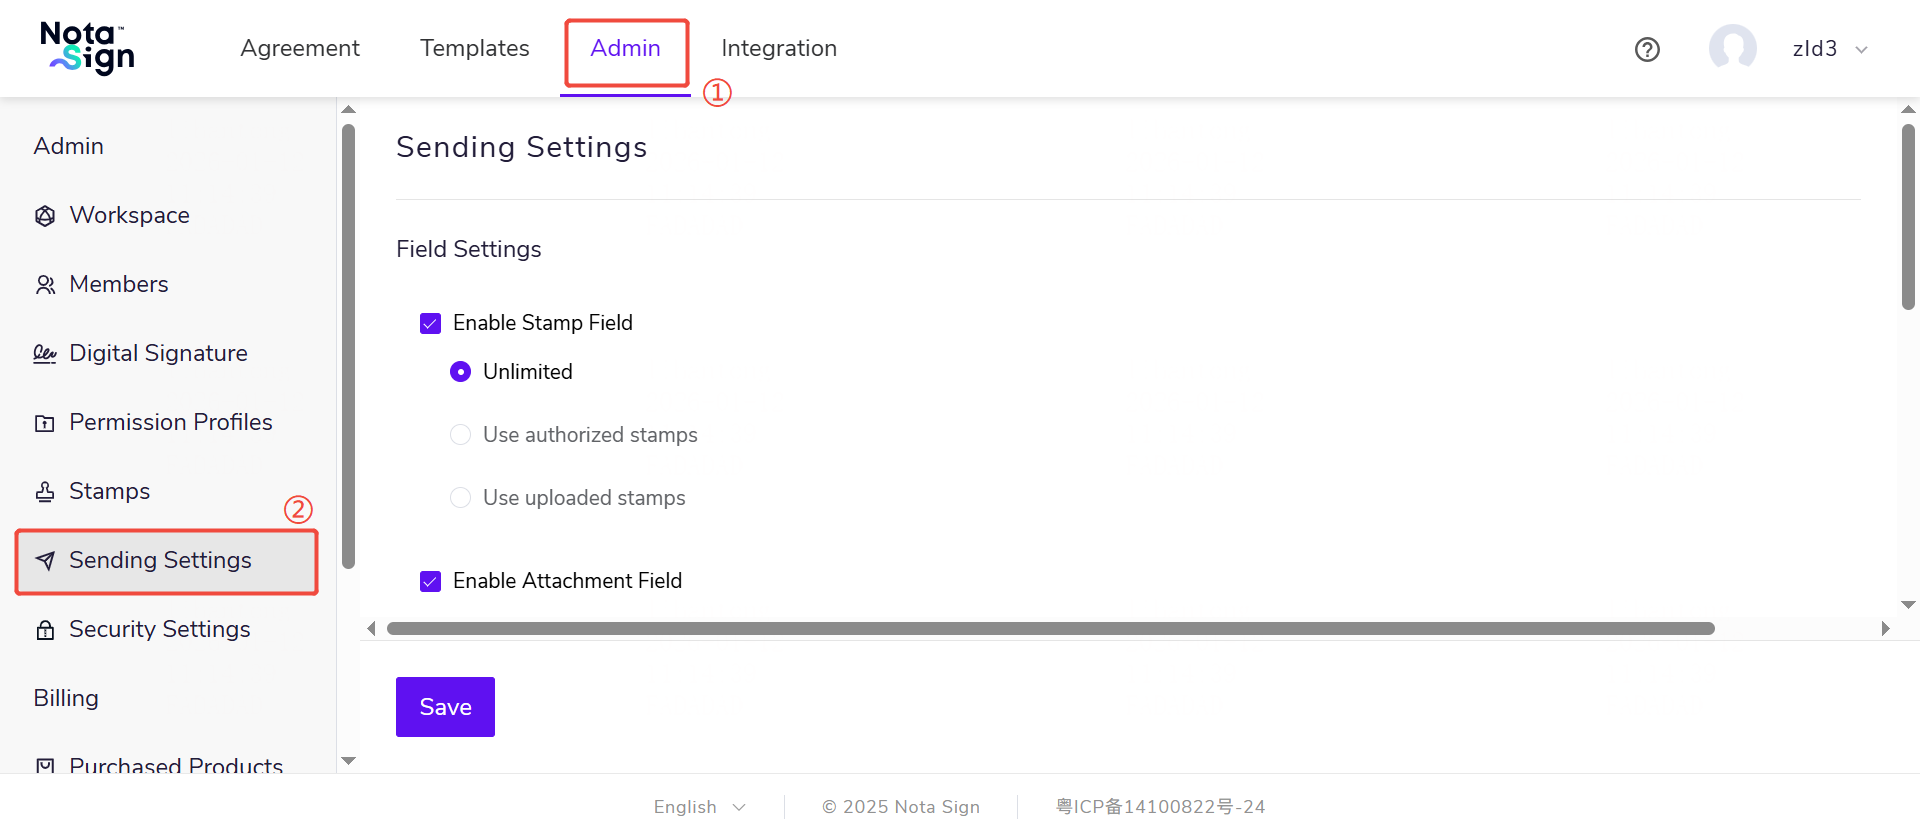
2.2 Under “Recipient Settings,” scroll to the bottom of the page and find the “Default Sequential Signing” option.
- If the user checks this option: When creating new envelopes or new templates, the “Sign in Order” option will be enabled by default.
- If the user does not check this option: When creating envelopes or templates, the “Sign in Order” option will be disabled by default.
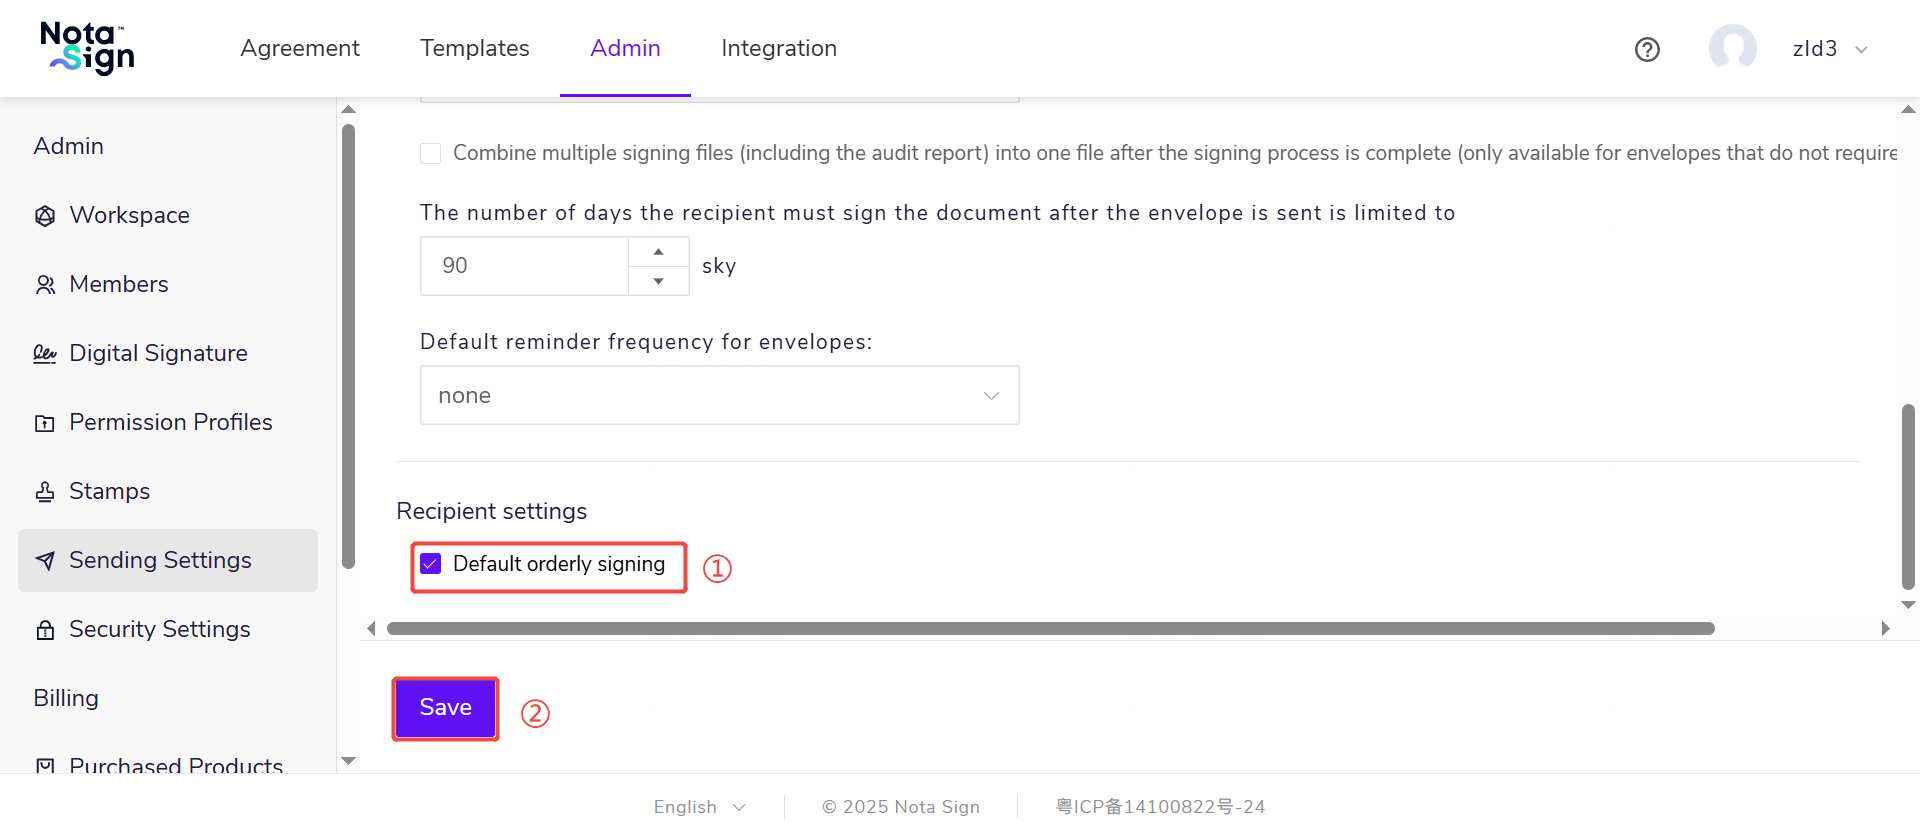
2.3 Click [Save].
If creating an envelope based on an existing template, the signing order will only be controlled by the template settings and will not be affected by this default configuration.
XI. Customizing Default Signing Validity Period
1. Feature Overview
To ensure the signing process proceeds efficiently and prevents documents from remaining incomplete for extended periods, Nota Sign allows you to preset the default signing validity period for envelopes. This setting will be automatically applied to all new envelopes, requiring recipients to complete signing within the specified number of days, after which envelopes will expire automatically. By uniformly configuring the validity period, you can strengthen time-based process management and reduce manual intervention.
2. How to Set the Default Signing Validity Period
2.1 Click [Manage] in the left navigation bar and select [Sending Settings] from the menu.
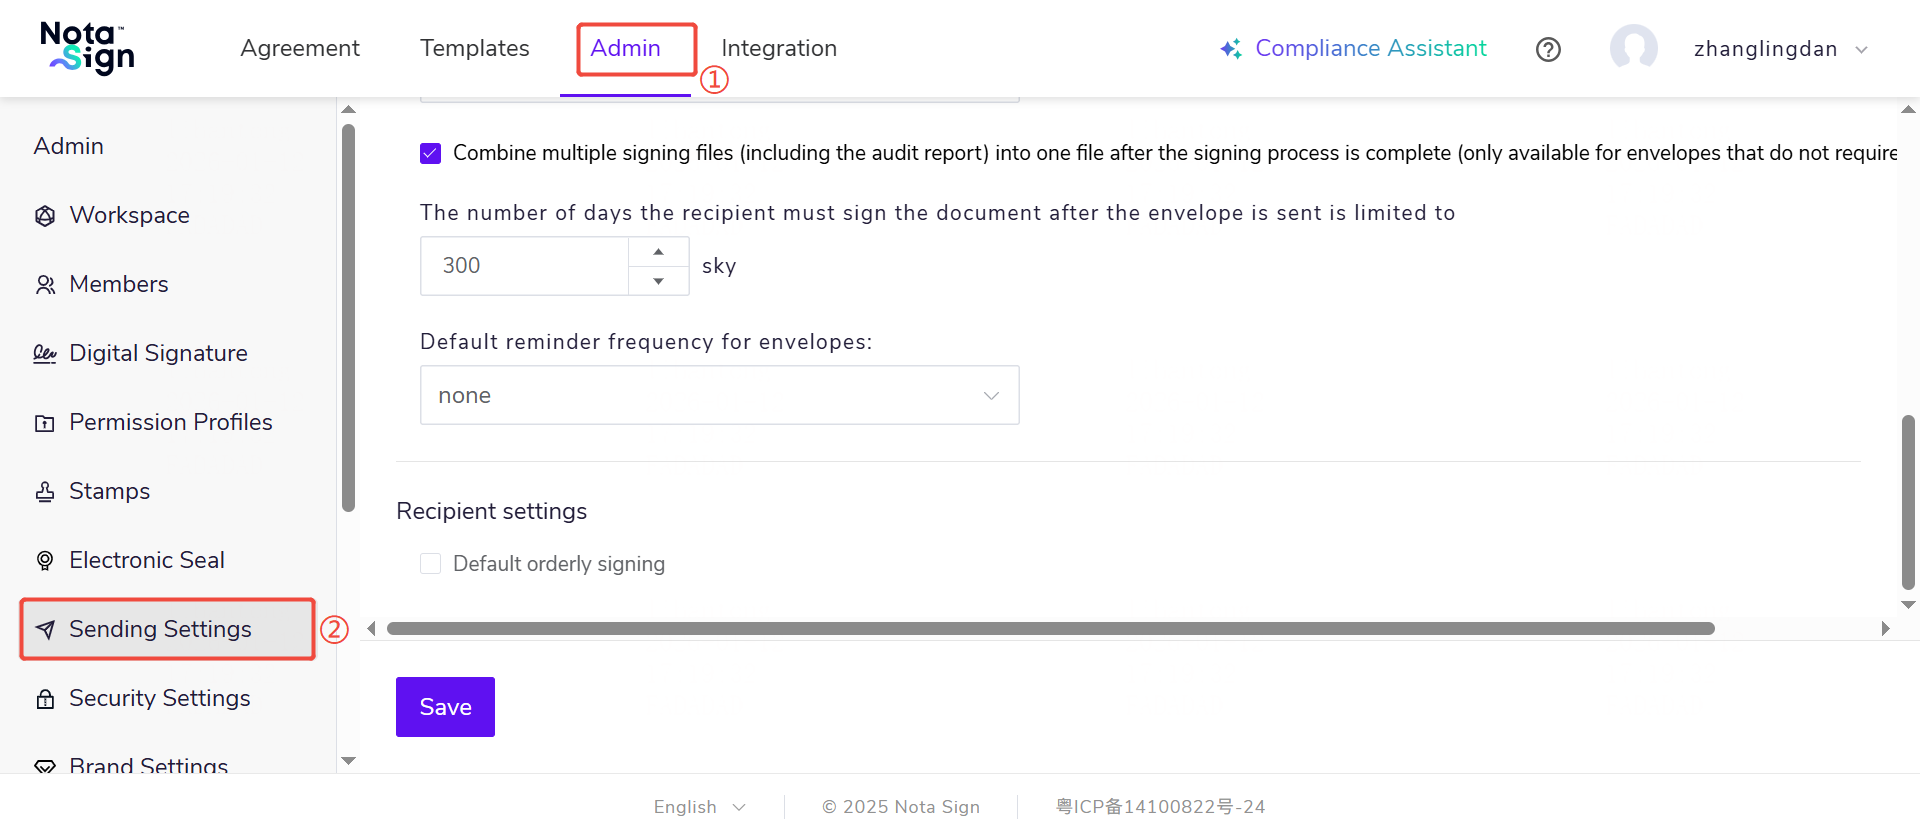
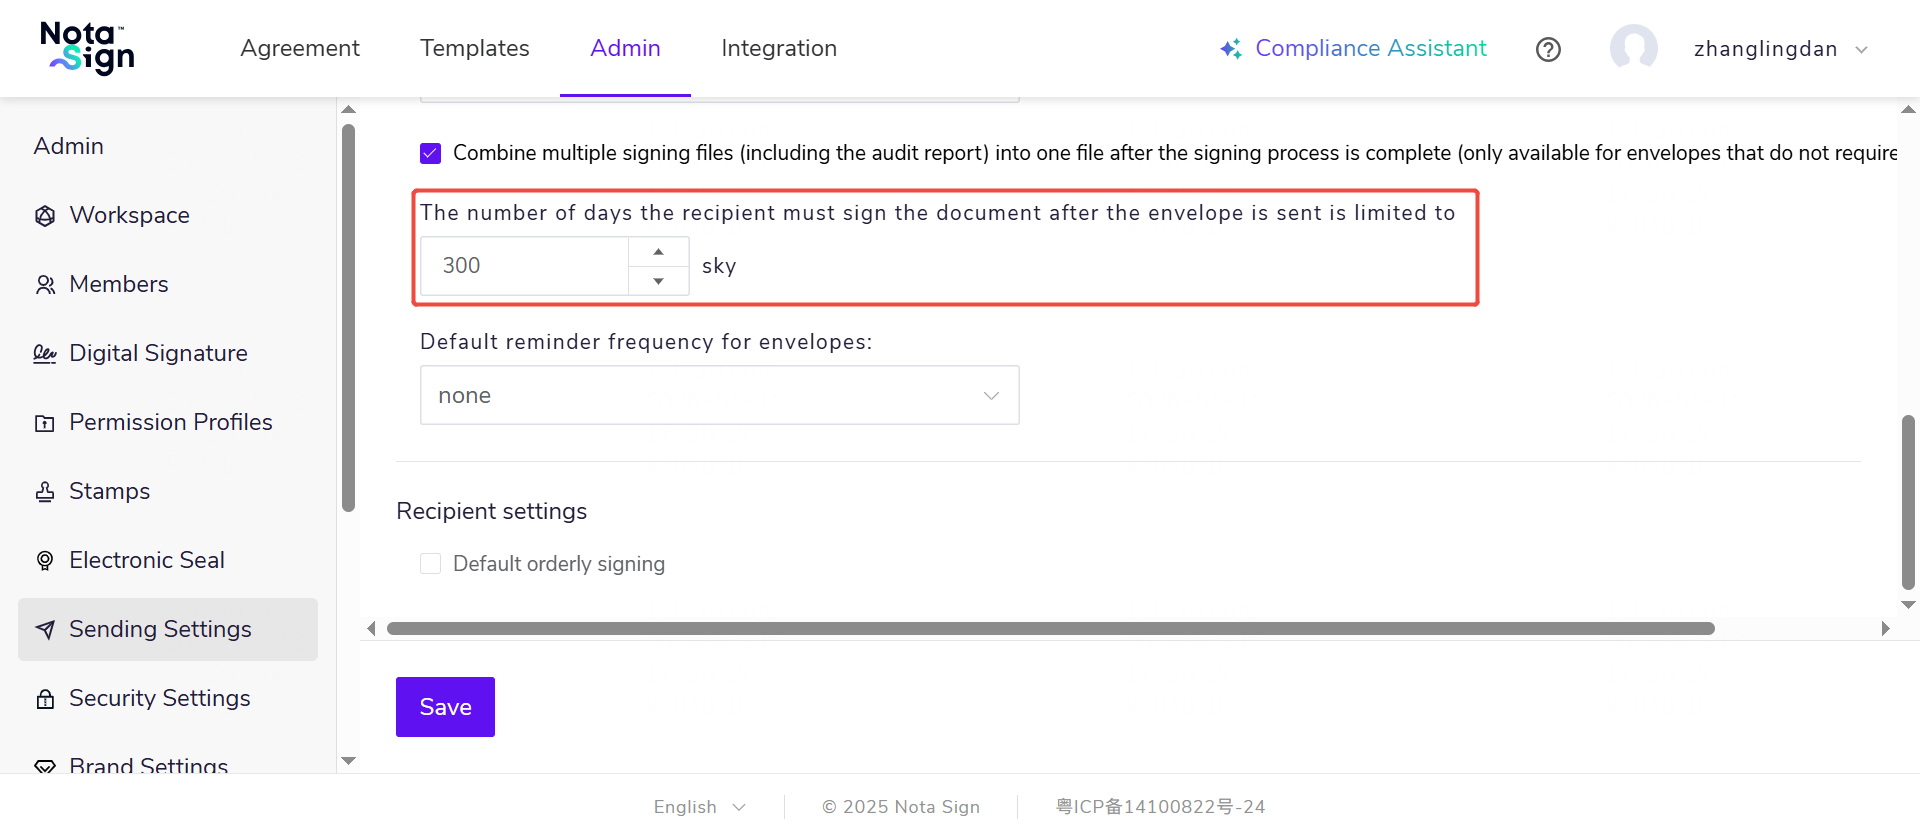
2.2 Customize the signing validity period: Set the number of days within which recipients must sign documents after the envelope is sent.
2.3 Click [Save]. The signing validity period will take effect for envelopes initiated subsequently.
XII. Setting Default Automatic Reminder Frequency
1. Feature Overview
To ensure that sent envelopes are signed in a timely manner, administrators can enable the “Automatic Reminder” feature for the workspace. Administrators can customize the reminder start time and frequency to avoid excessive disturbance or delayed reminders.
2. Setting Automatic Reminders
2.1 Click [Manage] in the left navigation bar and select [Sending Settings] from the menu.
2.2 Customize reminder frequency: After the envelope is sent, automatically send signing reminders to recipients who have not yet completed signing at the specified interval.
In normal signing scenarios: All recipients who have not signed will receive reminders at the configured frequency.
In sequential signing scenarios:
- Only the recipient who is currently expected to sign will receive reminders;
- Recipients who have completed signing will no longer receive any reminders;
- Recipients in subsequent rounds will not start receiving reminders until their turn comes, after previous signing rounds are completed.
2.3 Click [Save Changes]. When members of this workspace initiate envelopes, recipients will receive automatic reminders.
If the envelope has expired or recipients have completed signing, the system will automatically stop sending reminders. Additionally, if the reminder time you set exceeds the envelope’s validity period, reminders will also automatically terminate when the envelope expires.
XIII. Forced Reading Settings
You can configure forced reading settings for envelopes.
1. In [Manage] → [Sending Settings], you can configure forced reading settings for envelopes.
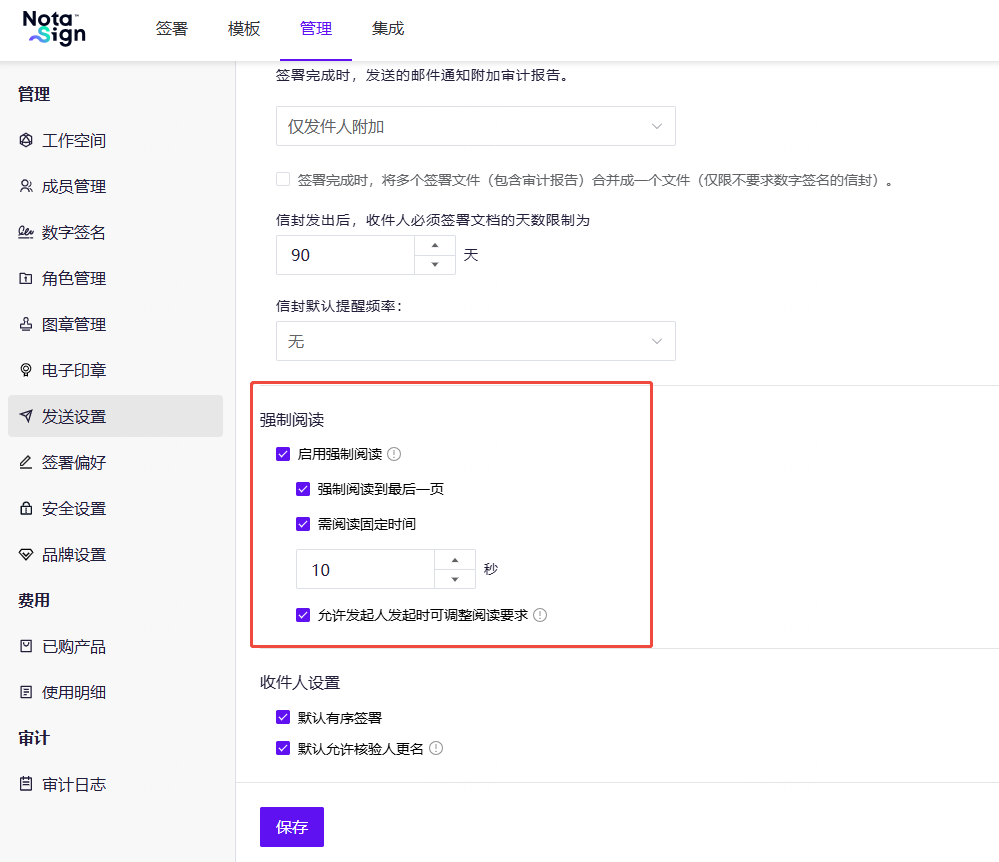
💡 Note: You can set the fixed reading time from 1 to 3600 seconds.
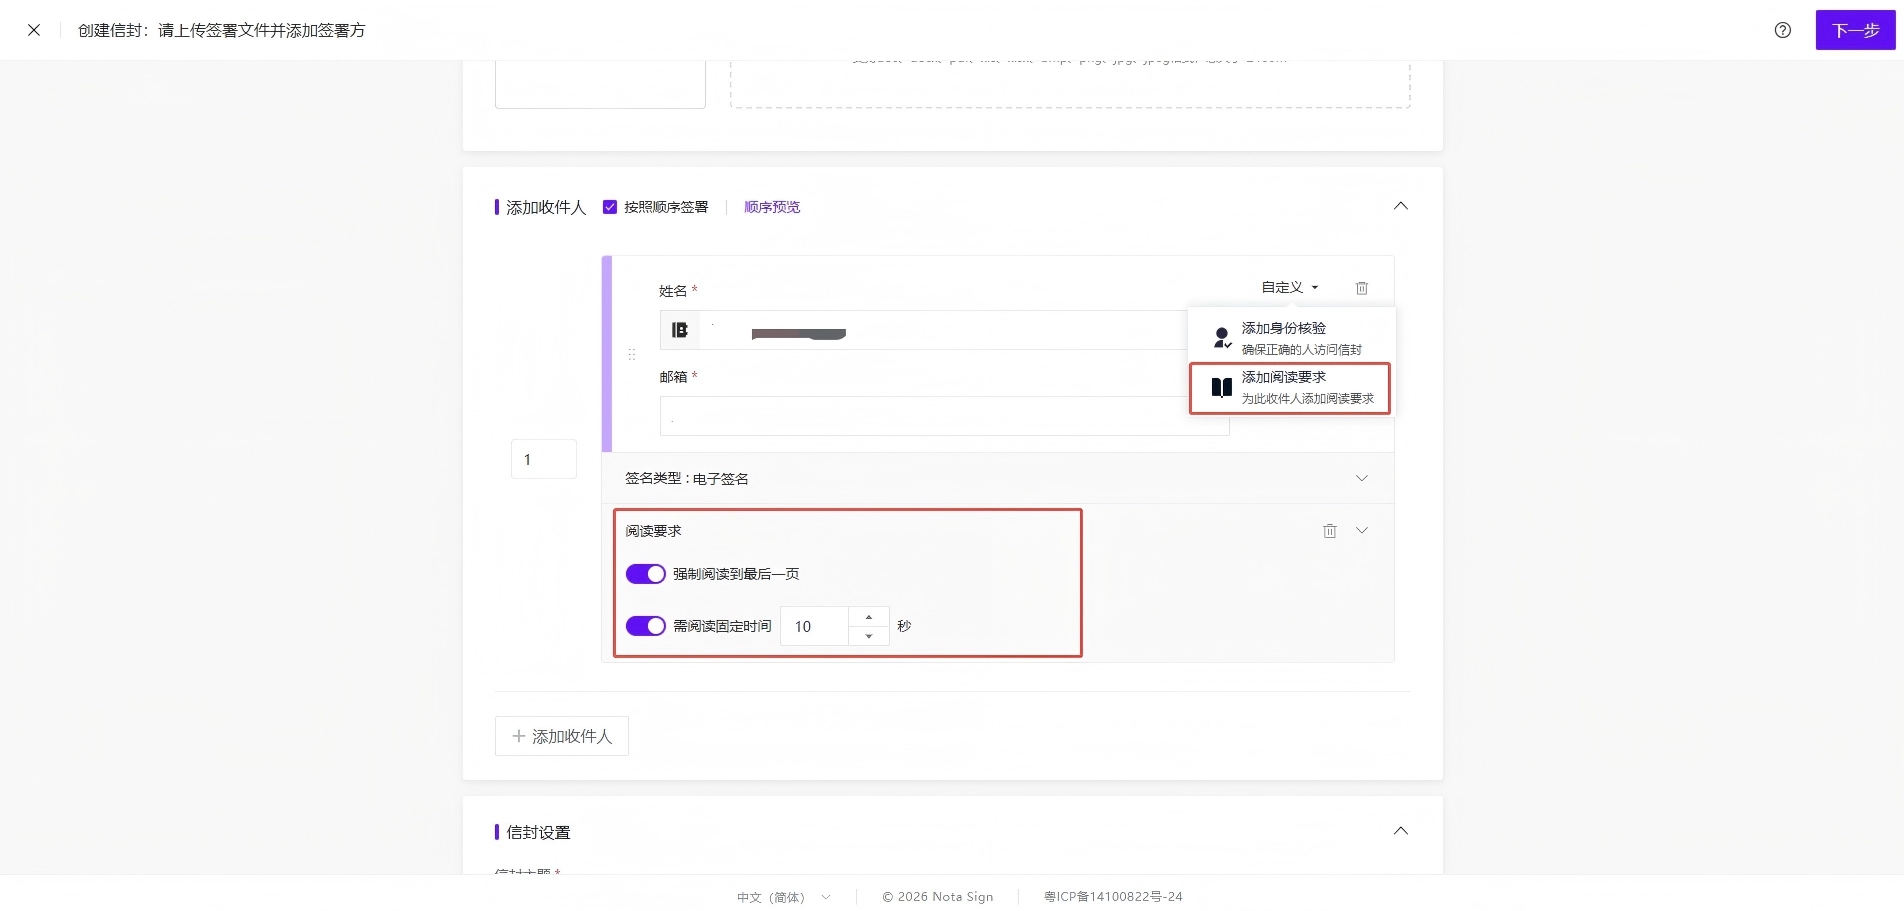
2. When initiating signing, you can set forced reading in [Custom] → [Add Reading Requirement].
XIV. Terms Confirmation Before Submission
You can configure a [Terms Confirmation Pop-up] for designated signers. When signers click [Submit] after completing signatures, fill-ins, and other actions, the system will display a terms confirmation pop-up. Signers must check to confirm all terms before they can proceed to submit.
1. Enabling Terms Confirmation Pop-up
1.1 In Manage -> Sending Settings, enable the [Enable Terms Confirmation Pop-up] toggle;
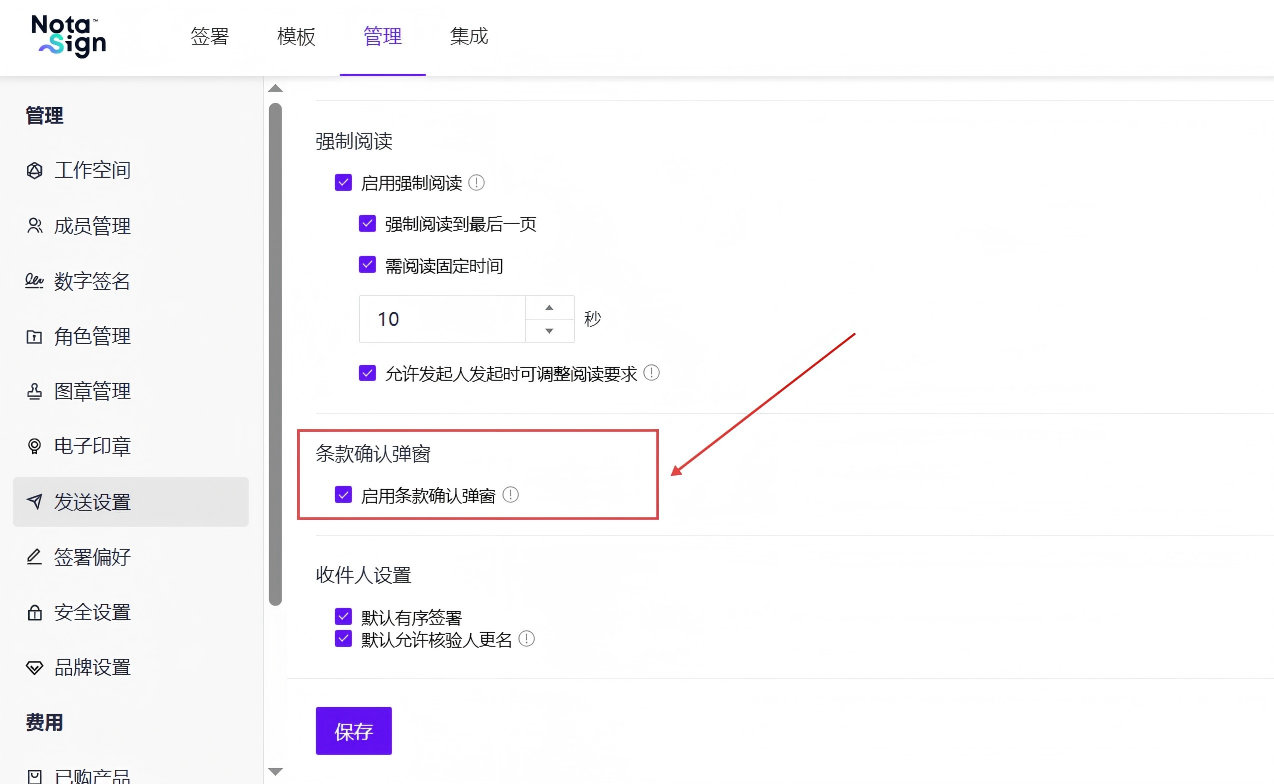
1.2 After enabling, the [Terms Confirmation Pop-up] entry will appear in the signer settings for envelope initiation, templates, and batch sending;
1.3 After disabling, new envelopes, templates, and batch sending will no longer display the entry, but configurations in existing drafts, templates, and envelopes already initiated will not be affected.
💡 Note: GxP workspaces do not display this toggle; Singpass-specific signing processes do not support this feature.
2. Configuring Terms and Initiating Envelopes
2.1 In the signer settings when initiating an envelope, enable the [Terms Confirmation Pop-up] for the signer;
2.2 Click [Add Terms] in the terms configuration panel and enter the terms content that the signer needs to confirm;
2.3 Each signer must have at least 1 valid term and up to 20 terms, with each term limited to 500 characters;
2.4 Supports adding, editing, and deleting terms. The term order determines the display order in the pop-up on the signing side;
2.5 Pure spaces, line breaks, or empty content are not counted as valid terms. Enabling with no valid terms will not allow saving or sending.
💡 Note: Terms are configured per signer, not per signature control. If a signer has multiple signature controls, the pop-up will only appear once before submission.
3. Configuring in Templates
3.1 [Terms Confirmation Pop-up] can be configured in the template role settings, and will display correctly when reopened after saving;
3.2 When creating envelopes using the template, the configuration will be inherited by the corresponding signers.
XV. Reviewer Renaming Settings
1. Feature Overview
In some signing scenarios, the recipient name filled in by the sender may differ from the recipient’s ID document name or commonly used signature name.
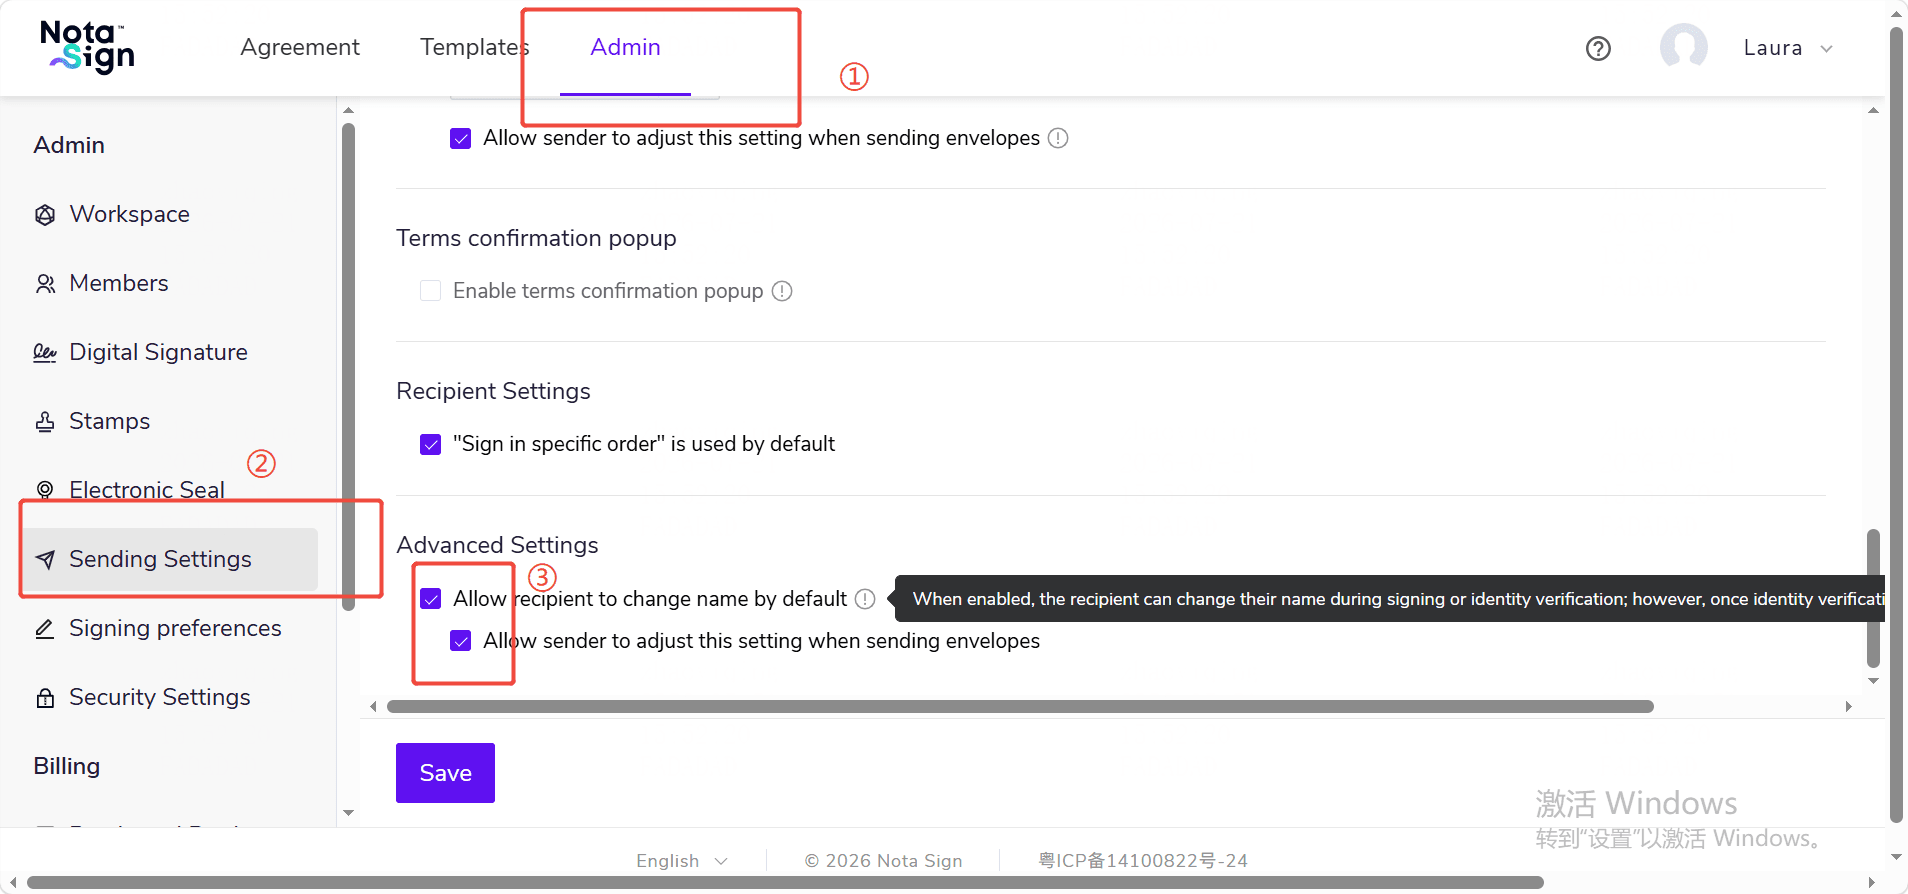
Administrators can configure in Sending Settings whether to allow recipients to change their names during the signing process. This setting applies to subsequent new envelopes, templates, and batch sending processes within the current workspace, helping enterprises maintain consistency between recipient names and identity verification information.
Administrators can configure the following two options:
- Default Allow Recipient Renaming: Controls whether new envelopes, templates, or roles default to allowing recipients to change their names.
- Allow Senders to Adjust This Setting When Sending Envelopes: Controls whether senders can modify this setting for individual recipients when initiating envelopes.
2. How to Configure?
2.1 Log in to the Nota Sign workspace;
2.2 Click [Manage] - [Sending Settings];
2.3 In [Sending Settings], find the [Advanced Settings] section, and locate [Default Allow Reviewer Renaming]. Administrators can choose whether to uncheck this option.
2.4 If you want to allow senders to adjust this setting when initiating envelopes, check [Allow Senders to Adjust This Setting When Sending Envelopes].
2.5 Click [Save] to complete the settings.
XVI. Configuring Digital Signature Identity Verification
When enterprises need to strengthen signer identity confirmation in digital signature scenarios, administrators can configure digital signature identity verification policies in Sending Settings. After enabling, eligible digital signature recipients must complete Nota Sign identity verification before proceeding with the digital signature flow when submitting their signing.
This setting currently applies to Hong Kong Digi-Sign ID-One digital signature scenarios.
1. Feature Overview
Administrators can configure the following two options:
- Default Enable Digital Signature Identity Verification: Controls whether eligible digital signature recipients are required by default to complete Nota Sign identity verification.
- Allow Senders to Adjust This Setting When Sending Envelopes: Controls whether senders can enable or disable this setting for individual recipients when initiating envelopes.
When enabled, digital signature identity verification is triggered only when the recipient uses a digital signature, the CA selection scope is set to a specified CA, and the specified CA is Digi-Sign ID-One.
2. How to Configure?
2.1 Click [Manage] - [Sending Settings];
2.2 In [Advanced Settings], find [Default Enable Digital Signature Identity Verification]. If you want to require eligible recipients to complete identity verification by default, check this option;
2.3 If you want to allow senders to adjust this setting when sending envelopes, check [Allow Senders to Adjust This Setting When Sending Envelopes];
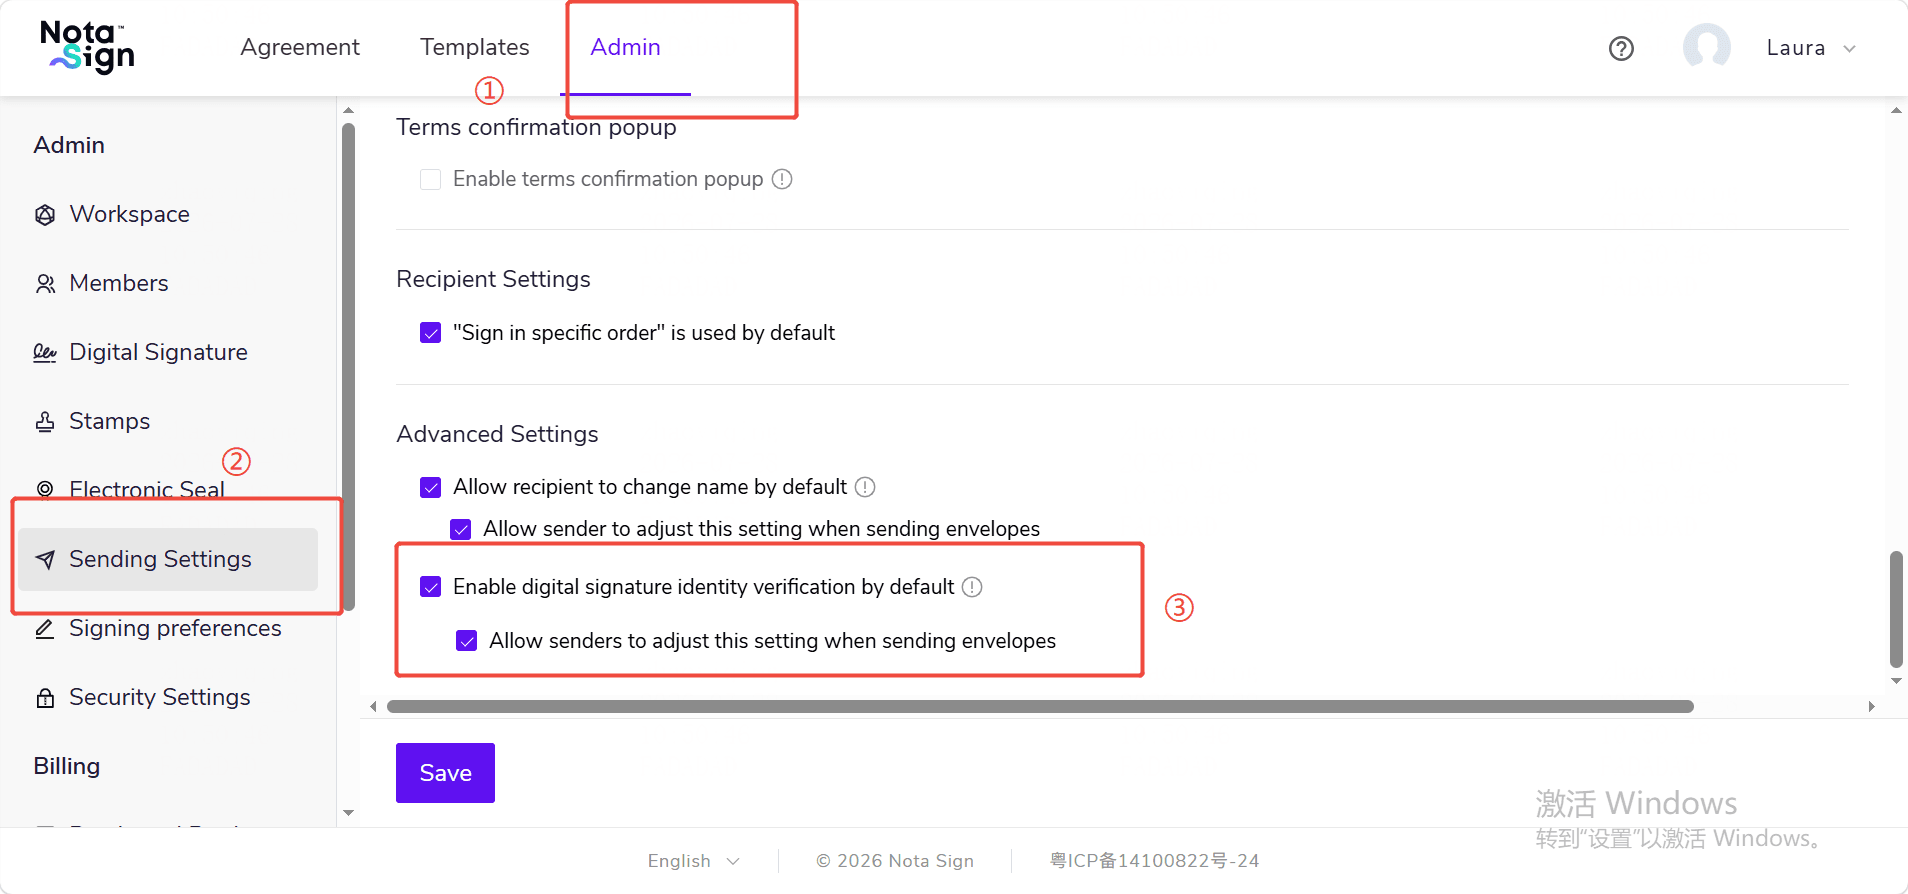
- Click [Save] to complete the settings.
3. Configuration Effectiveness Rules
When sending an envelope, the system reads the current workspace’s sending settings and applies them as the default policy for the envelope.
- If the administrator enables [Default Enable Digital Signature Identity Verification], eligible digital signature recipients are required by default to complete Nota Sign identity verification;
- If the administrator disables this setting, eligible digital signature recipients will not trigger Nota Sign identity verification by default;
- If the administrator [allows senders to adjust this setting], senders can modify this setting for individual recipients when sending envelopes;
- If the administrator does not allow senders to adjust this setting, the switch will not be displayed on the sender’s page, and the system will enforce the administrator’s configuration.
After the envelope is sent, the configuration saved at the time of sending will prevail. Subsequent modifications to sending settings by the administrator will not affect envelopes that have already been sent.
4. Important Notes
- This feature currently only applies to Hong Kong Digi-Sign ID-One CA;
- If the recipient does not hold a Digi-Sign ID-One certificate, the existing certificate application and OTP verification flow will be followed, and Nota Sign identity verification will not be triggered additionally;
- If the recipient ultimately does not choose the Digi-Sign ID-One digital signature service, this identity verification will not be triggered;
- Existing eKYC logs, audit report records, and billing rules follow the existing logic.