
I. Adding Standard Identity Verification
Video Tutorial:
1. Log in to the Nota Sign workspace, click [Sign] - [Initiate Signing];
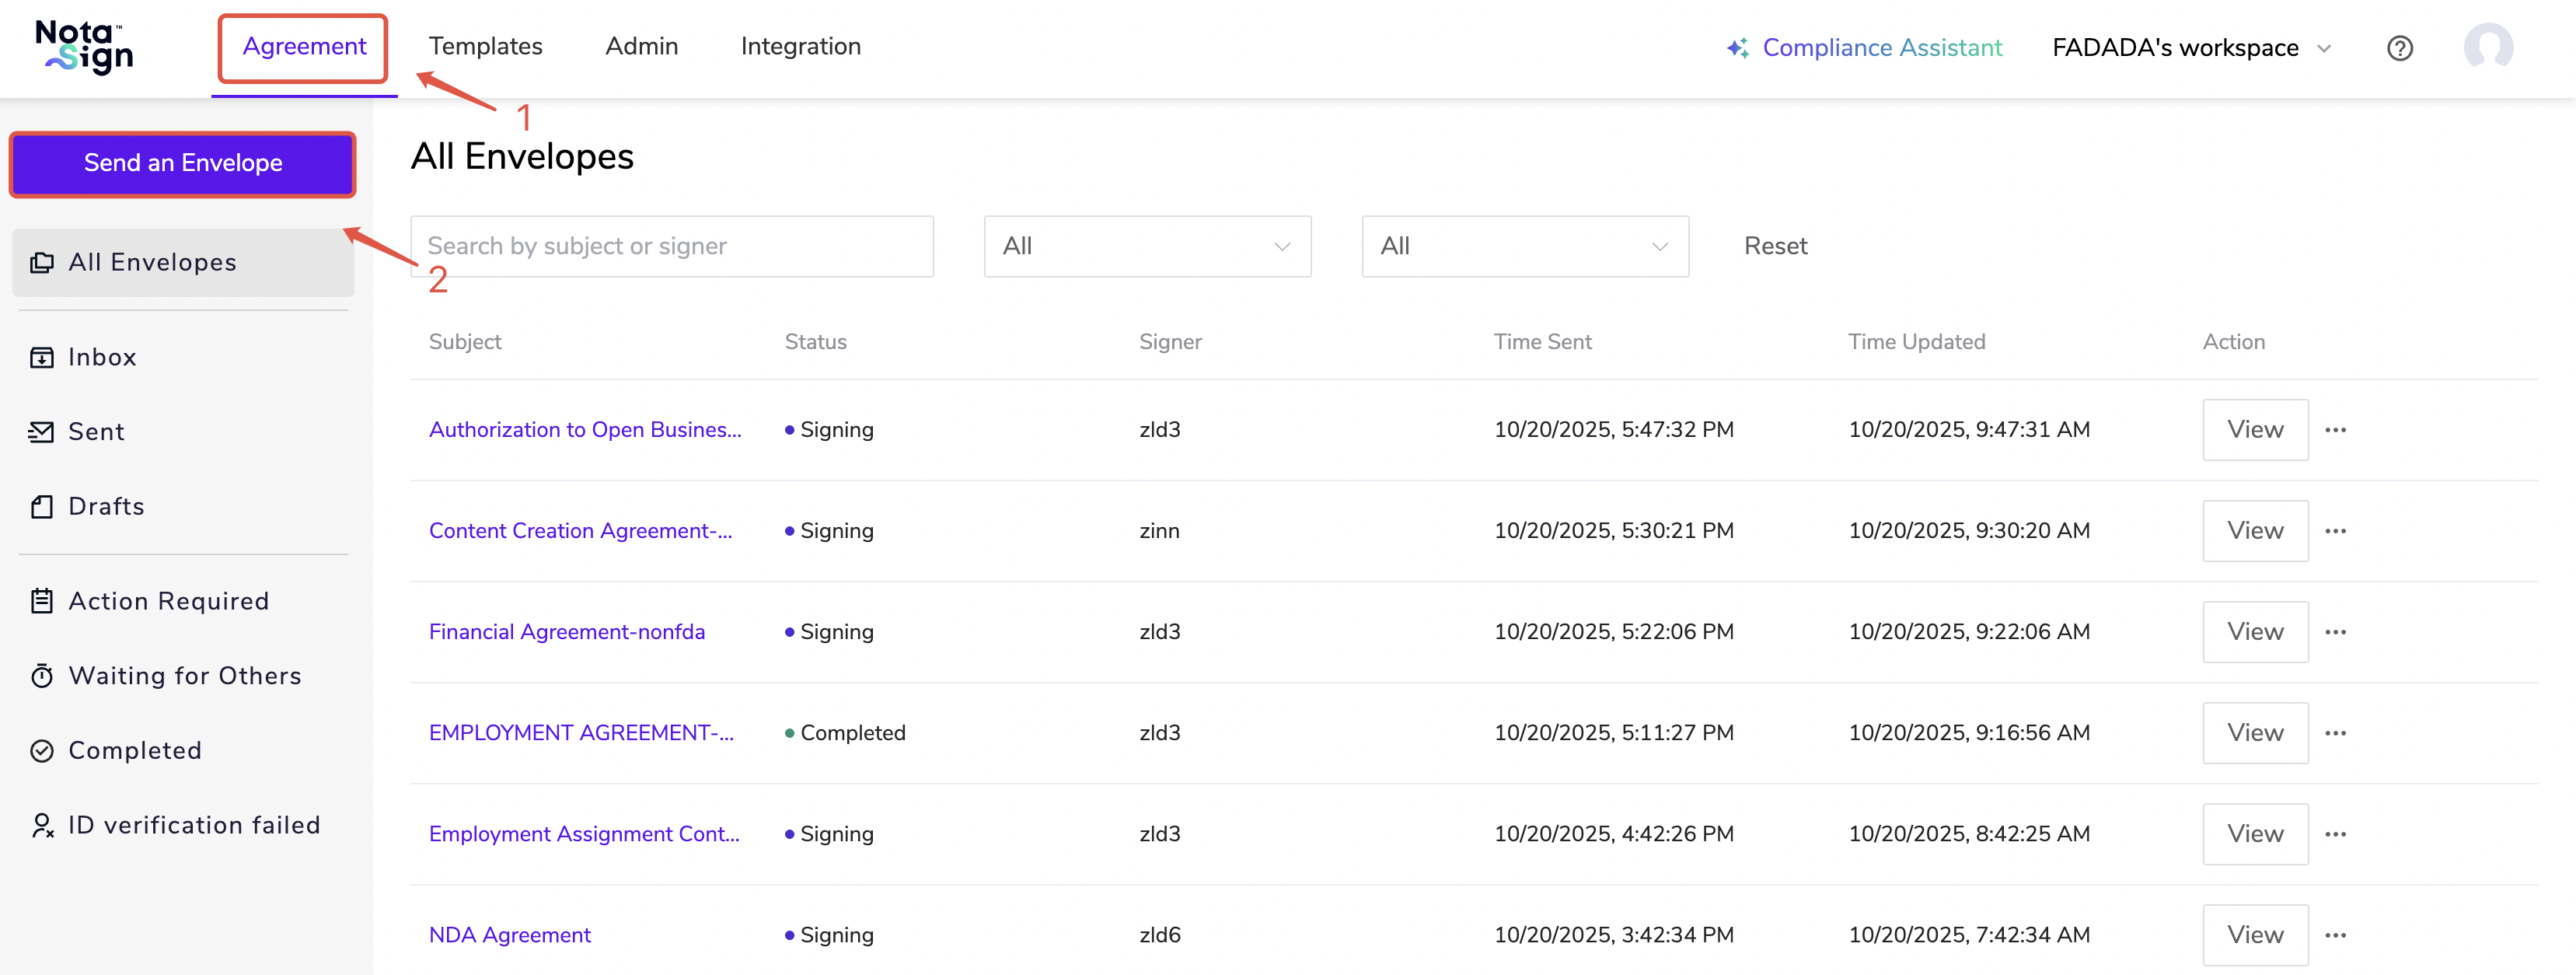
2. Upload files and create an envelope
Supports uploading multiple files. A single envelope supports up to 100MB and supports various common document formats (e.g., PDF, Word, etc.).
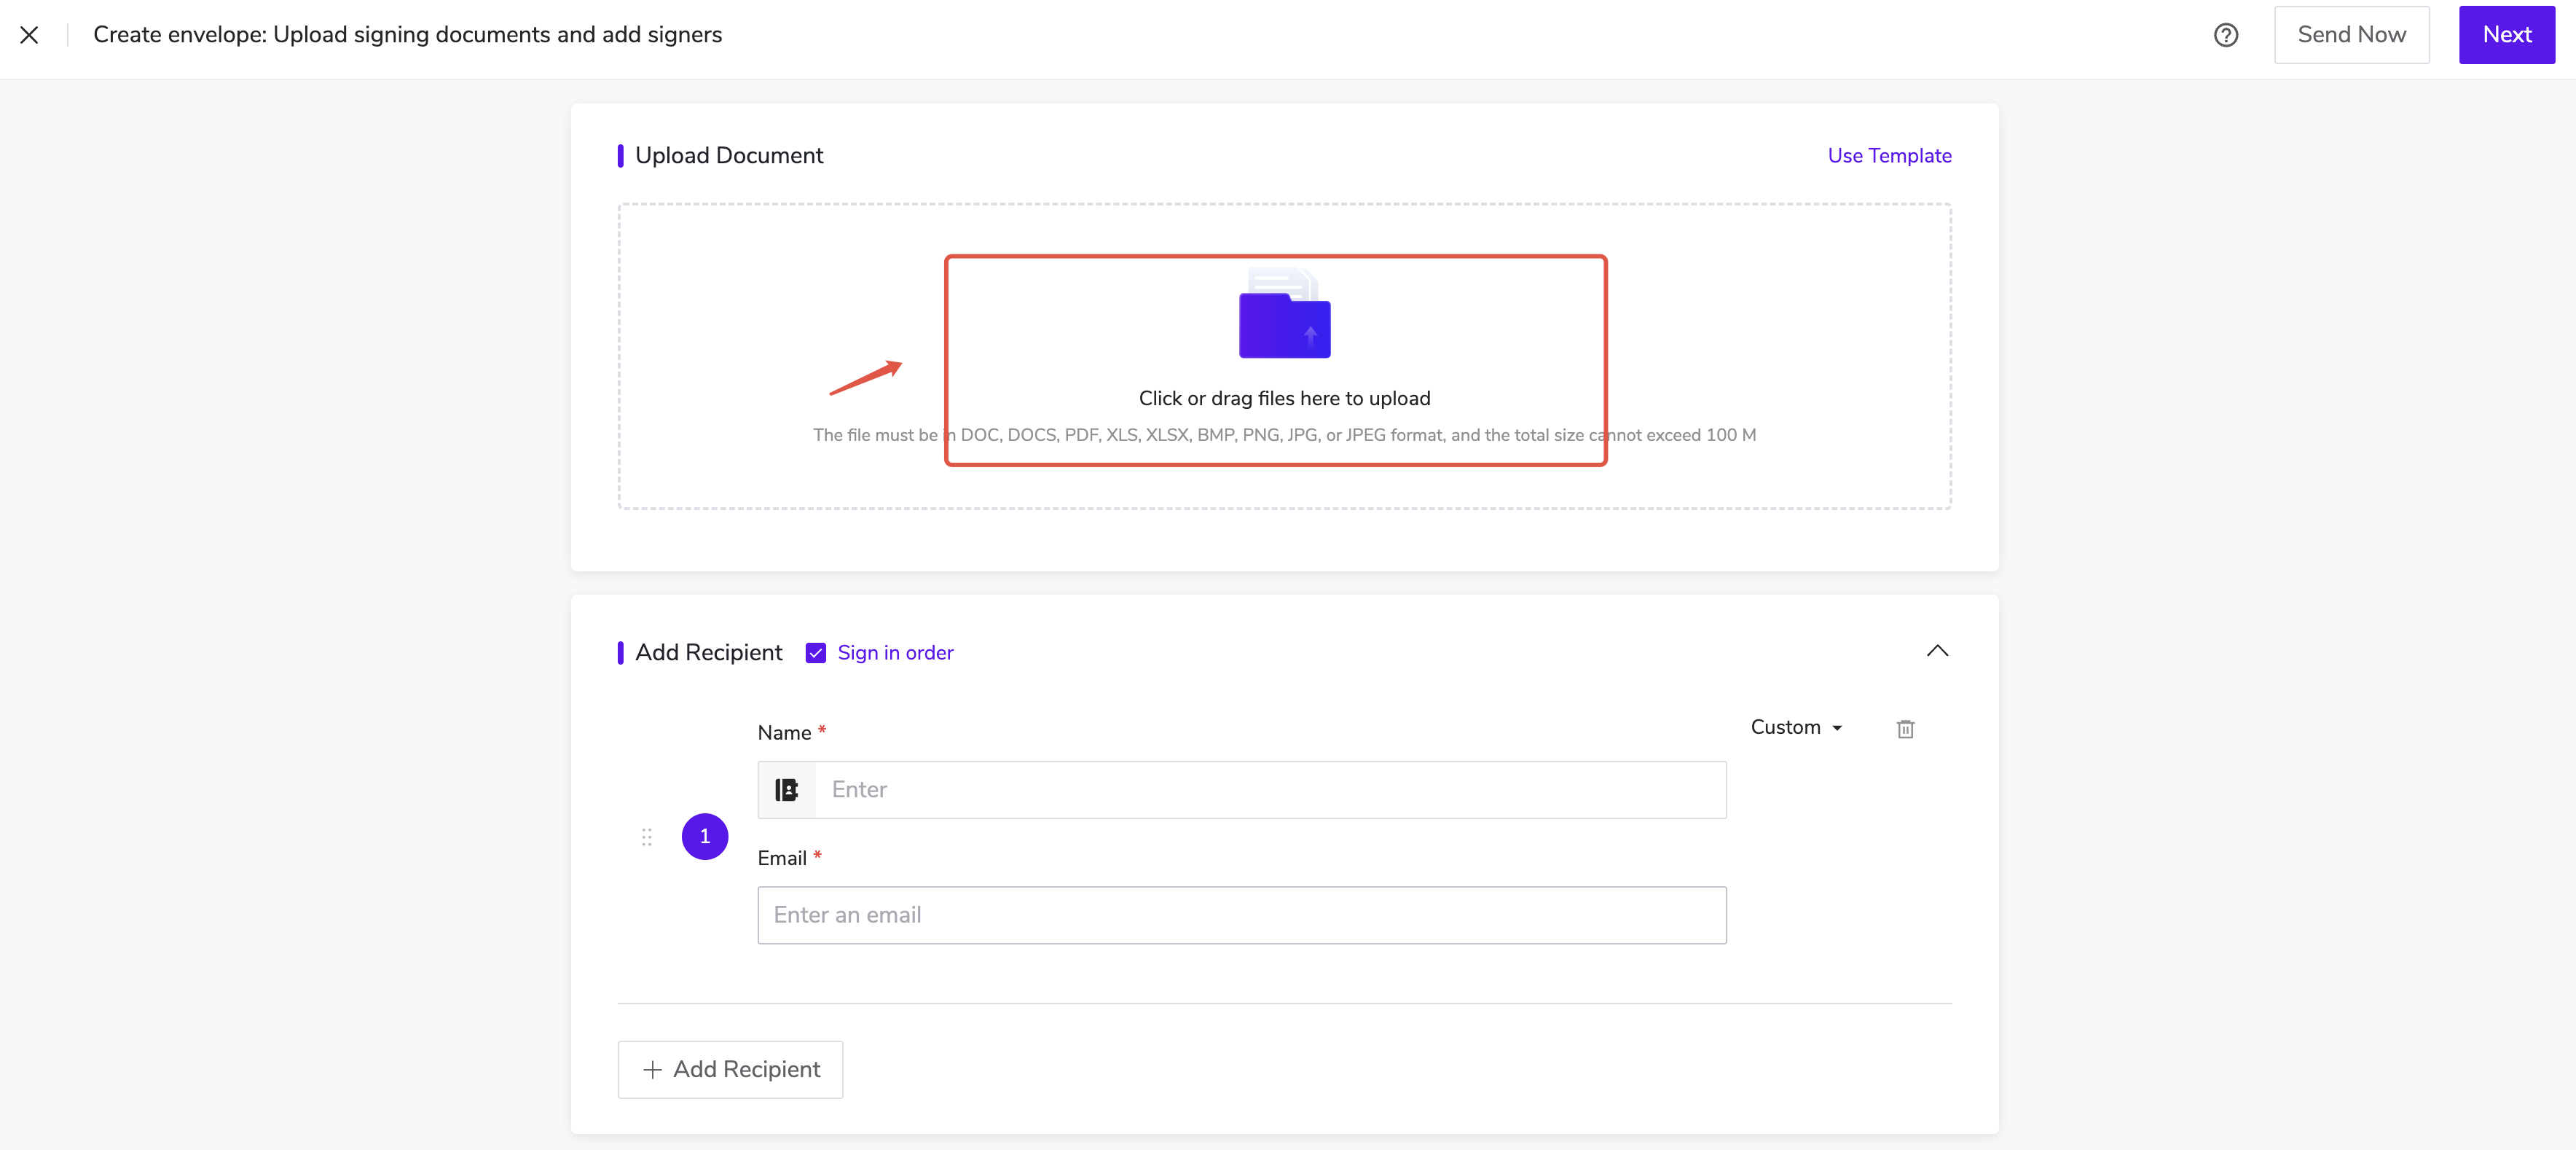
3. Set recipient information
-
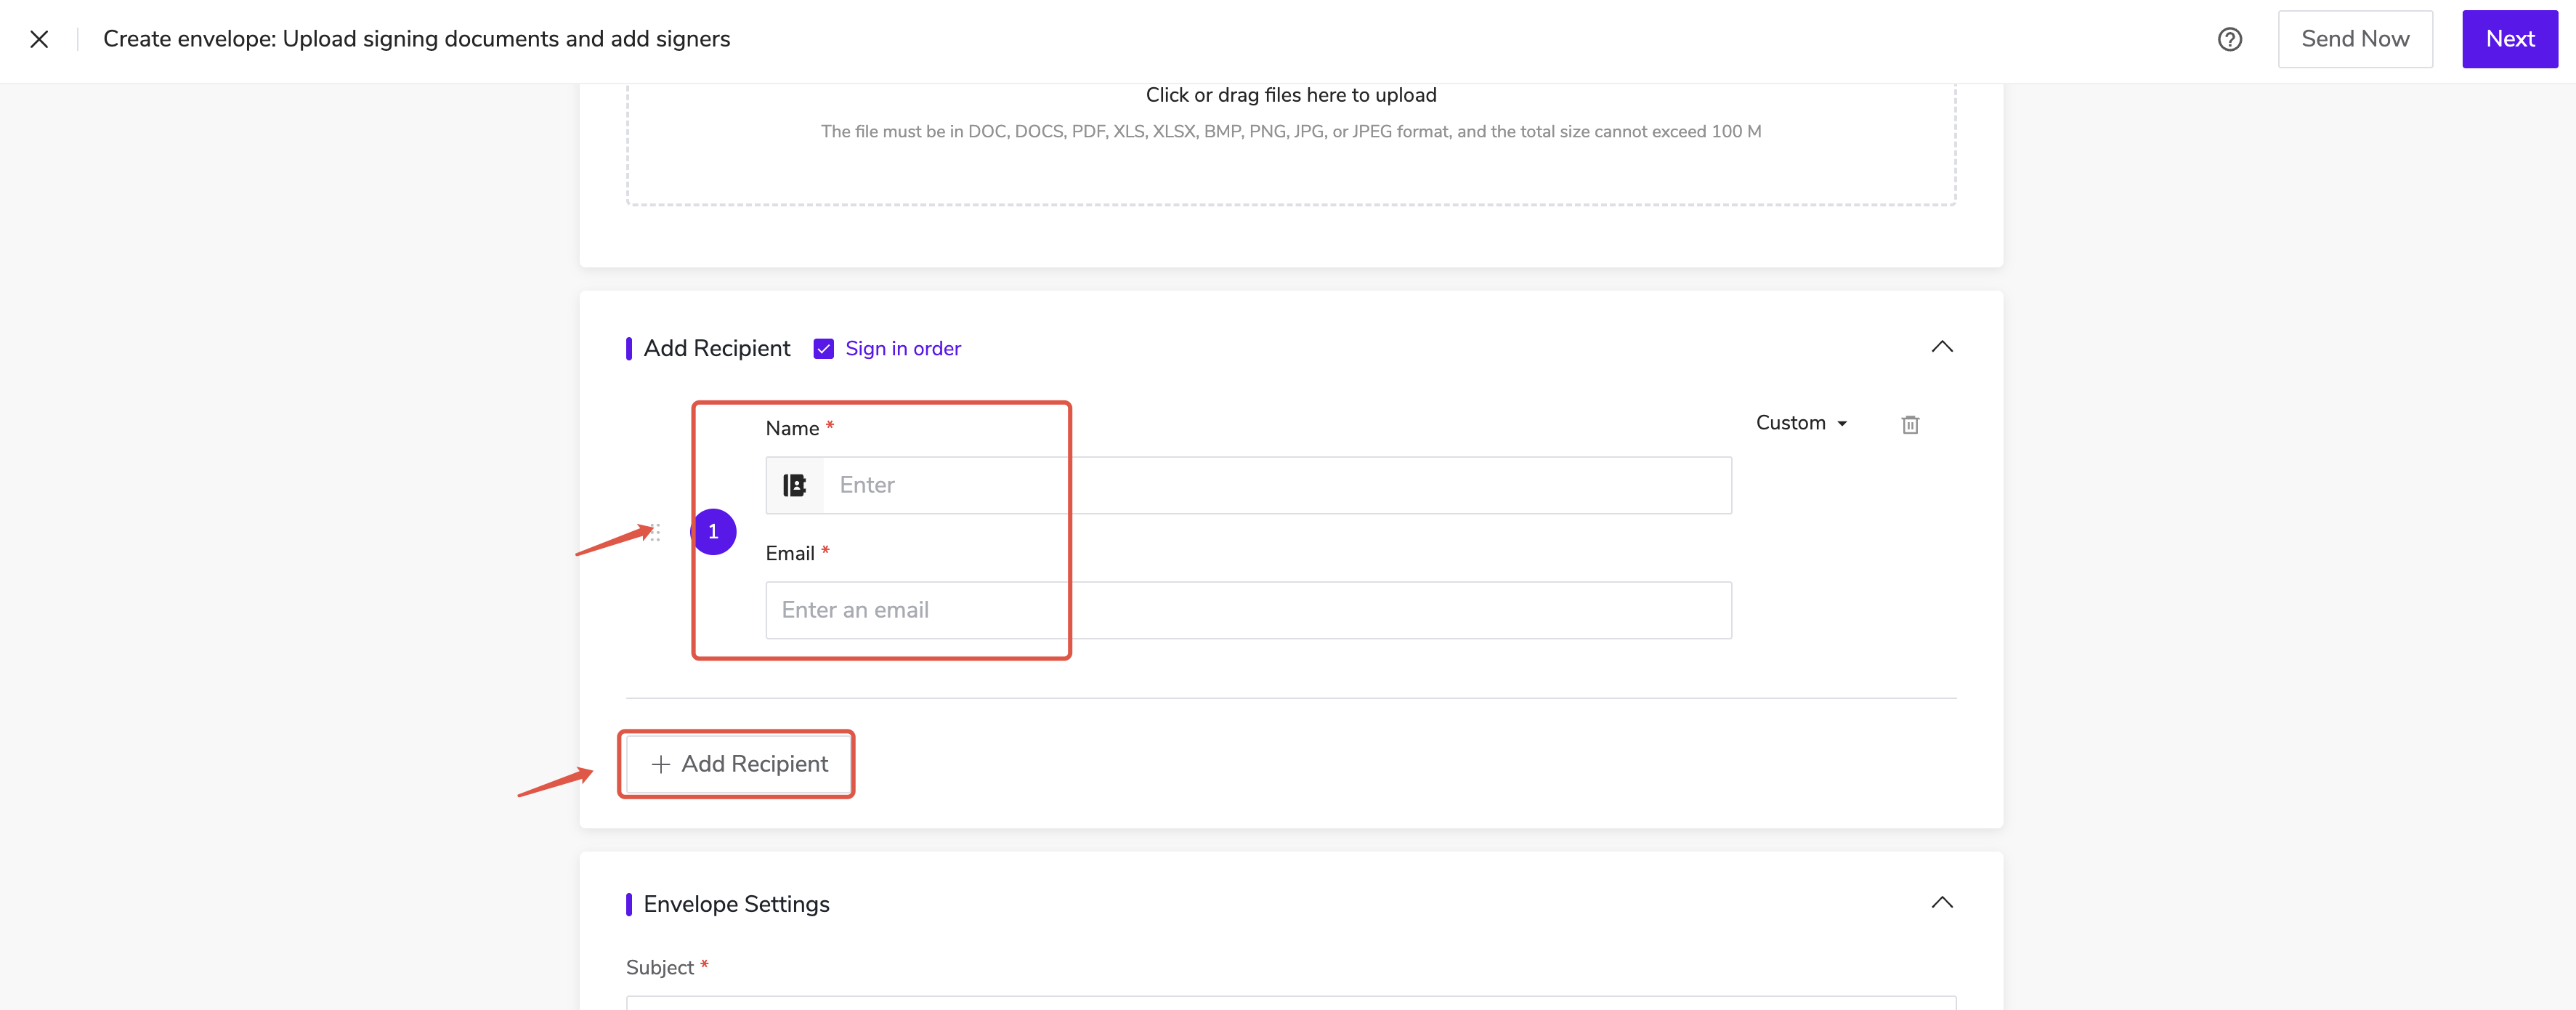
Enter the recipient’s [Name] and [Email Address]. The system will automatically send an email notification after the signing process begins;
-
Click the [Add Recipient] button in the lower-left corner to add multiple recipients.
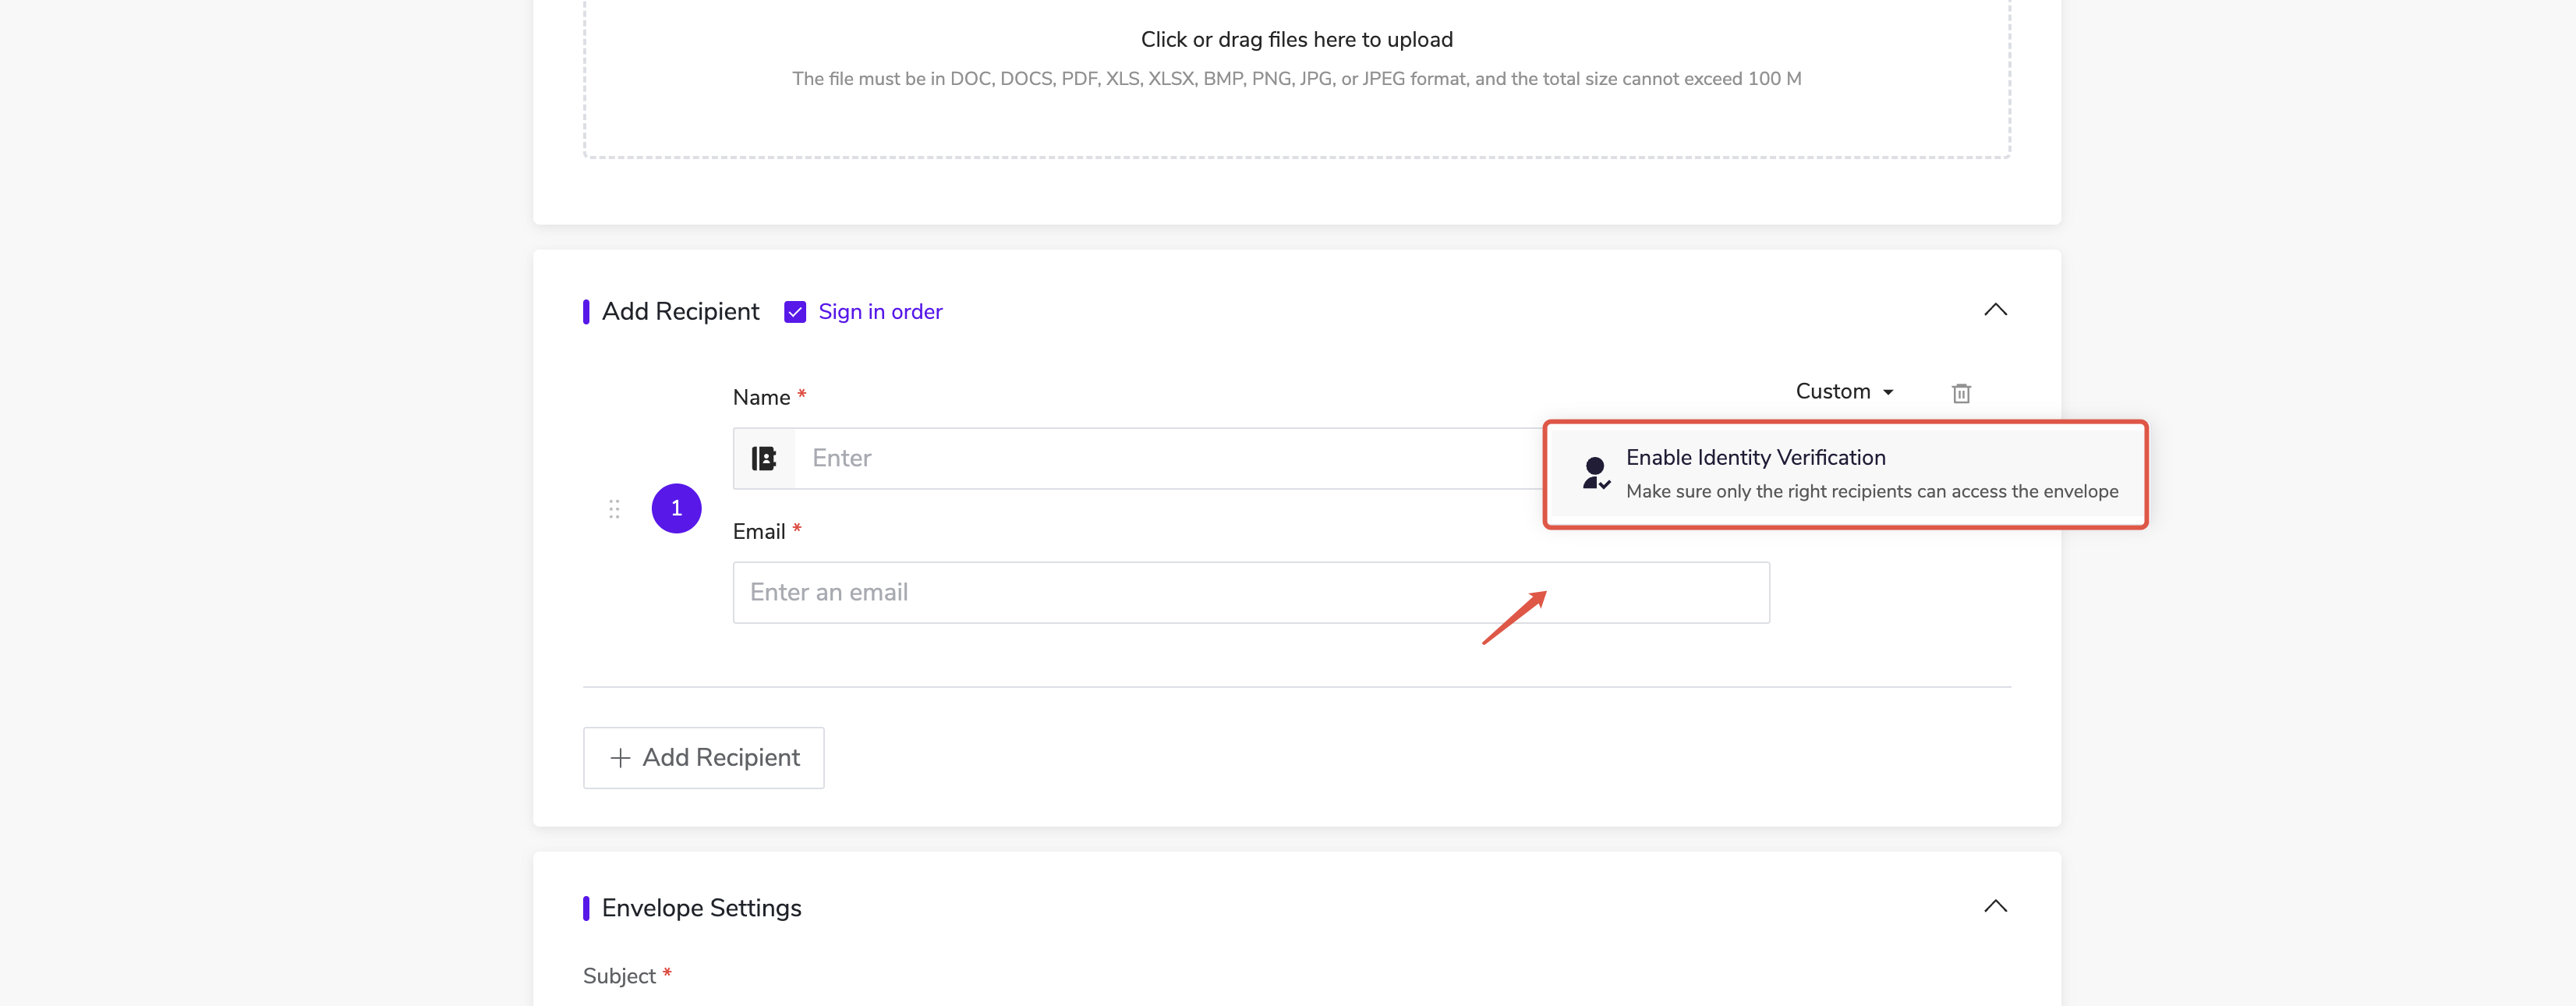
4. Set Identity Verification: After enabling, recipients are required to verify their identity before viewing documents, enhancing security.
-
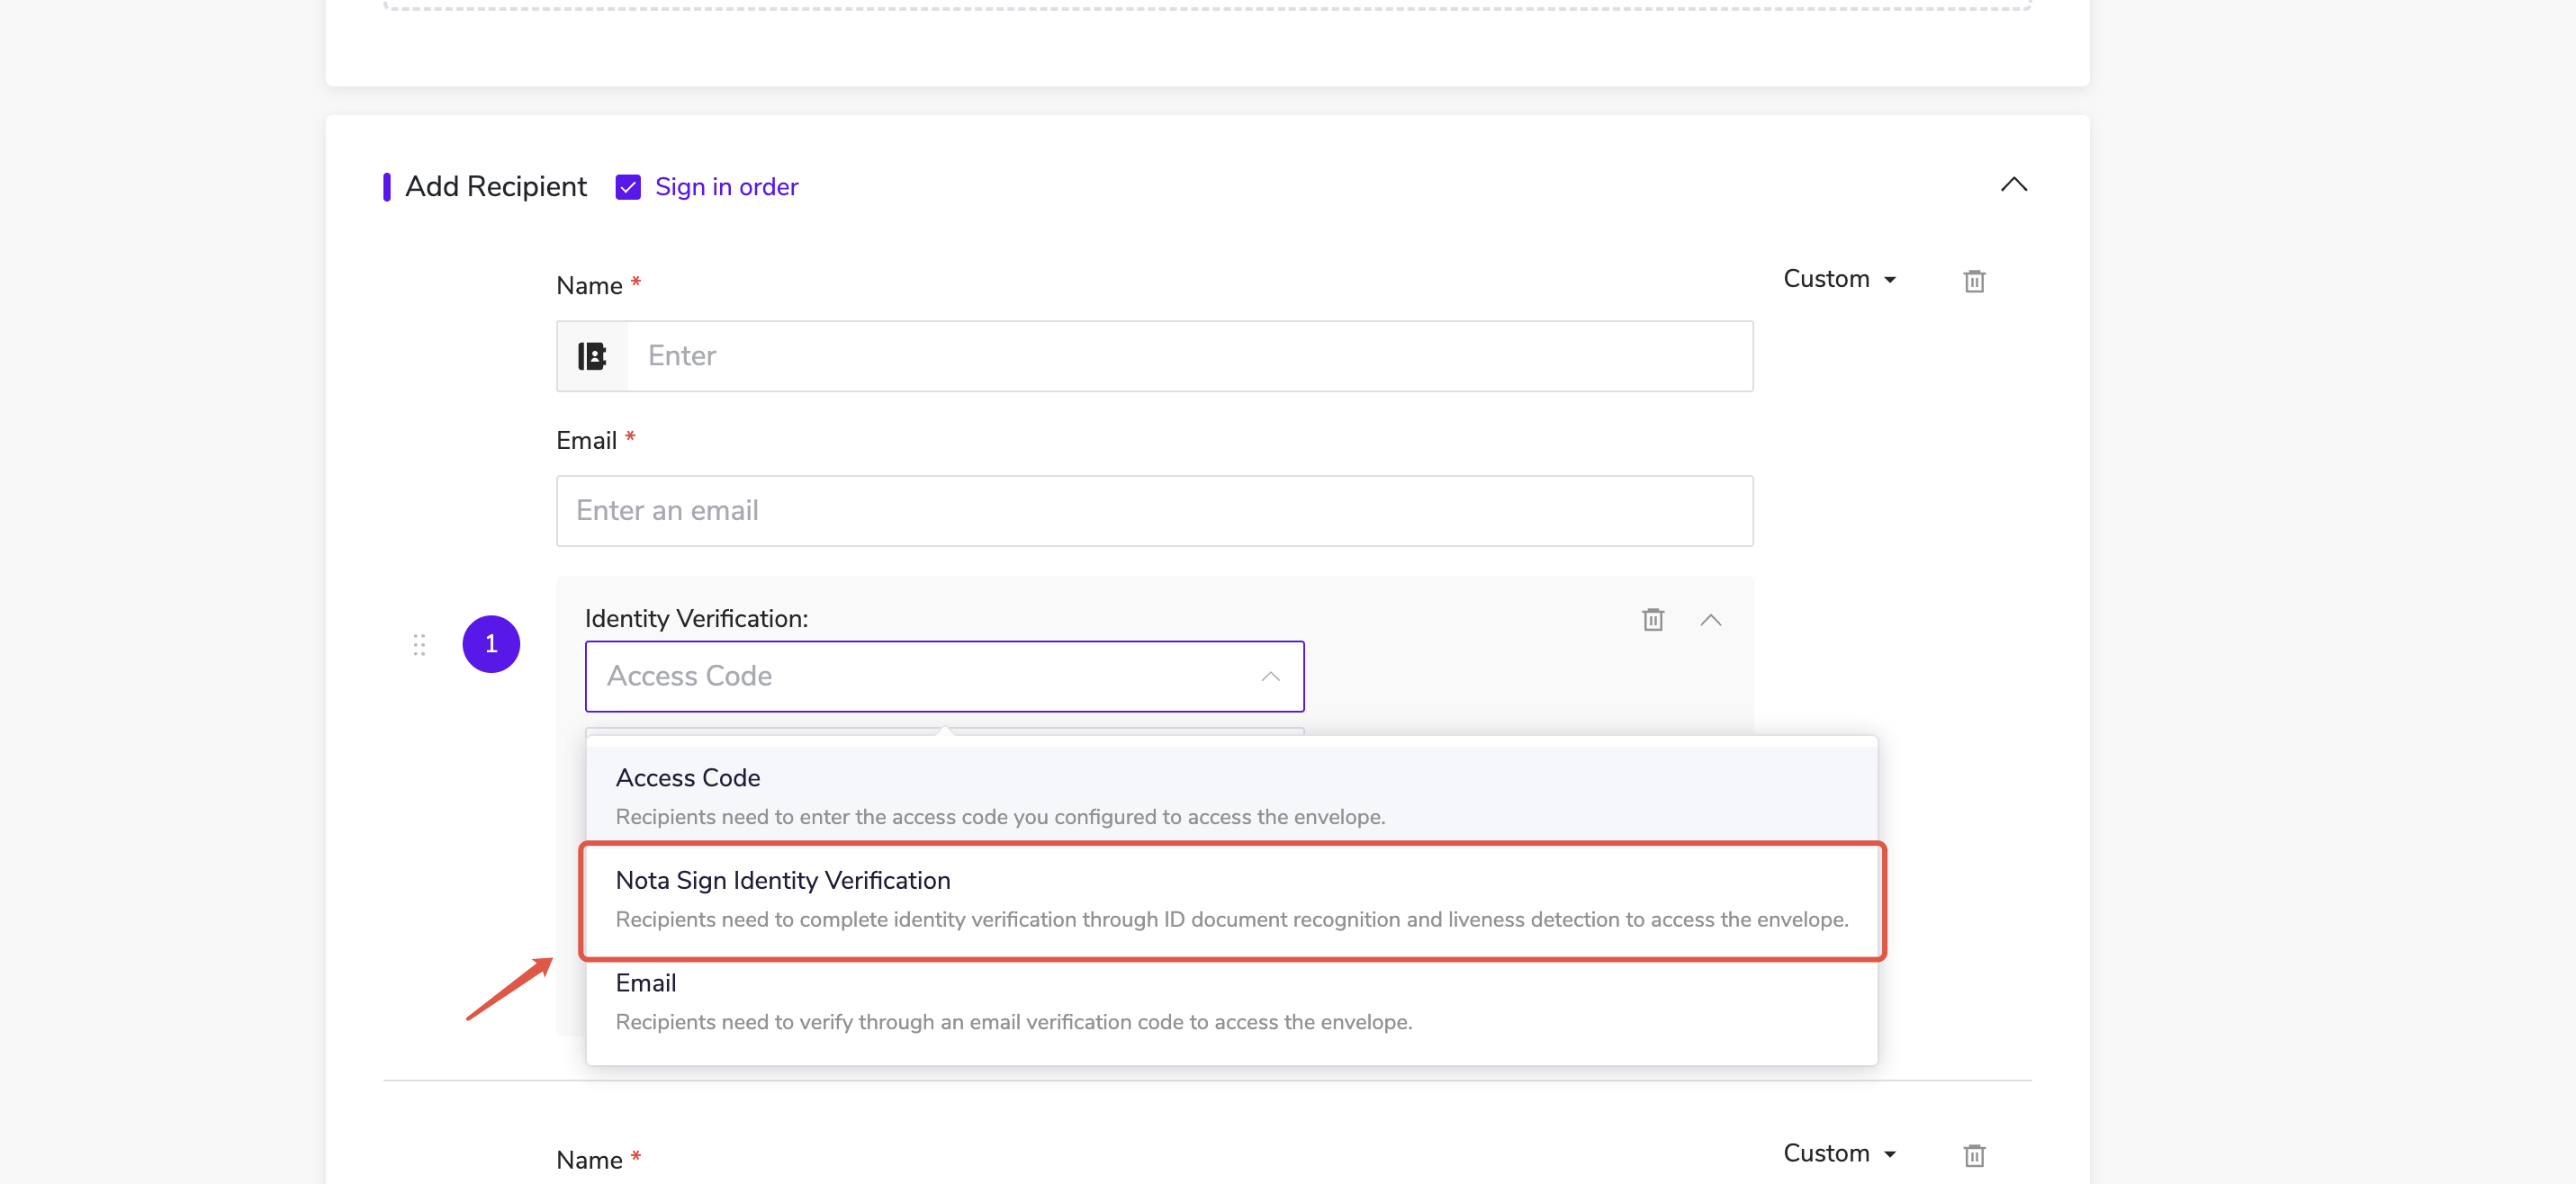
Click [Custom] - [Add Identity Verification] in the upper-right corner;
-
Select [Nota Sign Identity Verification] as the verification method.
-
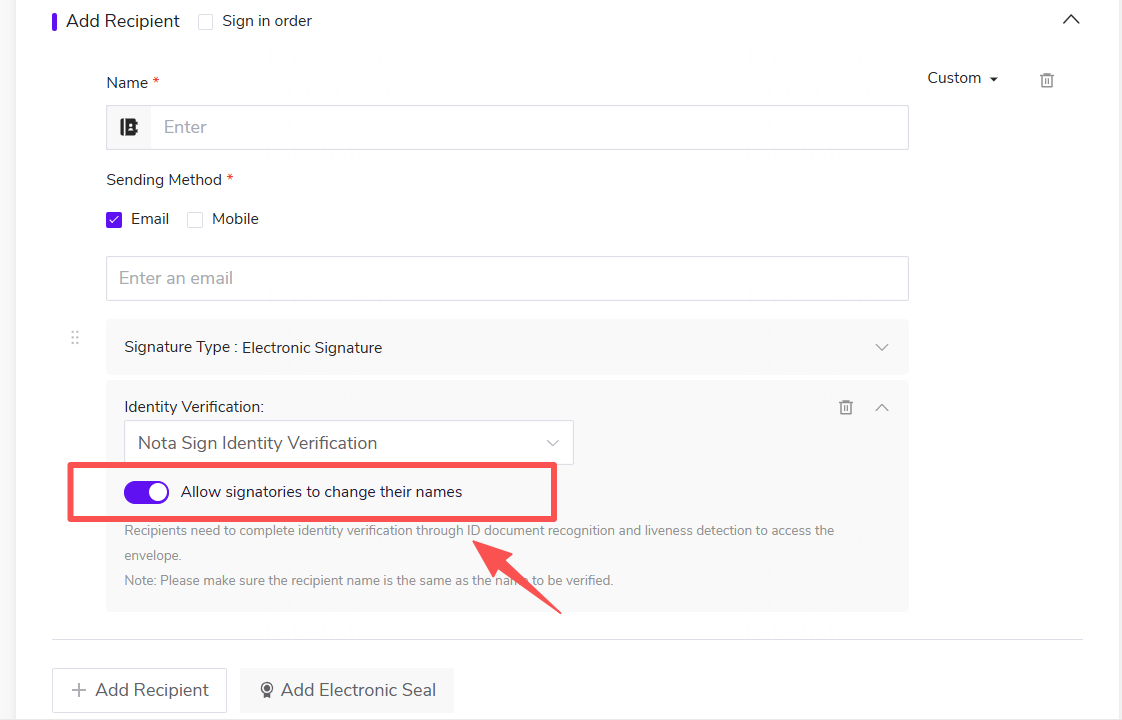
Under [Nota Sign Identity Verification], there is a checkbox option: [Allow reviewer to change name]. It is checked by default, and users can choose to uncheck it.
5. Set signing order: Sequential Signing or Custom Signing Order
-
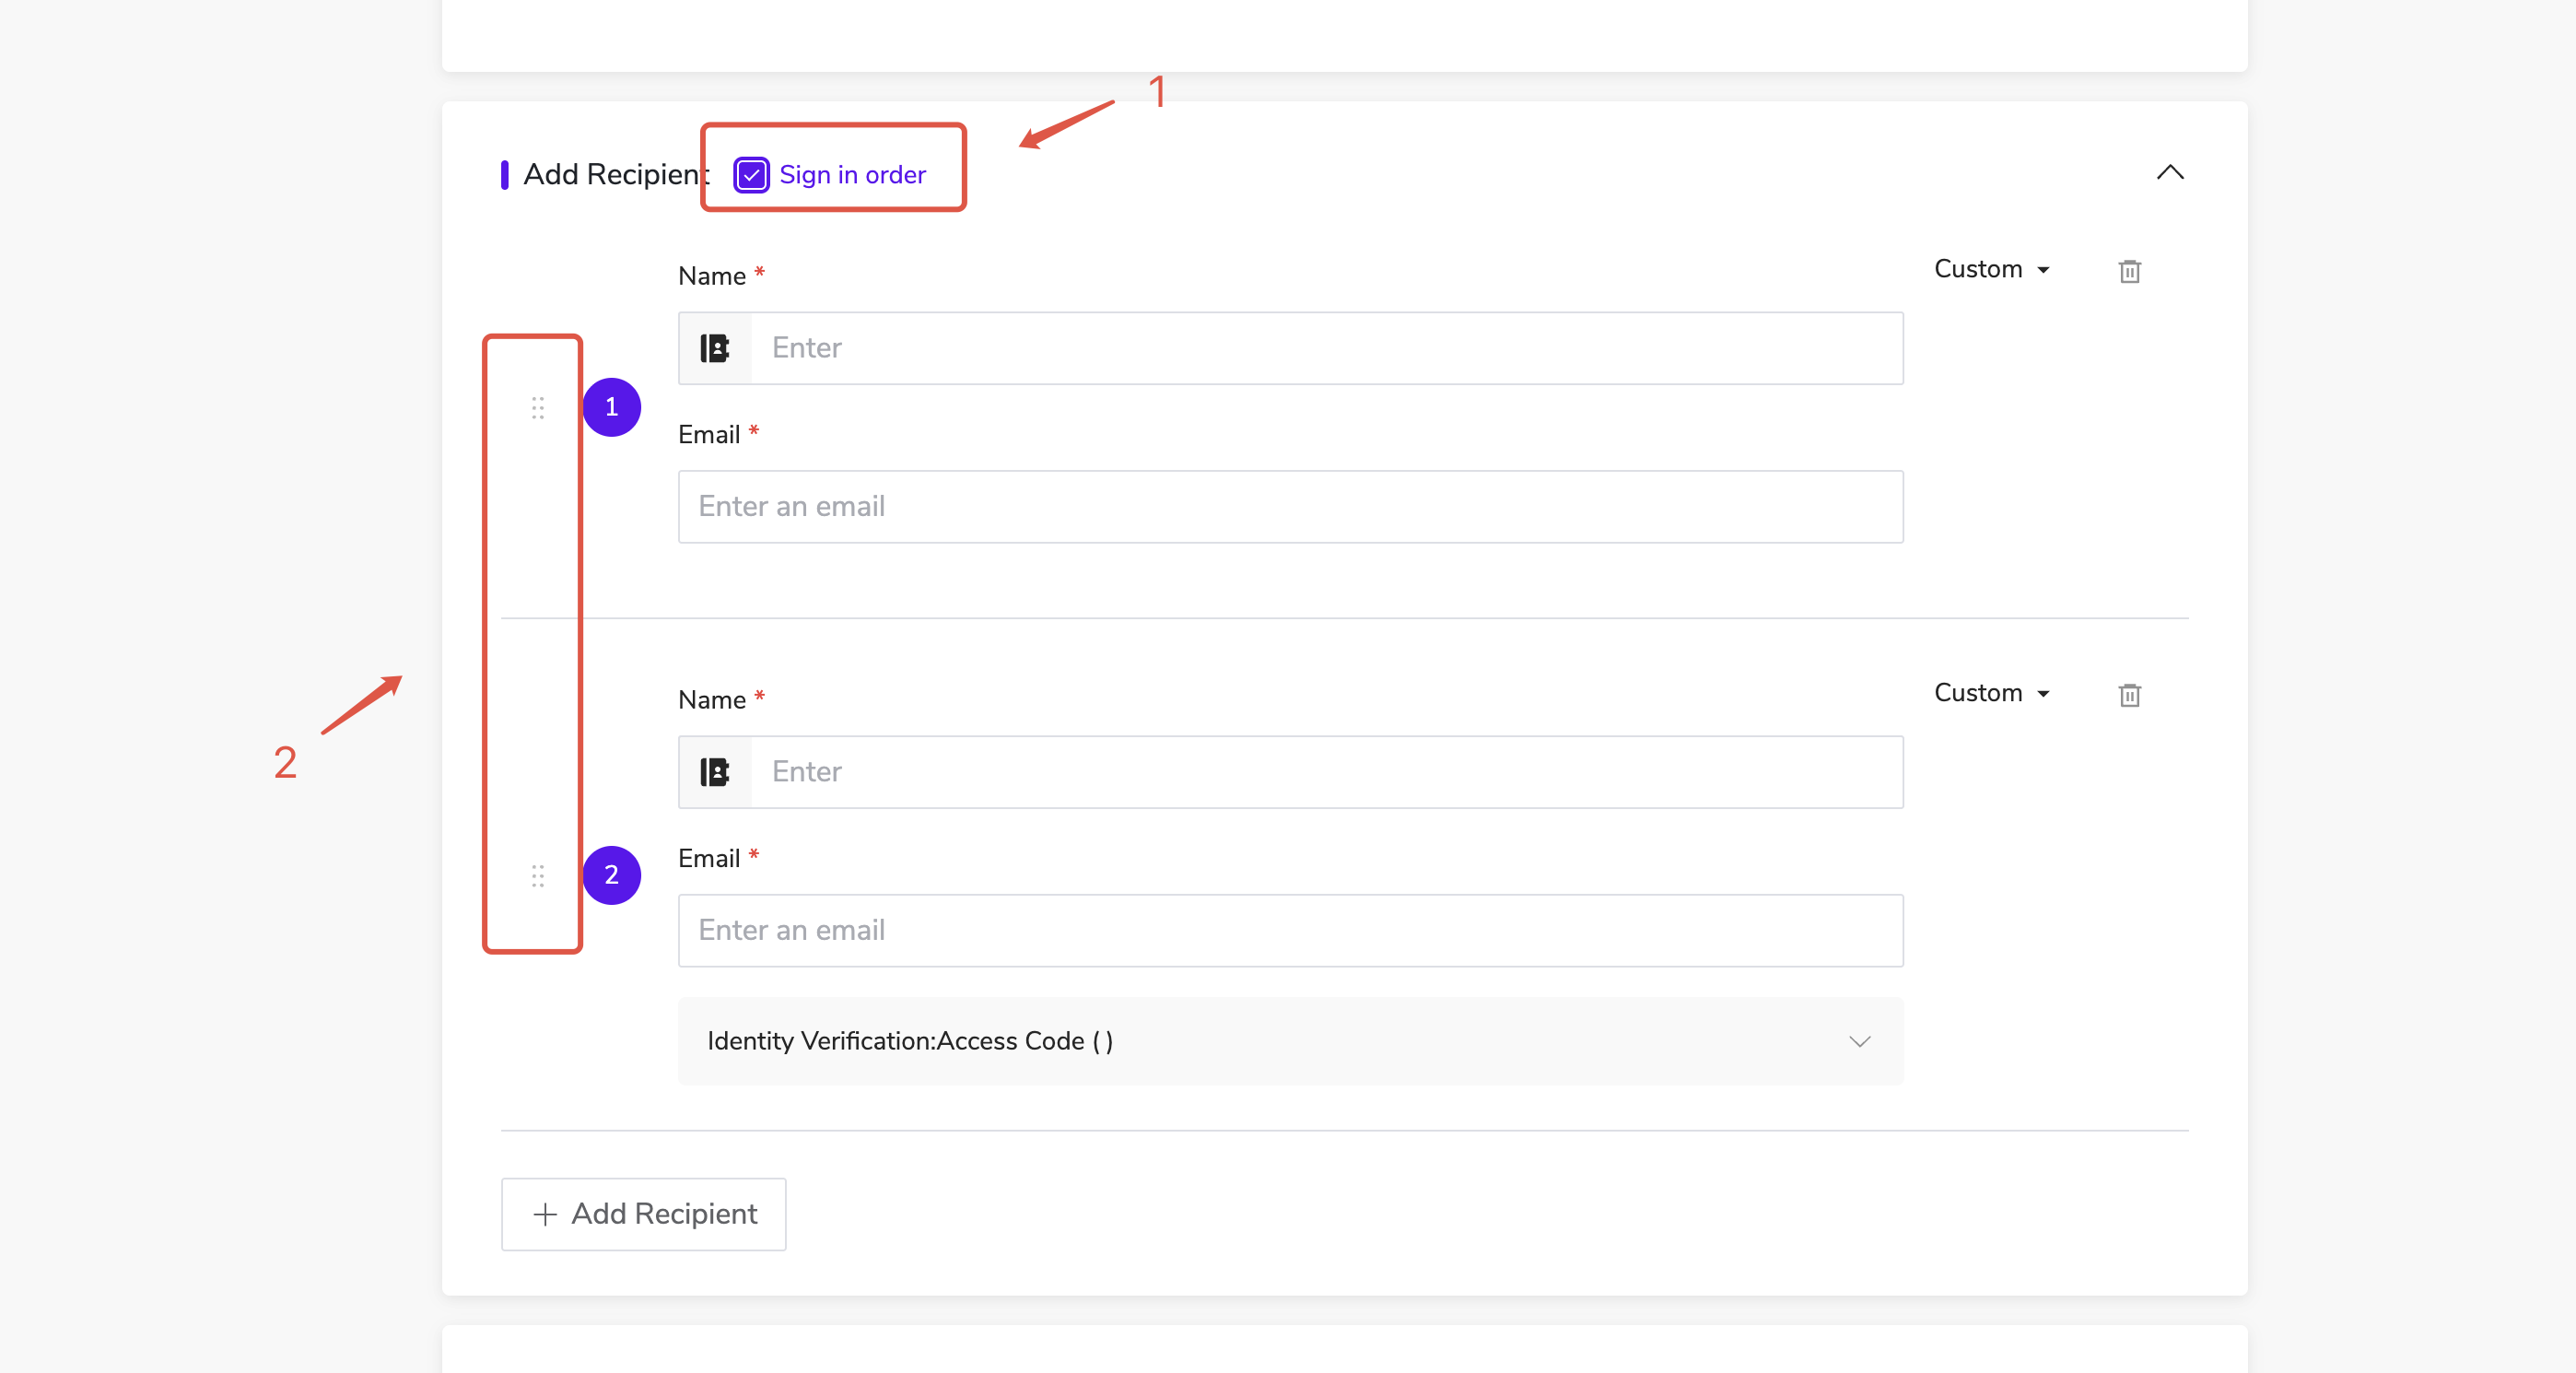
Sequential Signing: Applicable for scenarios where multiple recipients need to sign in sequence.
After successful initiation, the second recipient can only sign after the first recipient has completed signing. As shown, check [Sequential Signing] in the upper-left corner;
Custom Signing Order: After adding multiple recipients, drag the controls on the left to adjust the signing order.
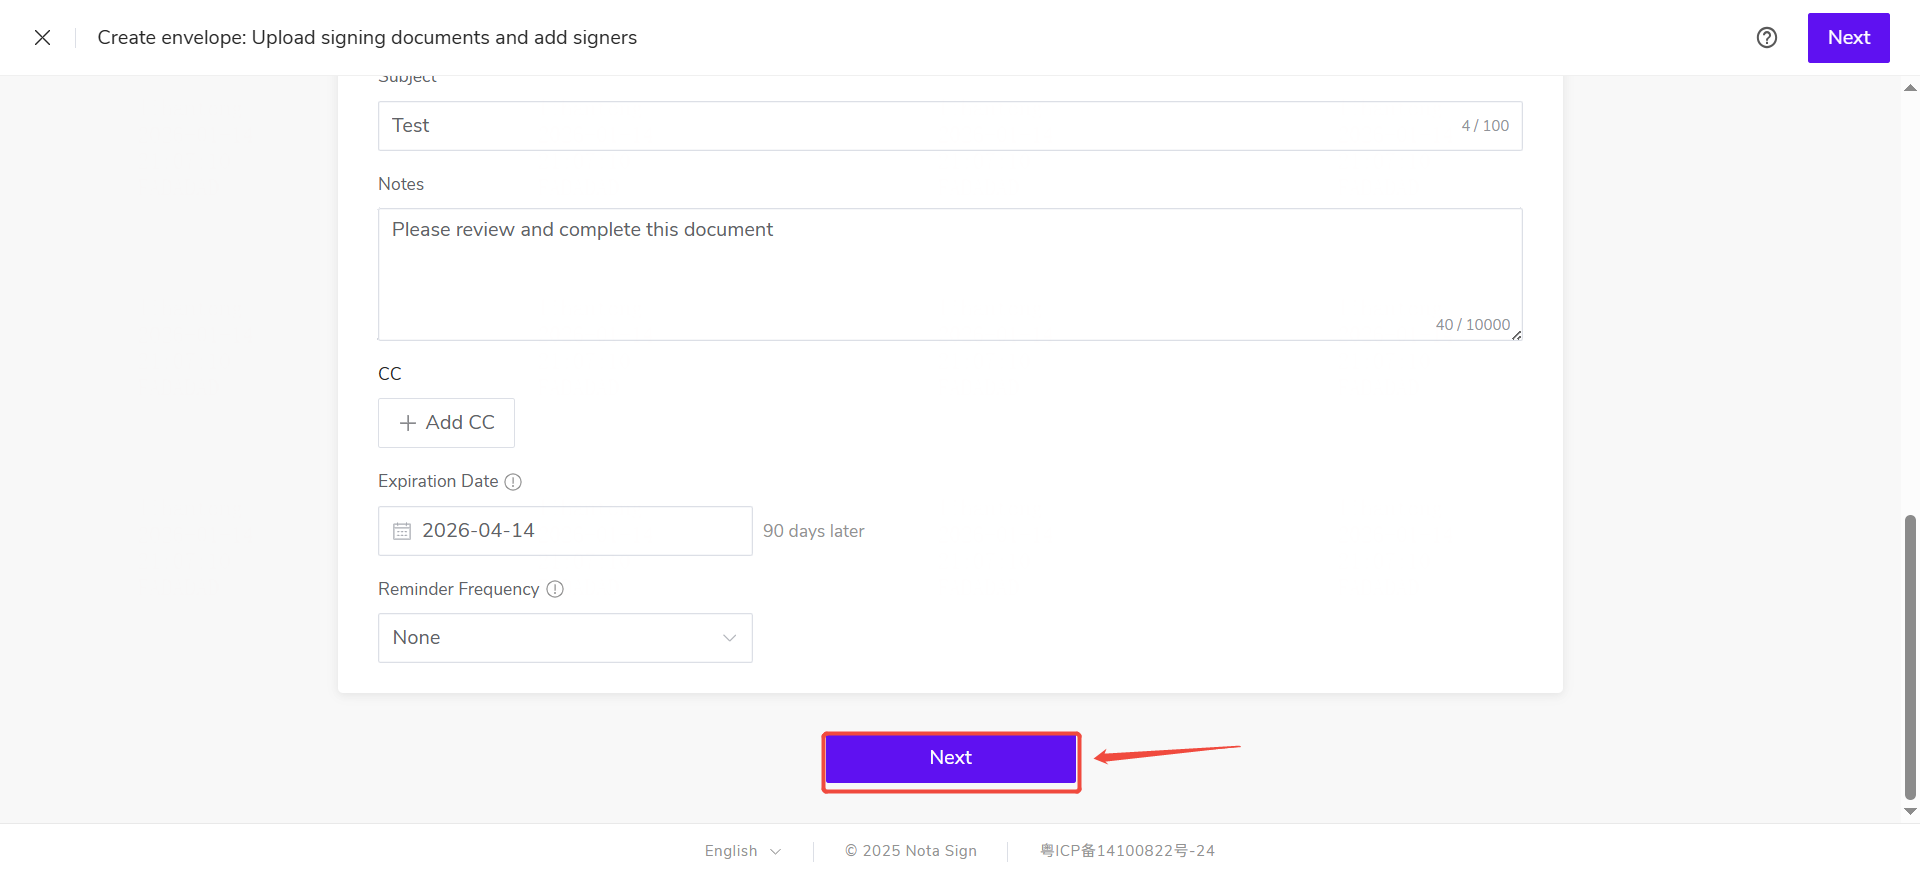
6. Set up the envelope
-
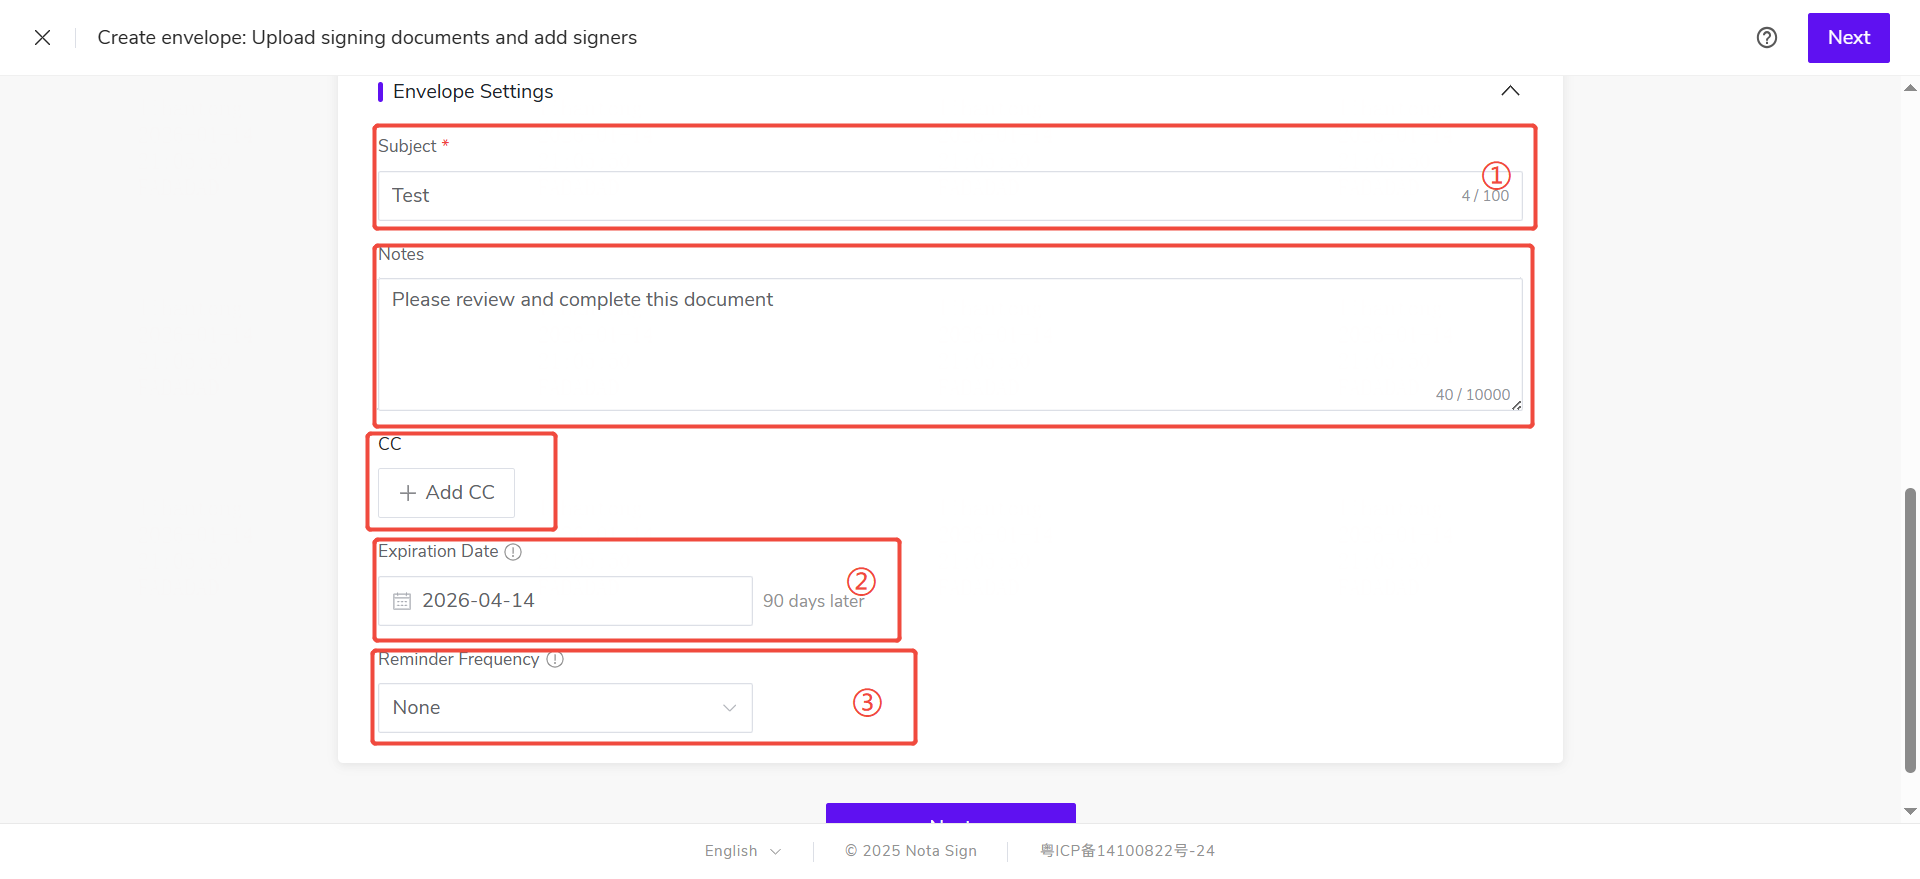
Envelope Subject: Will be used as the email subject line; defaults to the uploaded file name;
-
Select “Digital Signature” type: Select [Not Required], defaults to standard Electronic Signature (SES);
-
Deadline: Set the signing deadline. The default is 90 days; after expiration, signing is no longer possible.
-
Custom Reminder Frequency: Automatically send signing reminders to recipients who have not yet completed signing at specified intervals after the envelope is sent.
-
Add Remarks: Will be displayed in the envelope details page for supplementary information;
-
Add CC Recipients: Add personnel who need to be informed of the process progress. They will receive notification emails after signing is completed and can view the document content.
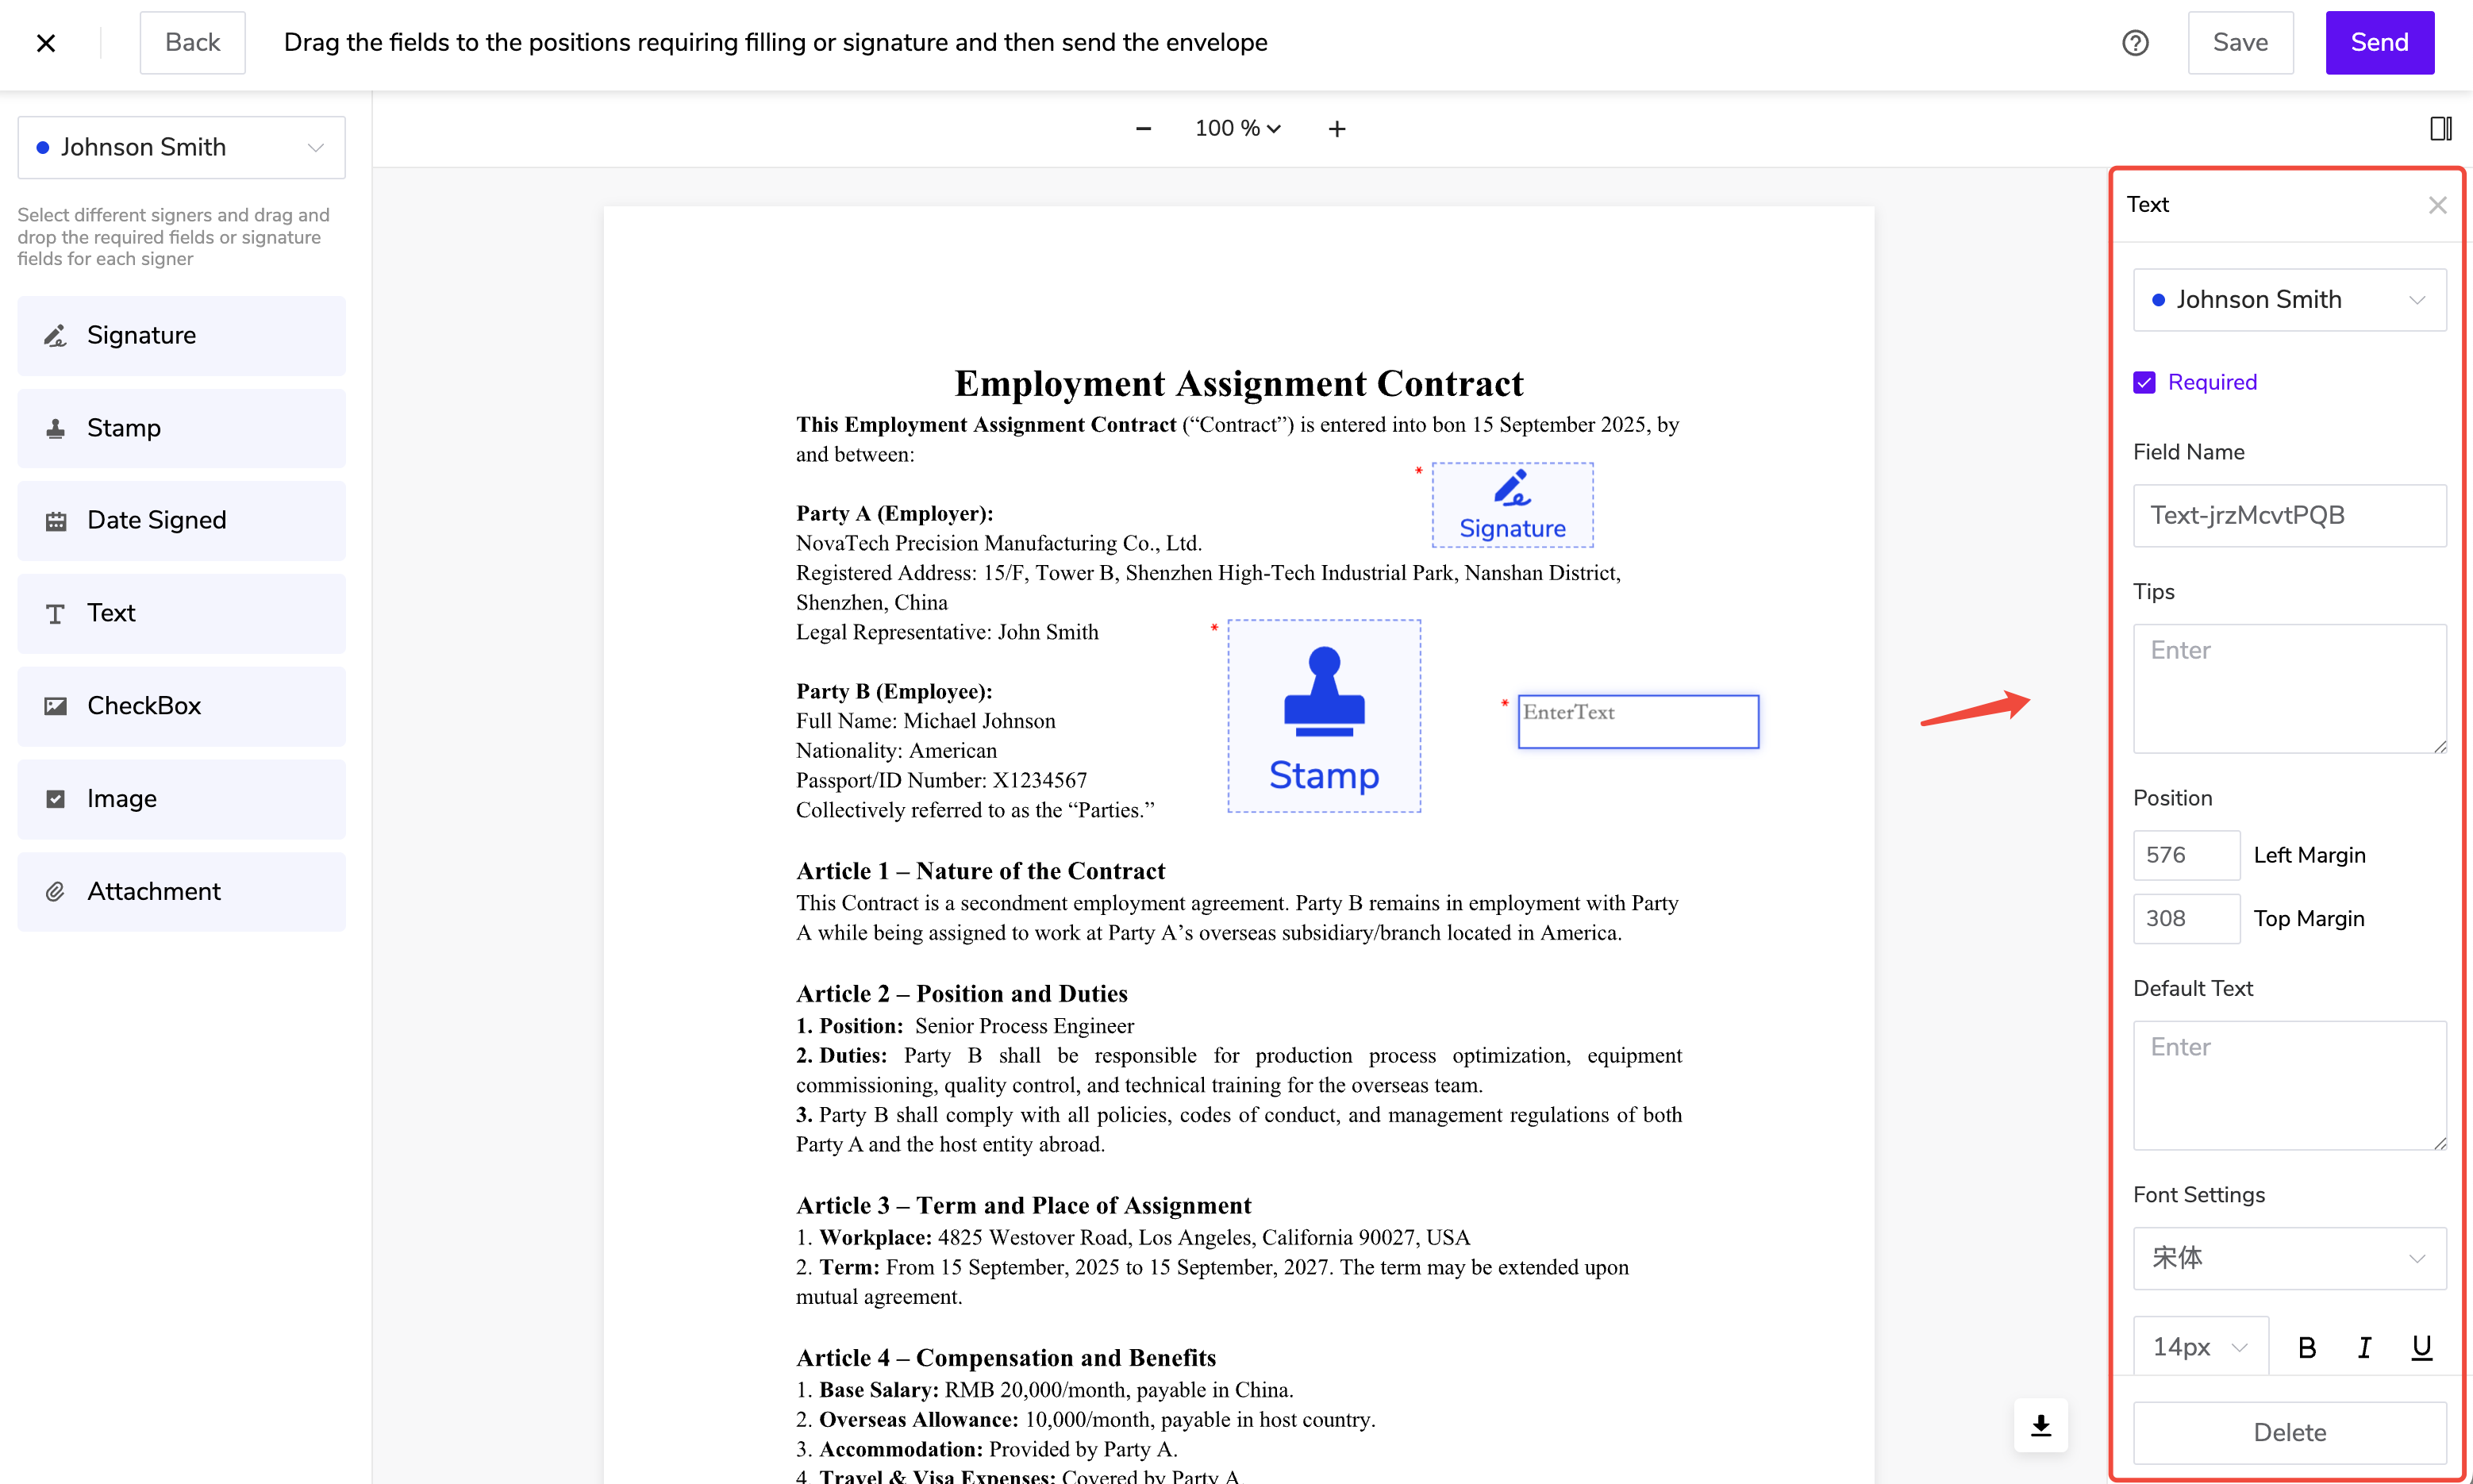
7. Configure signing controls
Click [Next] at the bottom of the page to enter the control settings interface.
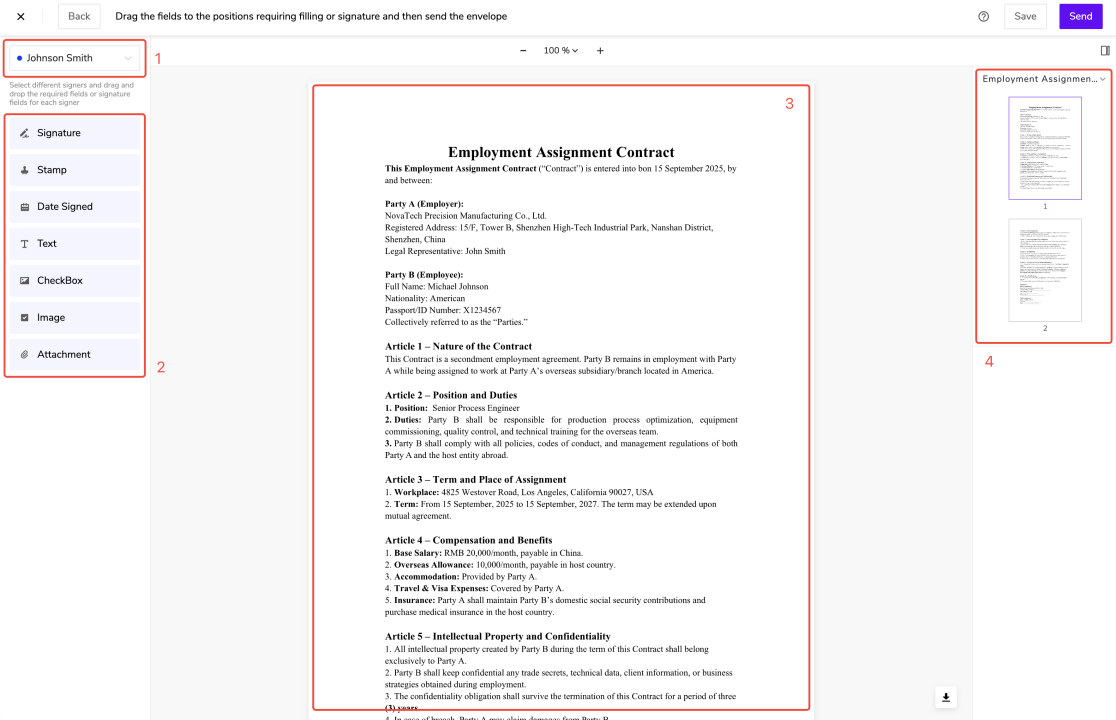
The signing settings page is mainly used to configure controls, including:
-
Recipient Settings: Select different recipients to configure controls for each;
-
Control Settings Panel: Configure required controls and seal placement positions for recipients;
-
Document Preview Area: Provides a preview of uploaded documents and allows control placement;
-
Document List Navigation Area: Browse and quickly navigate to corresponding documents.
Steps:
(1) Select Recipient: Click the recipient selection box in the upper-left corner to choose the recipient to configure.
(2) Set Recipient Controls: Drag controls from the left control panel to the corresponding positions in the document.
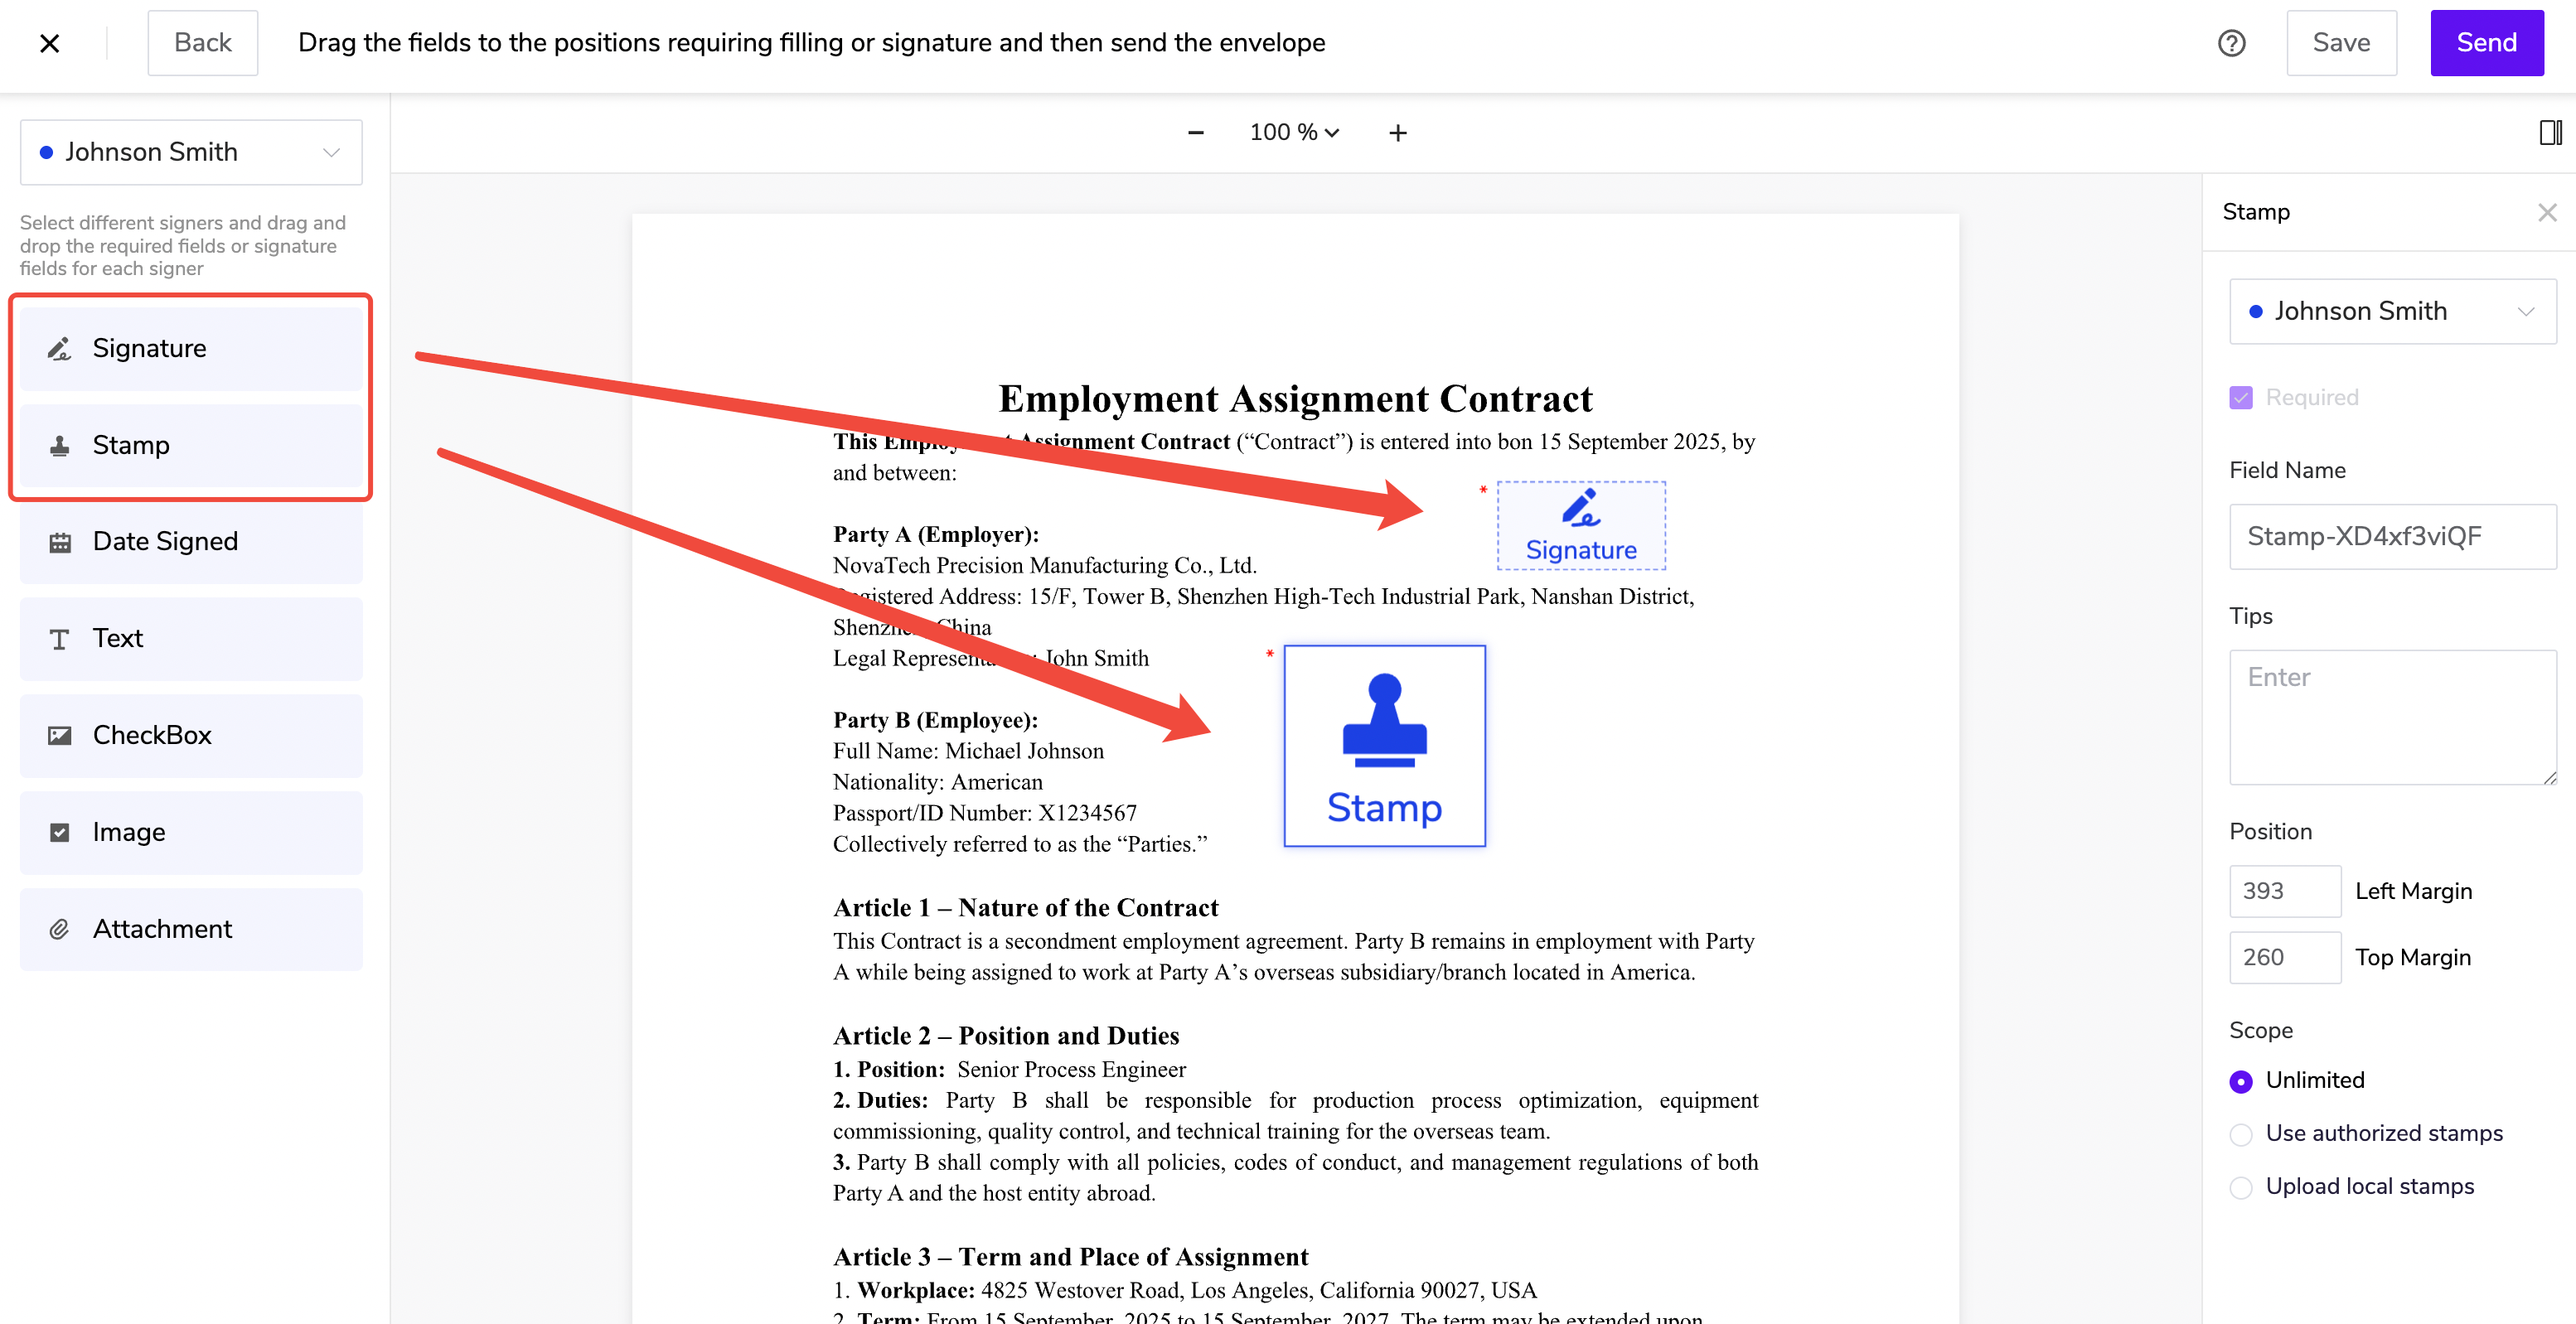
Nota Sign provides two types of controls: Signing Controls: Signature, Seal, Signing Date; Fill-in Controls: Text, Checkbox, Image, Attachment;
When using the Text Fill-in Control, the designated recipient must complete this control before the signing process can continue. Please ensure each recipient completes all required controls to avoid delays in the overall signing process.
(3) After clicking a control, you can configure properties on the right side:
- Assigned Recipient: Specify who needs to fill in this control;
- Required: Set whether it is mandatory;
- Control Name: Helps identify the control content;
- Tooltip: Set instructional guidance text;
- Default Content: Set pre-filled text content;
- Font Style: Supports bold, italic, underline;
- Font Type and Size: Supports multiple fonts and sizes (12px–28px).
8. Send the signing envelope
After completing control settings, click [Send] in the upper-right corner to send the envelope.
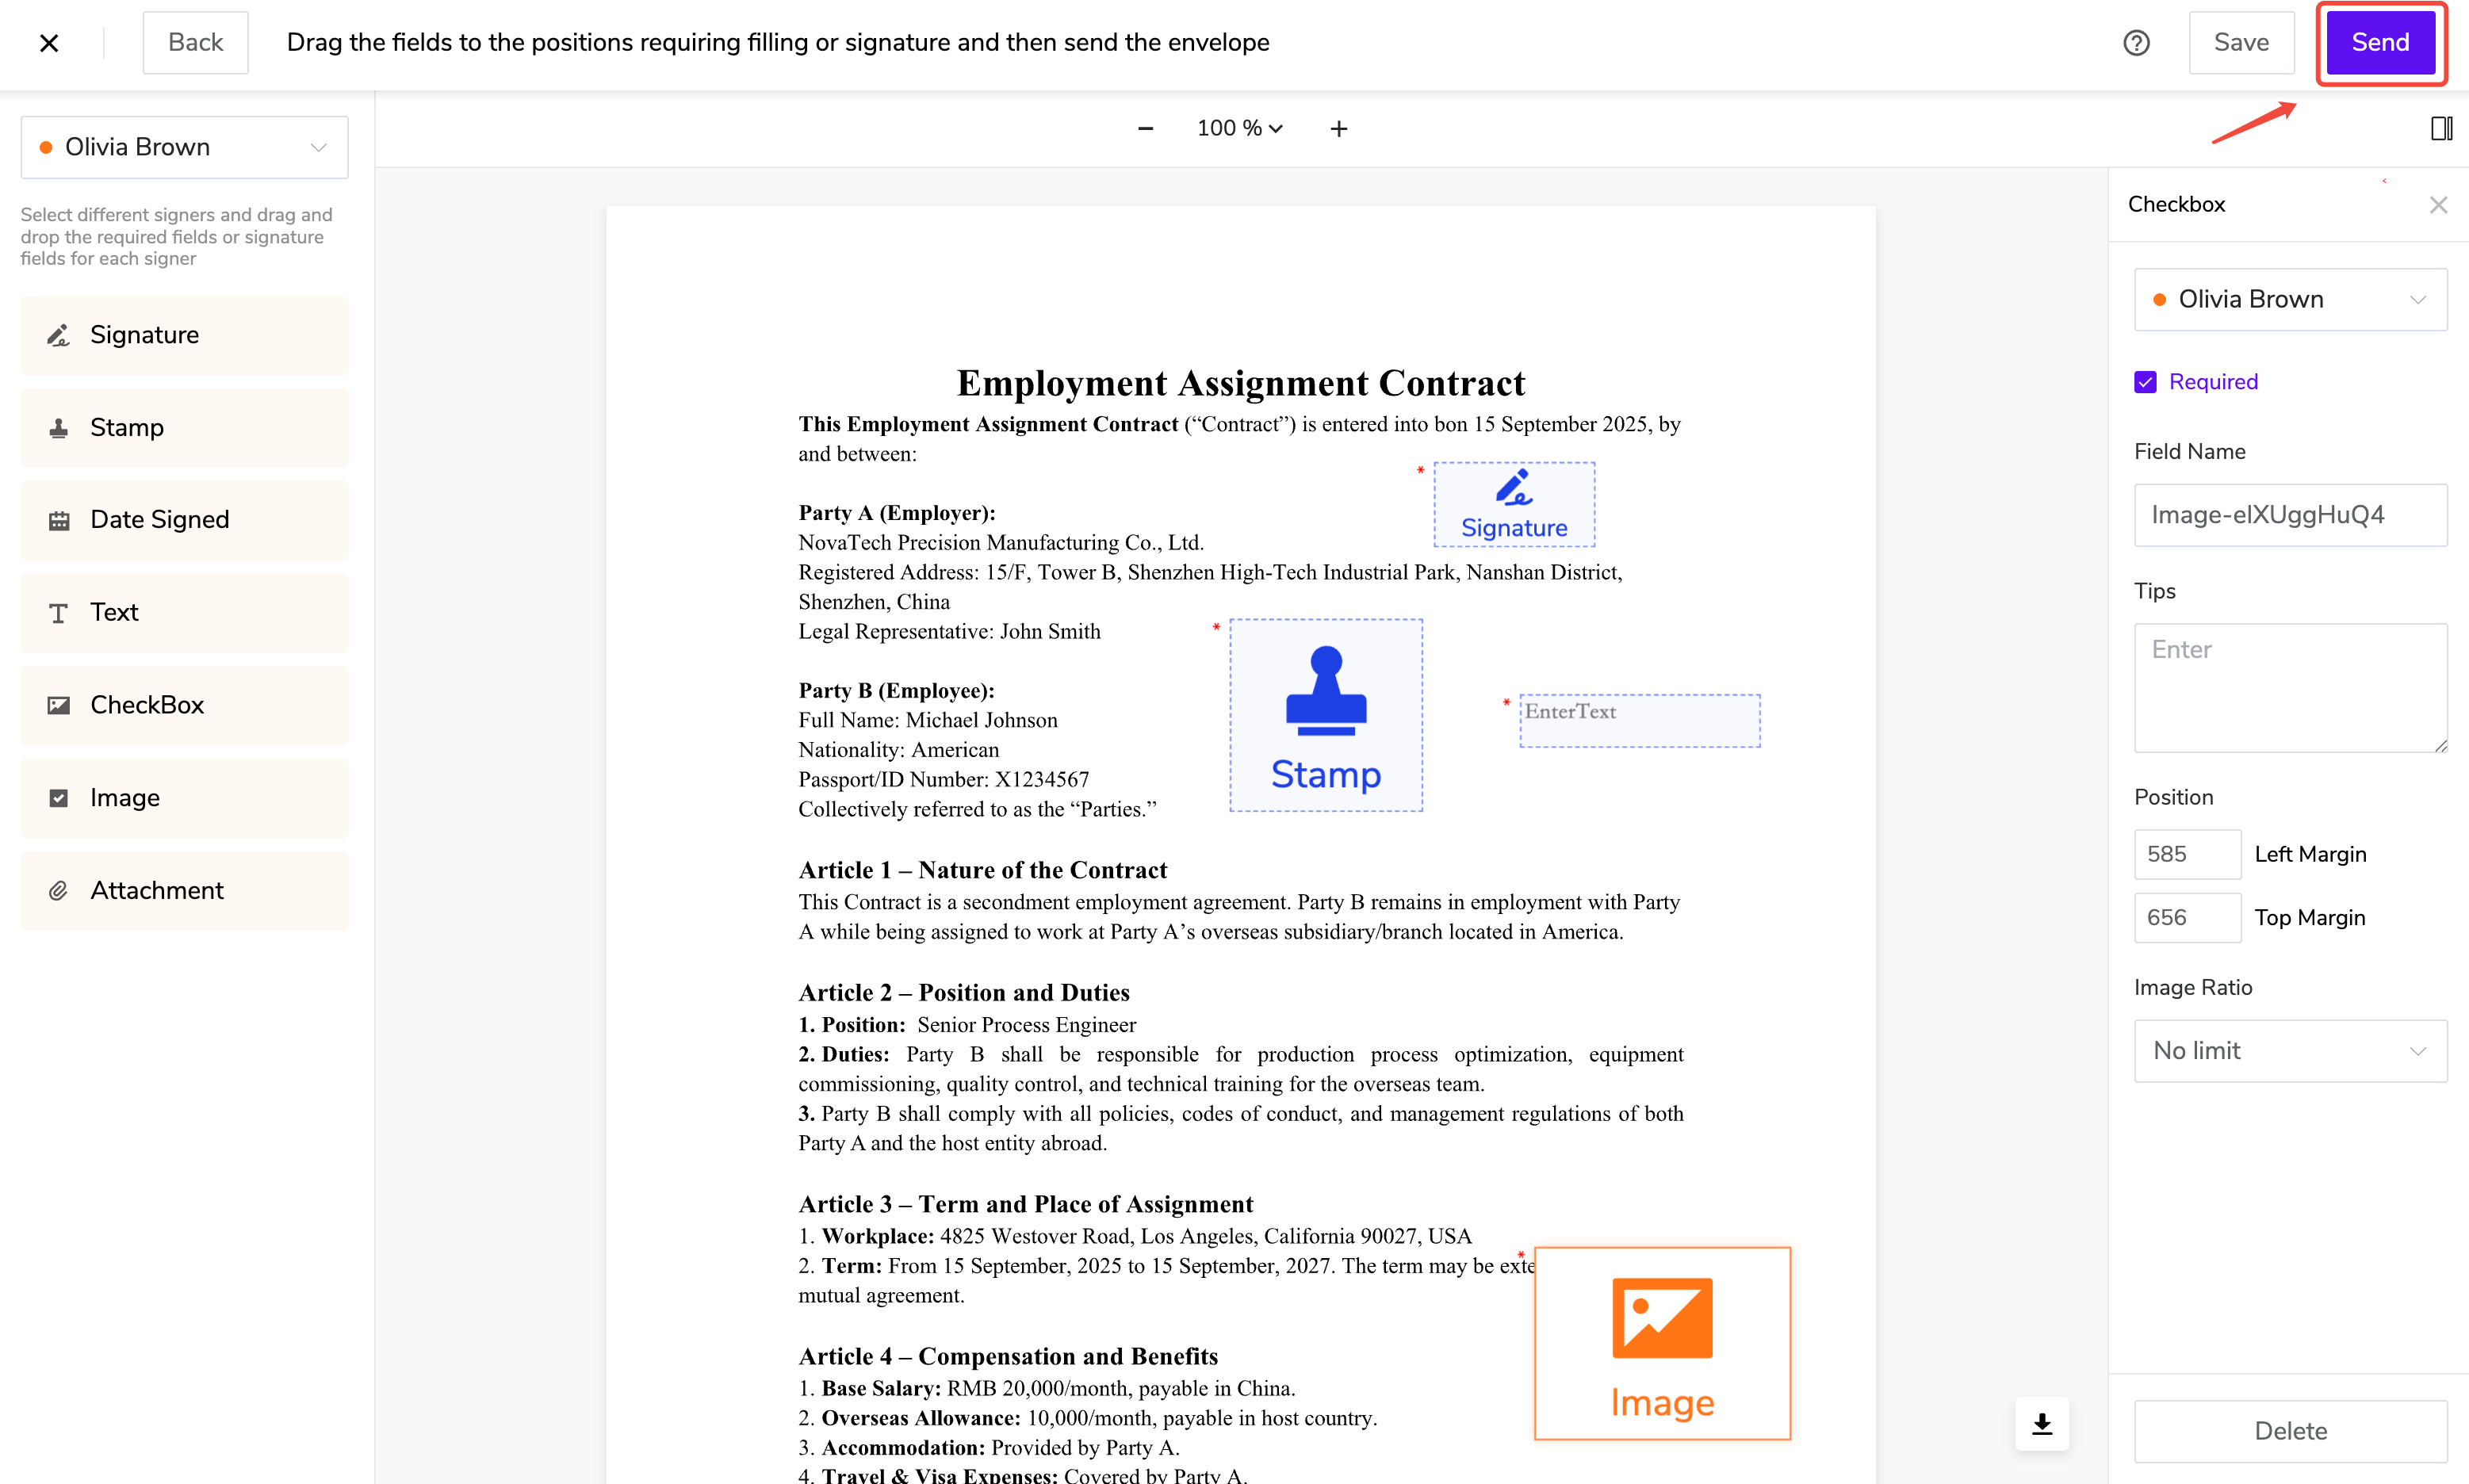
Recipients will receive a signing email or SMS from the system. Click the link to access the document for signing.
Once successfully sent, one envelope quota will be deducted.
II. Adding Digital Signature Identity Verification
When recipients need to use Digi-Sign ID-One to complete a digital signature, the sender can enable digital signature identity verification for that recipient based on the administrator’s configuration. After enabling, recipients are required to complete Nota Sign identity verification before submitting the digital signature. Only after passing the verification can they proceed with CA verification and the digital signature.
Whether the sender is allowed to adjust this setting must first be configured by the administrator in [Manage] - [Send Settings].
1. When can this be set?
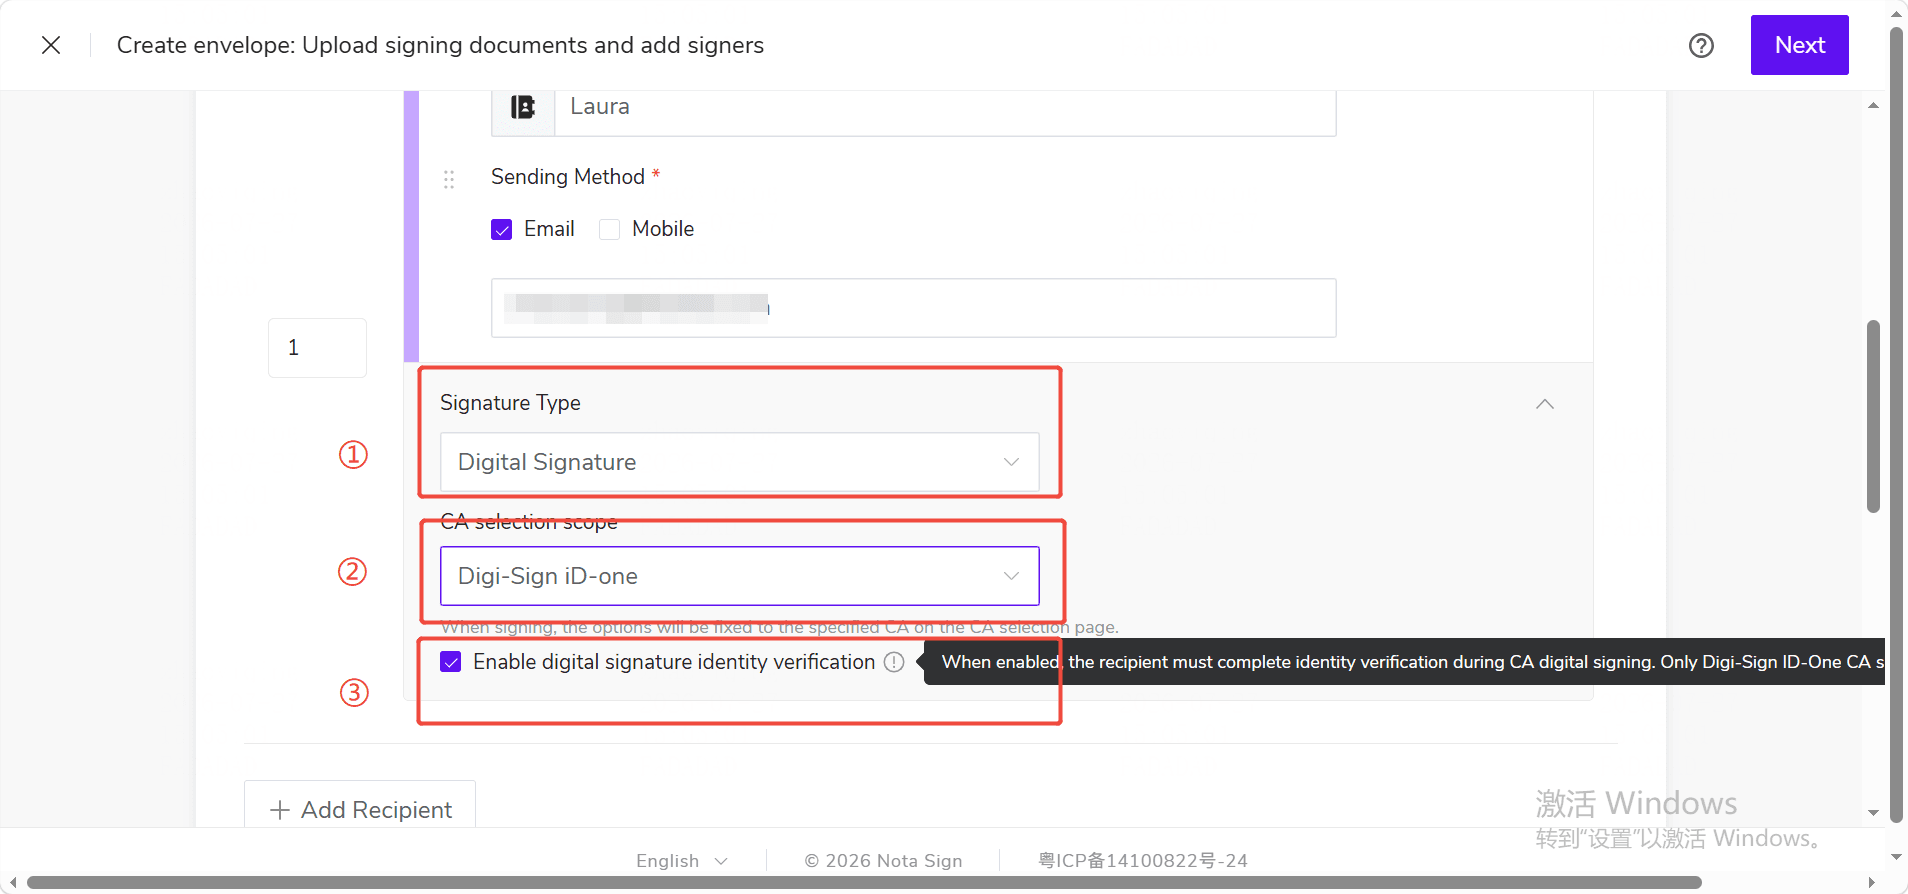
The [Enable Digital Signature Identity Verification] option will only appear when all of the following conditions are met:
* The recipient’s signing type is [Digital Signature];
* The CA selection scope is [Specify CA];
* The specified CA is [Digi-Sign ID-One];
* The administrator allows senders to adjust this setting when sending envelopes.
If the option does not appear on the page, it means the current recipient or workspace does not yet meet the configuration conditions, and the system will follow the existing digital signature process.
2. How to enable Digital Signature Identity Verification?
(1) Click [Sign] - [Initiate] to enter the Initiate Envelope page;
(2) Upload the documents to be signed and add recipient information;
(3) Set the recipient’s signing type to [Digital Signature];
(4) Select [Specify CA] in the CA selection scope;
(5) Select [Digi-Sign ID-One] as the specified CA;
(6) If [Enable Digital Signature Identity Verification] is displayed on the page, you can enable or disable it as needed;
(7) After completing the other envelope settings, click [Send].
3. What happens when the recipient signs?
If the recipient already holds a Digi-Sign ID-One certificate and digital signature identity verification is enabled:
(1) The recipient completes document filling and signing control operations, then clicks Submit;
(2) The system enters the digital signature process and checks the recipient’s Digi-Sign ID-One certificate status;
(3) The recipient must first complete Nota Sign identity verification;
(4) After identity verification is passed, the system proceeds to the CA OTP verification process;
(5) After OTP verification is passed, the digital signature is complete.
If the recipient does not hold a Digi-Sign ID-One certificate, the existing certificate application and OTP process will be used, and Nota Sign identity verification will not be triggered.
4. Important Notes
- When there are multiple recipients, each recipient’s digital signature identity verification settings are independent;
- If the administrator does not allow senders to adjust, senders cannot modify this setting on the sending page;
- If the recipient ultimately does not choose the Digi-Sign ID-One digital signature service, the Nota Sign identity verification will not be triggered;
- If identity verification fails, the recipient can re-verify according to the on-screen prompts. If they are unable to proceed, they may contact the sender for assistance.