
This document provides a detailed overview of all control types available in Nota Sign and their use cases. Controls are the core elements of the signing process. Senders drag and drop controls onto documents to specify the actions recipients need to complete (signing, filling in information, stamping, etc.).
I. Control Overview
Nota Sign provides two main categories of controls:
- Signing Controls: Signature, Seal, Signing Date, Freehand Drawing;
- Fill-in Controls: Text, Checkbox, Image, Attachment.
Additionally, there are special controls: Electronic Seal Control, Stamp Duty Control.
1. Common Control Properties
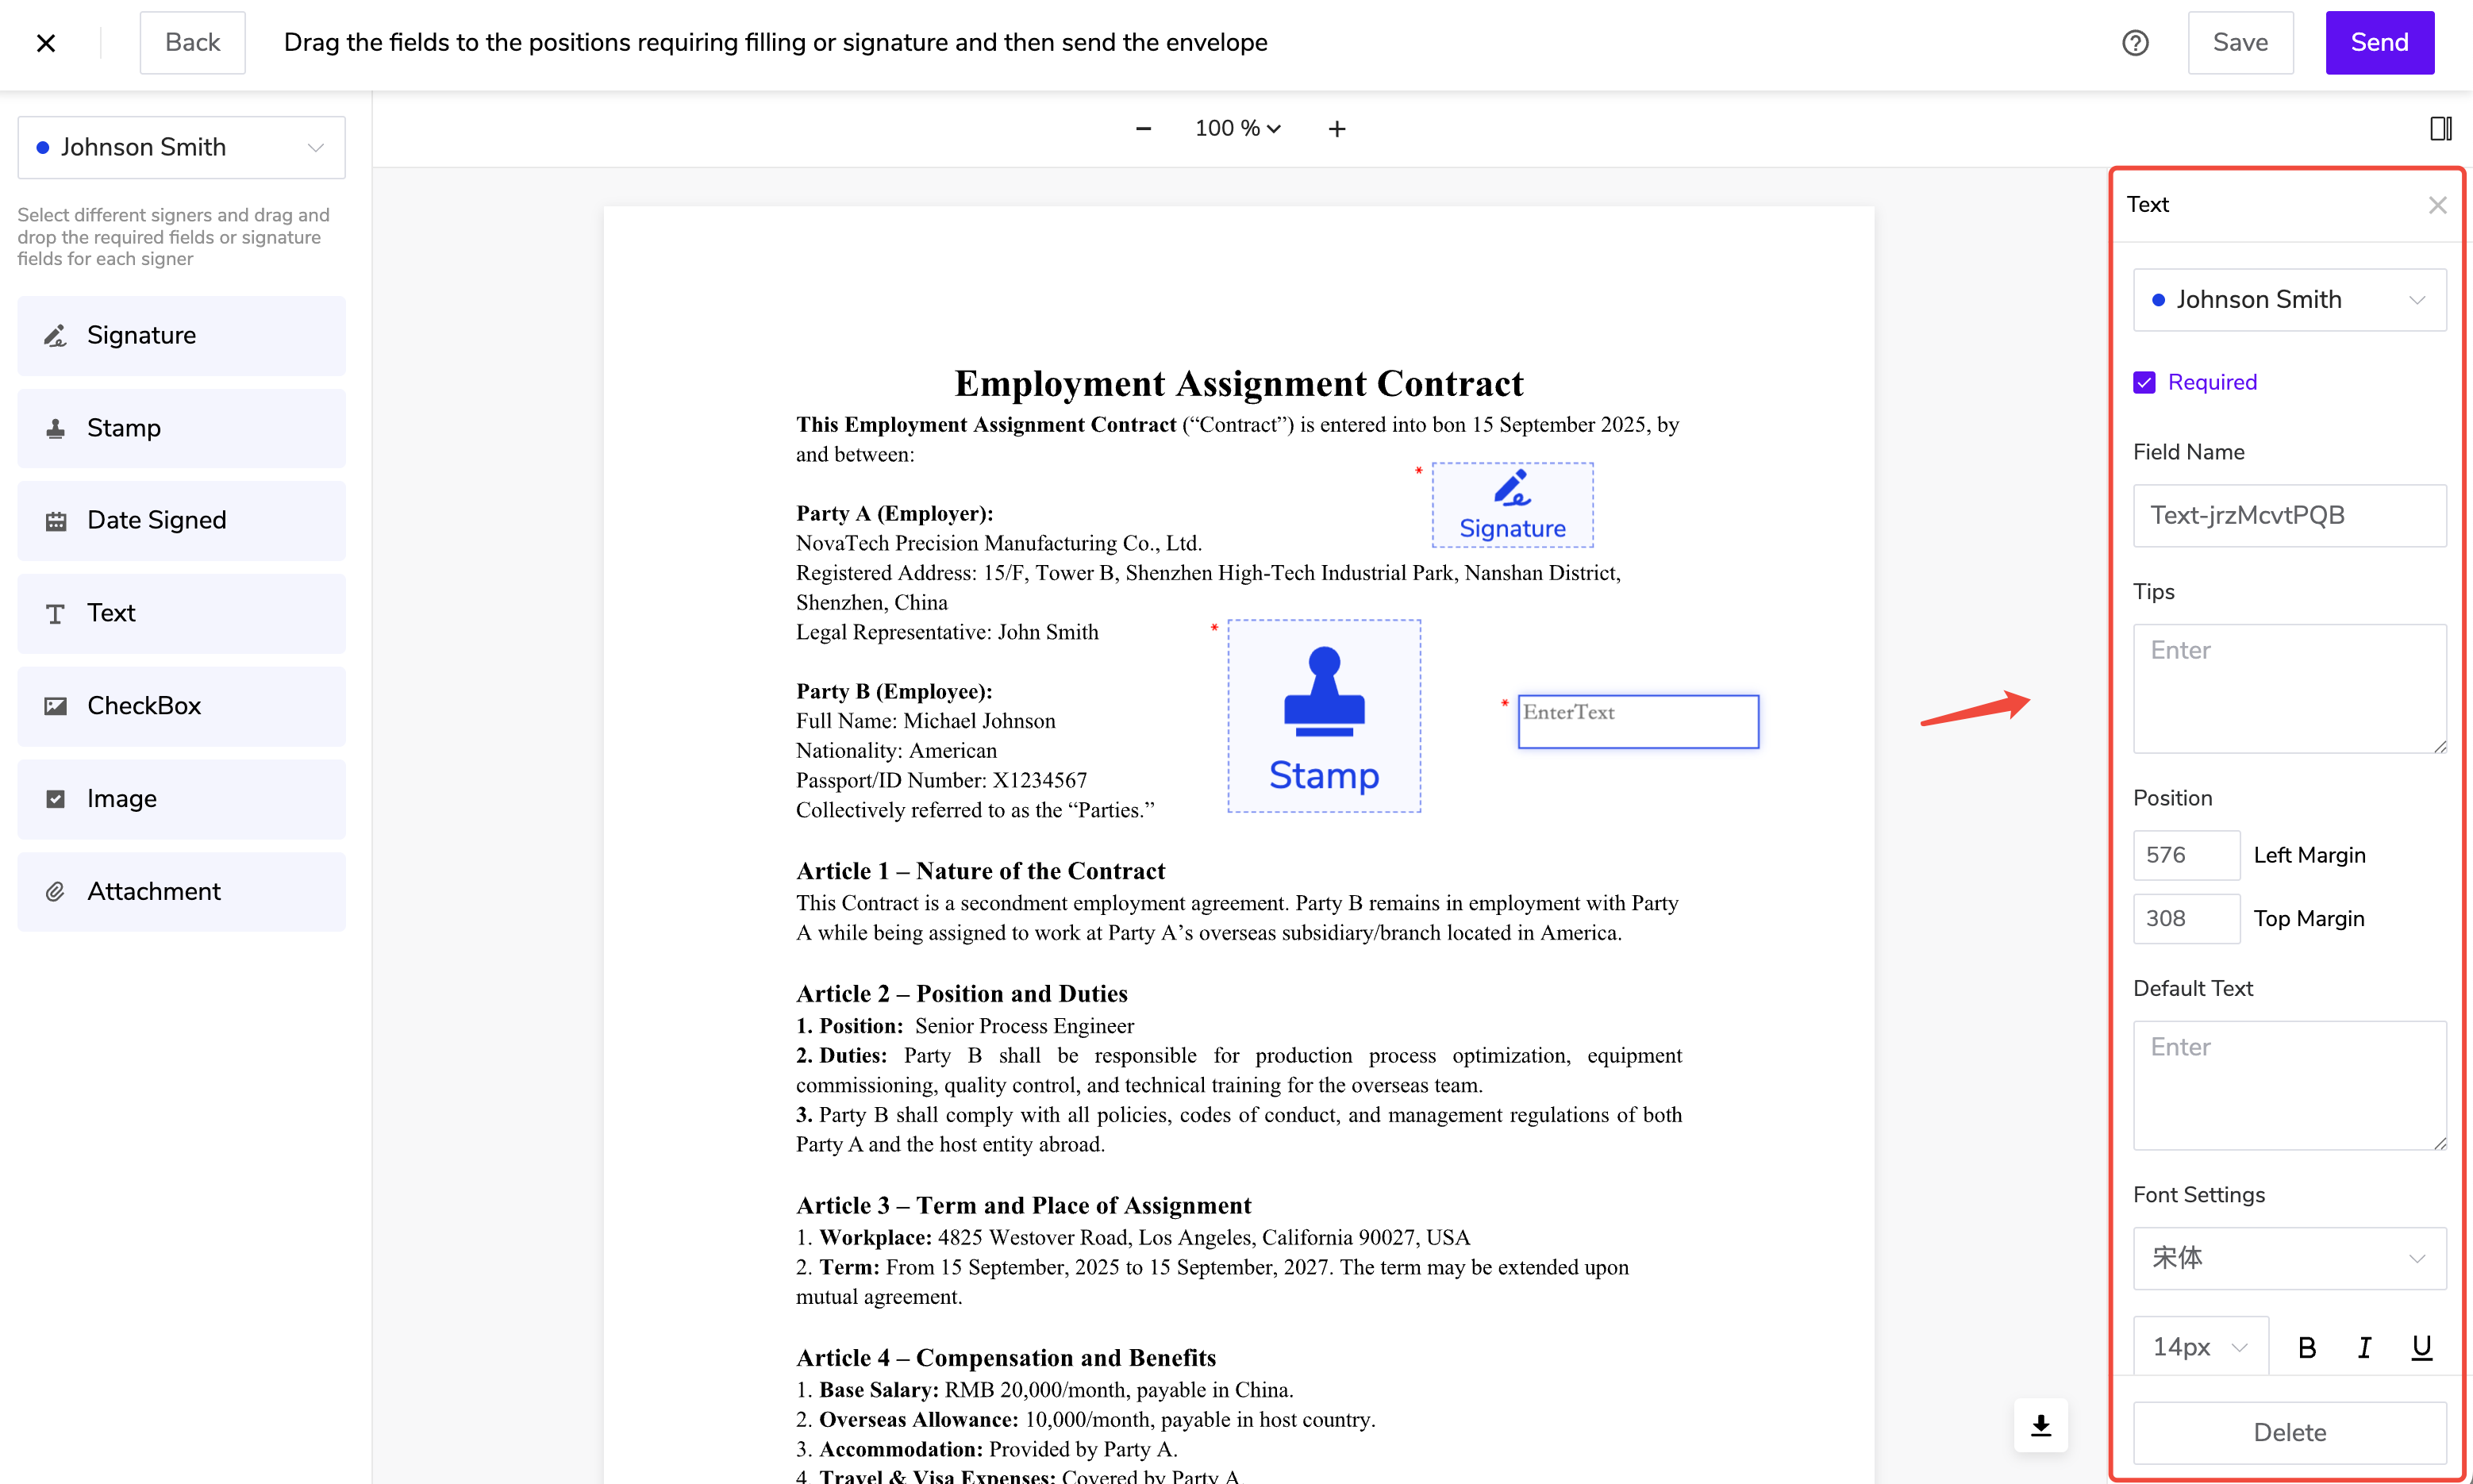
After clicking a control, you can configure properties on the right side:
- Assigned Recipient: Specify who needs to fill in this control;
- Required: Set whether it is mandatory;
- Control Name: Helps identify the control content;
- Tooltip: Set instructional guidance text;
- Default Content: Set pre-filled text content;
- Font Style: Supports bold, italic, underline;
- Font Type and Size: Supports multiple fonts and sizes (12px–28px).
2. Control Settings Interface
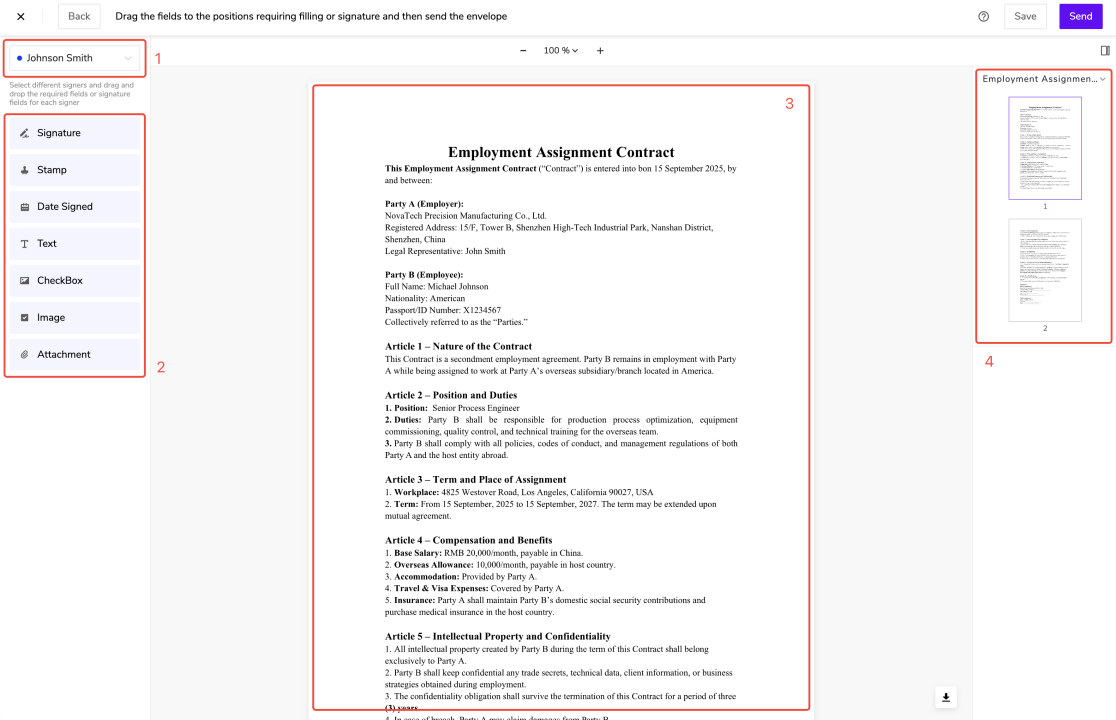
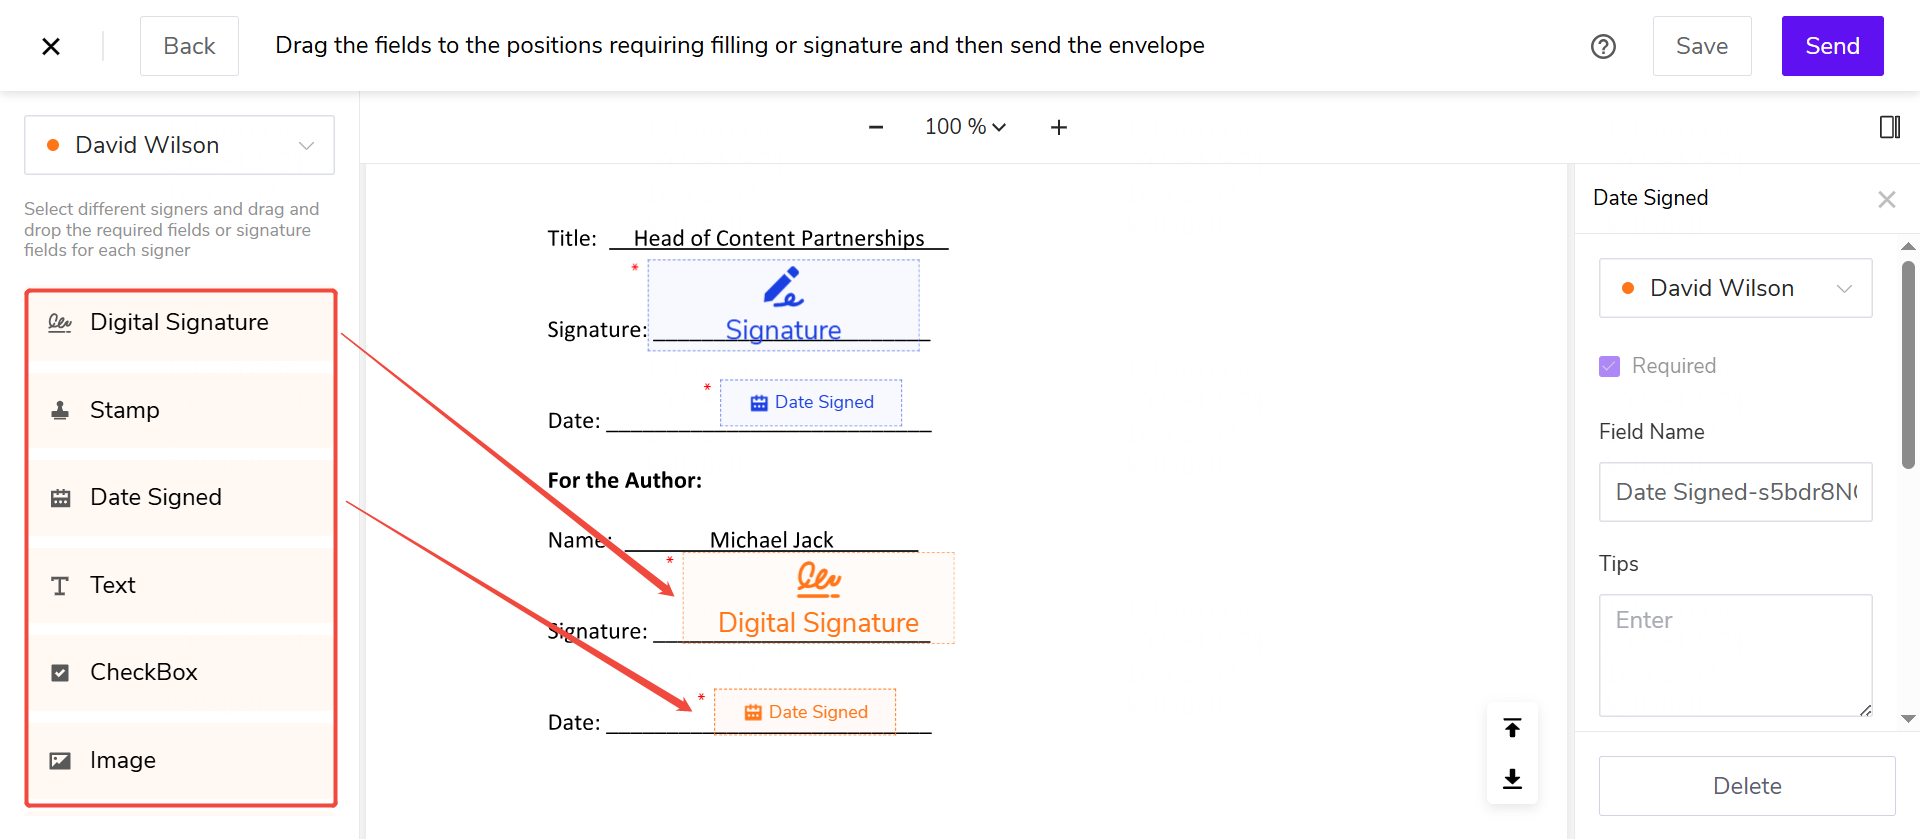
The signing settings page is mainly used to configure controls, including:
(1) Recipient Settings: Select different recipients to configure controls for each; (2) Control Settings Panel: Configure required controls and seal placement positions for recipients; (3) Document Preview Area: Provides a preview of uploaded documents and allows control placement; (4) Document List Navigation Area: Browse and quickly navigate to corresponding documents.
II. Signing Controls
1. Signature Control
Clicking the signature control provides multiple signature methods: Default Signature Style, Draw Signature, Upload Signature Image.
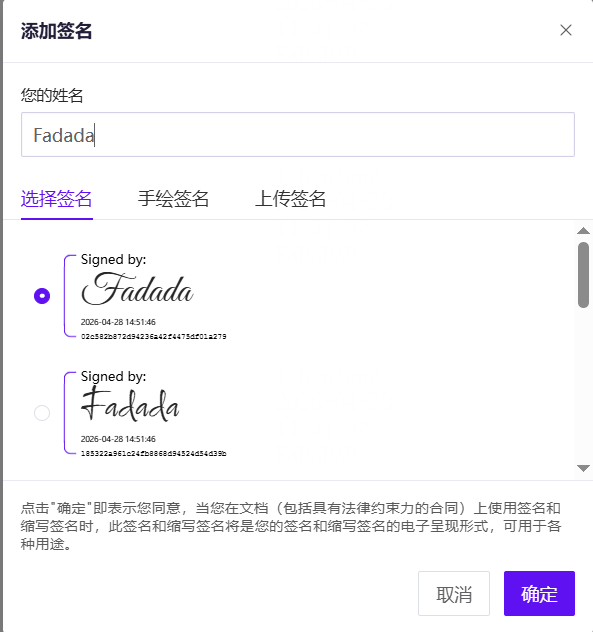
Use Case: Used for recipient signing confirmation; it is the most basic signing control.
If the signer is designated as Electronic_Signature, only Electronic_Signature controls can be placed.
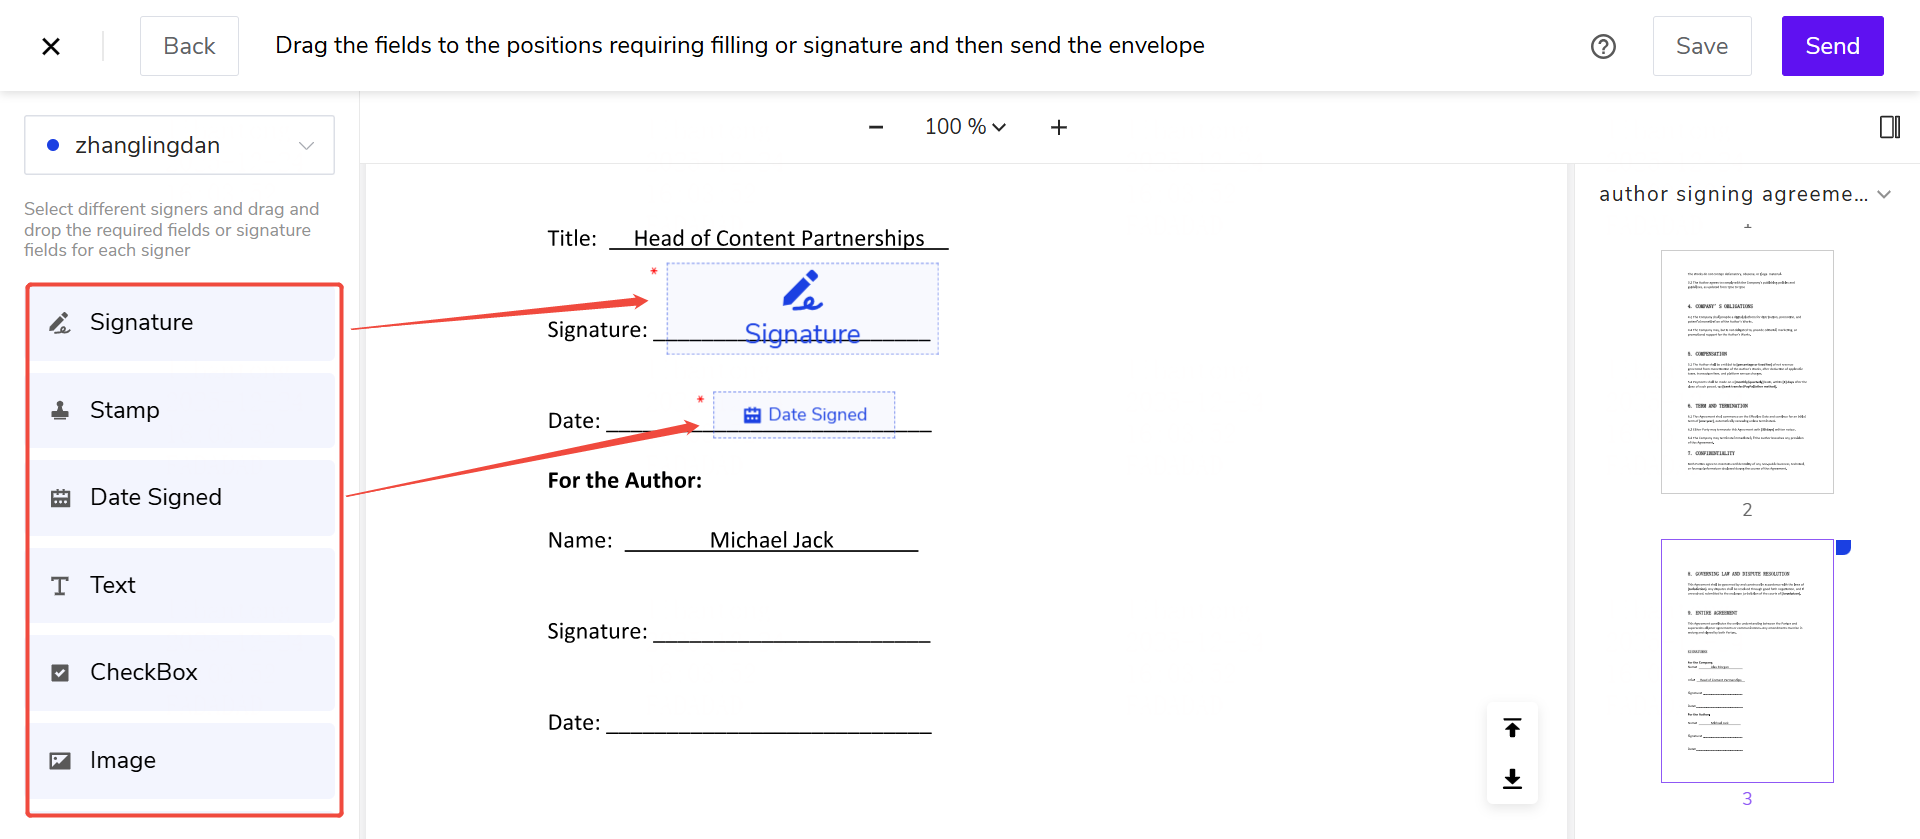
If the signer is designated as Digital Signature, only digital signature controls can be placed. A CA selection pop-up will appear after submission.
The system only displays the signature fields and form fields preset by the sender. Recipients cannot manually add new controls and can only complete filling and signing at designated positions.
> For recipients with both filling and signing tasks, a single submission completes all items at that node. Please review all required fields before submission to ensure the signing process proceeds smoothly.
2. Date Control
(1) When the sender presets a “Date Control” for the recipient, the system will automatically fill in the current date when the recipient enters the signing page.
Use Case: Used to automatically populate the signing date in documents without manual entry.
(2) The following date formats are currently supported:
| Date Format | Example |
|---|---|
| YYYY-MM-DD | 2026-08-04 |
| YYYY/MM/DD | 2026/08/04 |
| MM/DD/YYYY | 08/04/2026 |
| DD/MM/YYYY | 04/08/2026 |
| DD-MM-YYYY | 04-08-2026 |
| DD-MMM-YYYY | 04-Aug-2026 |
Where:
- YYYY represents the four-digit year;
- MM represents the two-digit month;
- MMM represents the abbreviated English month name;
- DD represents the two-digit day.
When the DD-MMM-YYYY format is selected, the month is fixed to use English abbreviations, including Jan, Feb, Mar, Apr, May, Jun, Jul, Aug, Sep, Oct, Nov, Dec, and does not change with the system or user’s language settings.
3. Seal Control
Used to affix a corporate or personal seal. Select an authorized seal or upload a compliant seal image.
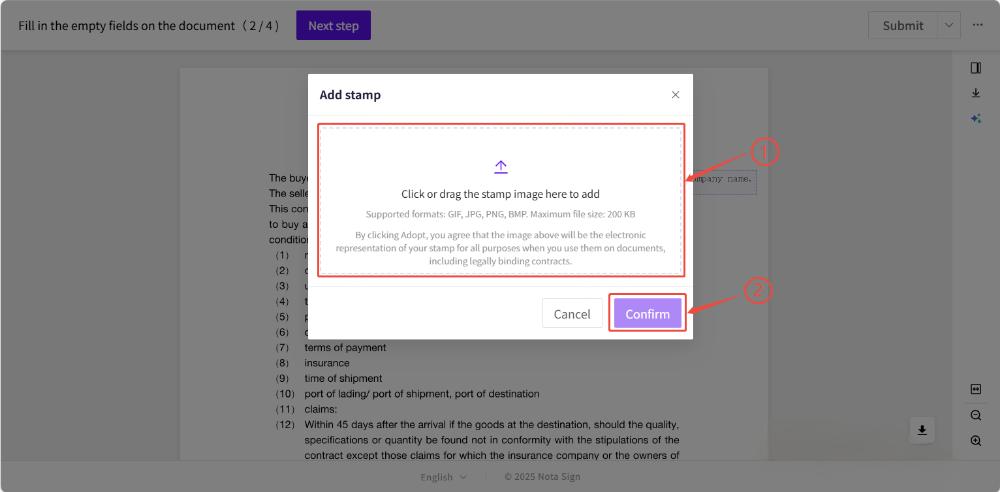
Configuration Steps:
Step 1: Enable Seal Control
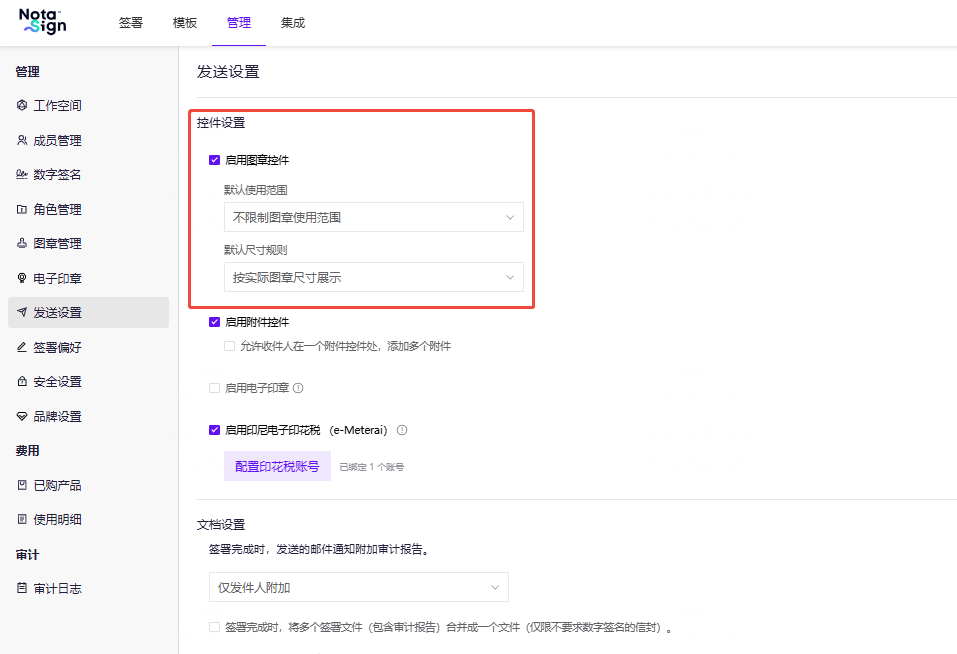
The sender must first enable the seal control in [Manage] - [Send Settings] and configure the following options:
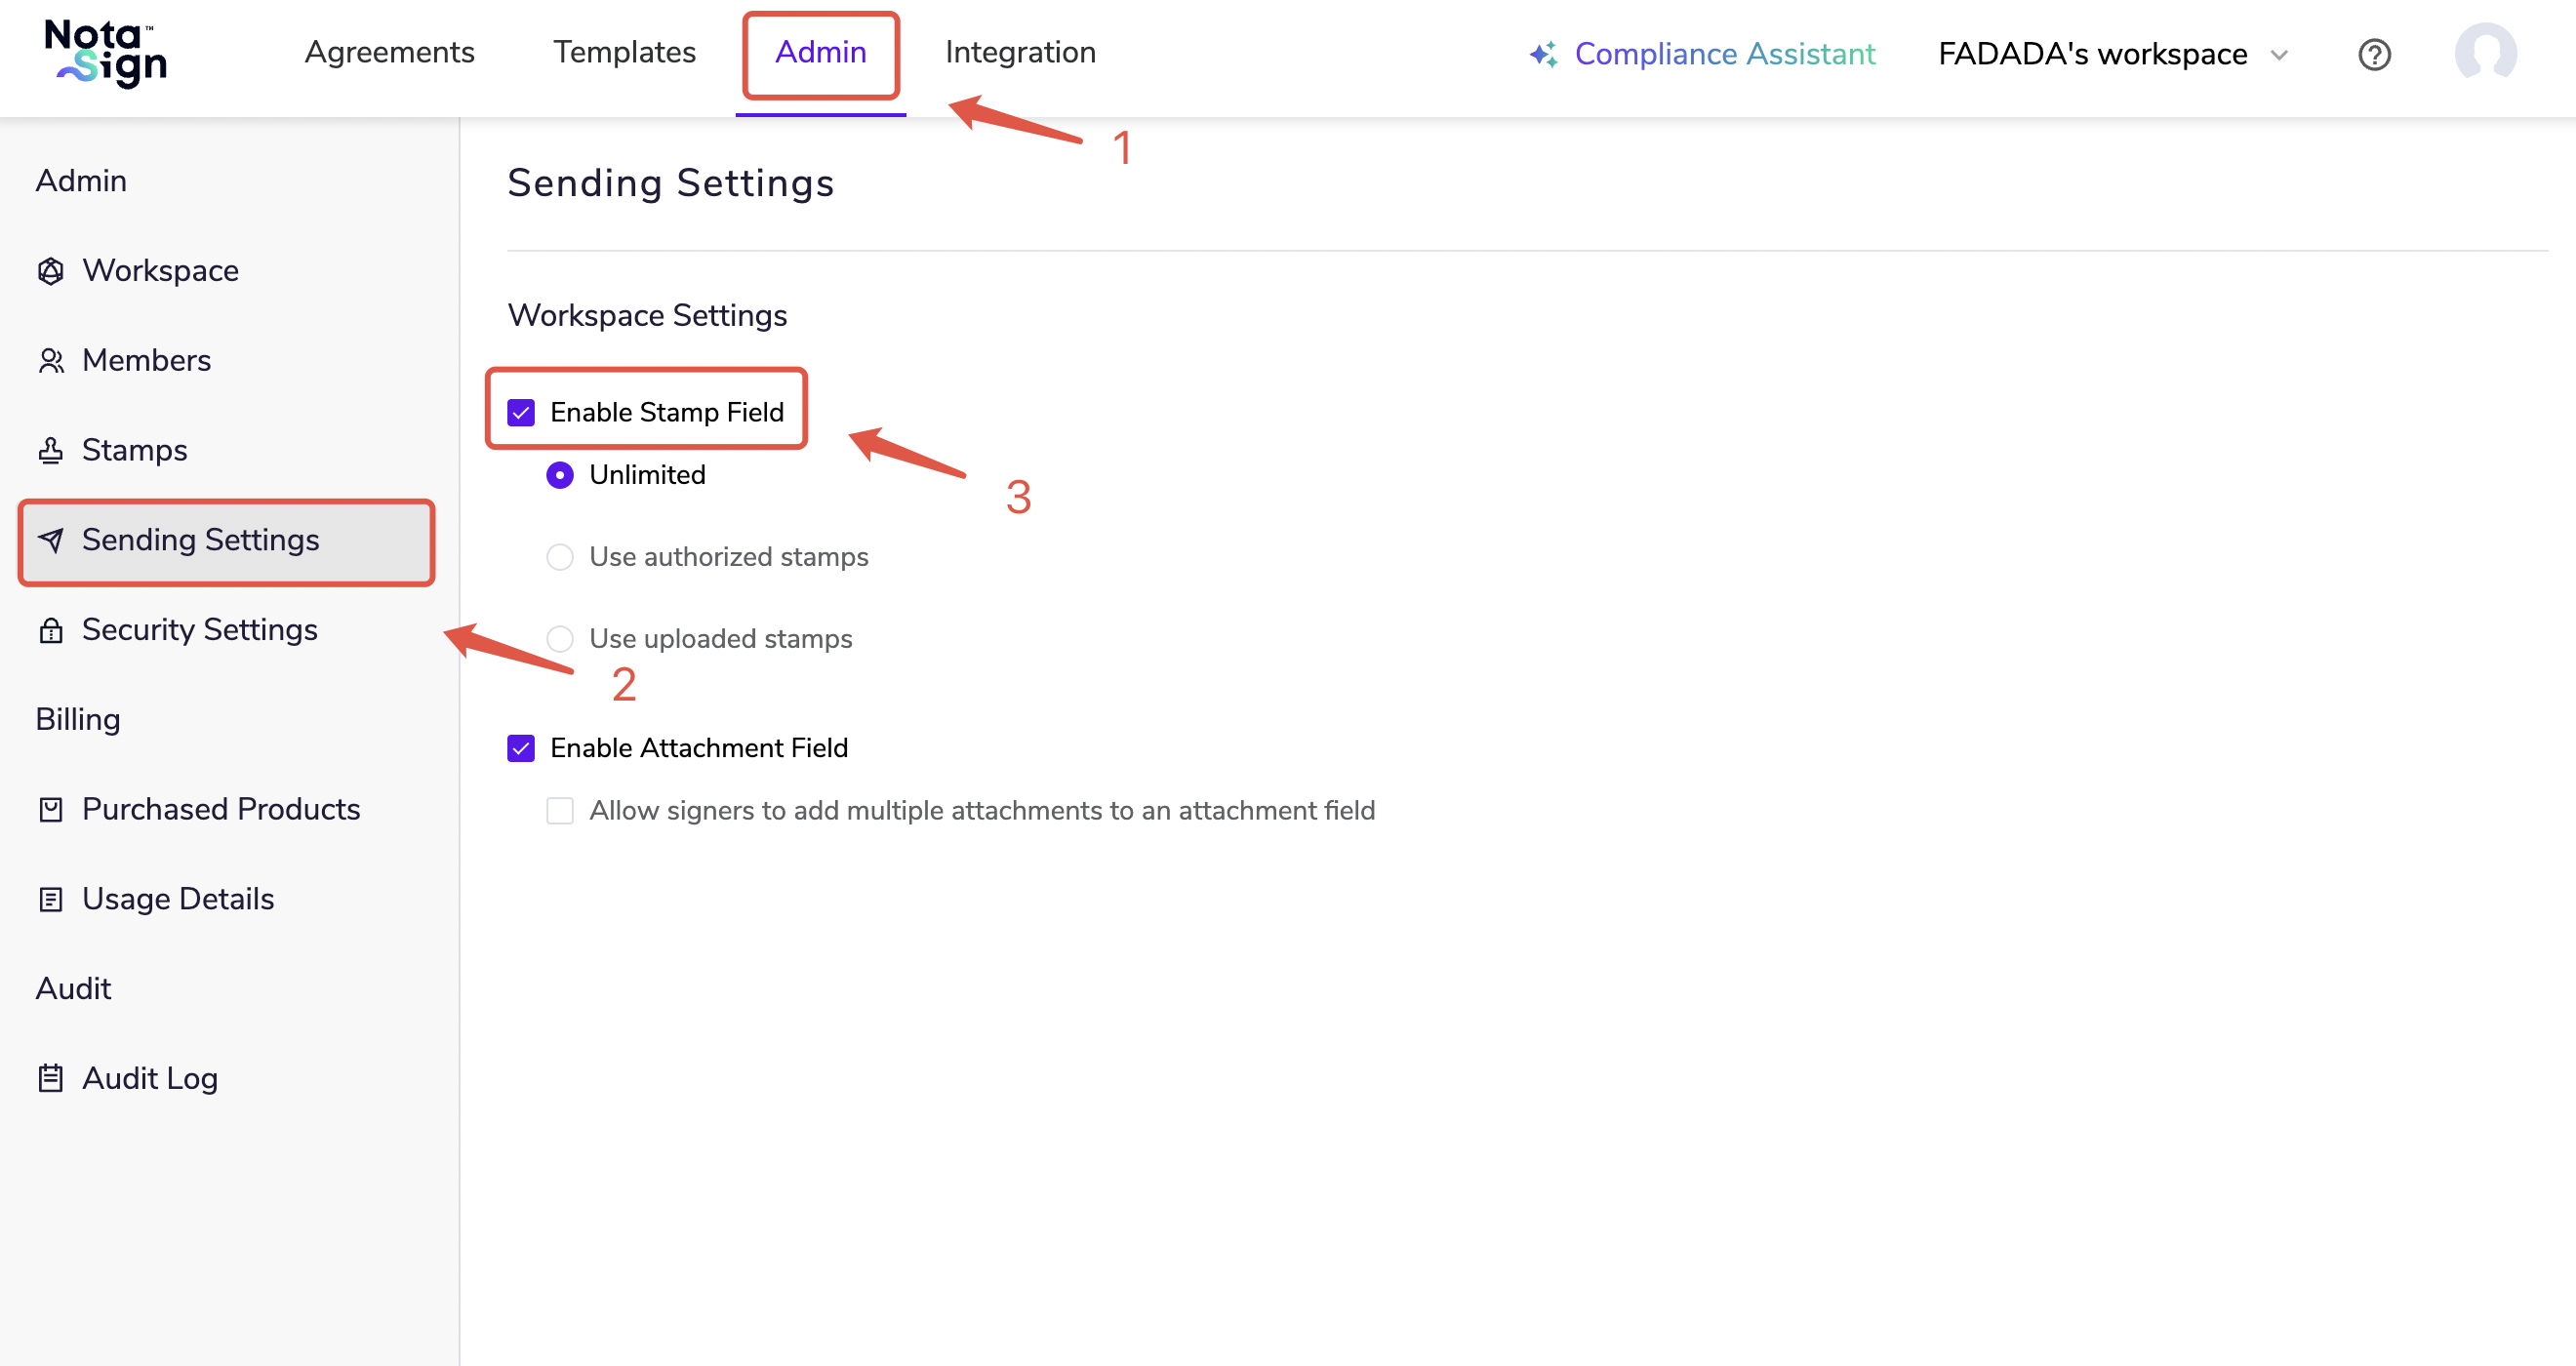
- Restrict Seal Usage Scope: Select from “No Restriction,” “Only Allow Authorized Seals,” or “Only Allow Uploaded Seals”;
- Default Size Rule: Select from “Display at Control Size” or “Display at Actual Seal Size” (defaults to “Display at Control Size”).
💡 Note: For SES envelopes, both size options are supported; for AES/Singpass envelopes, only “Display at Control Size” is supported.
Step 2: Configure Signing Preferences (Optional)
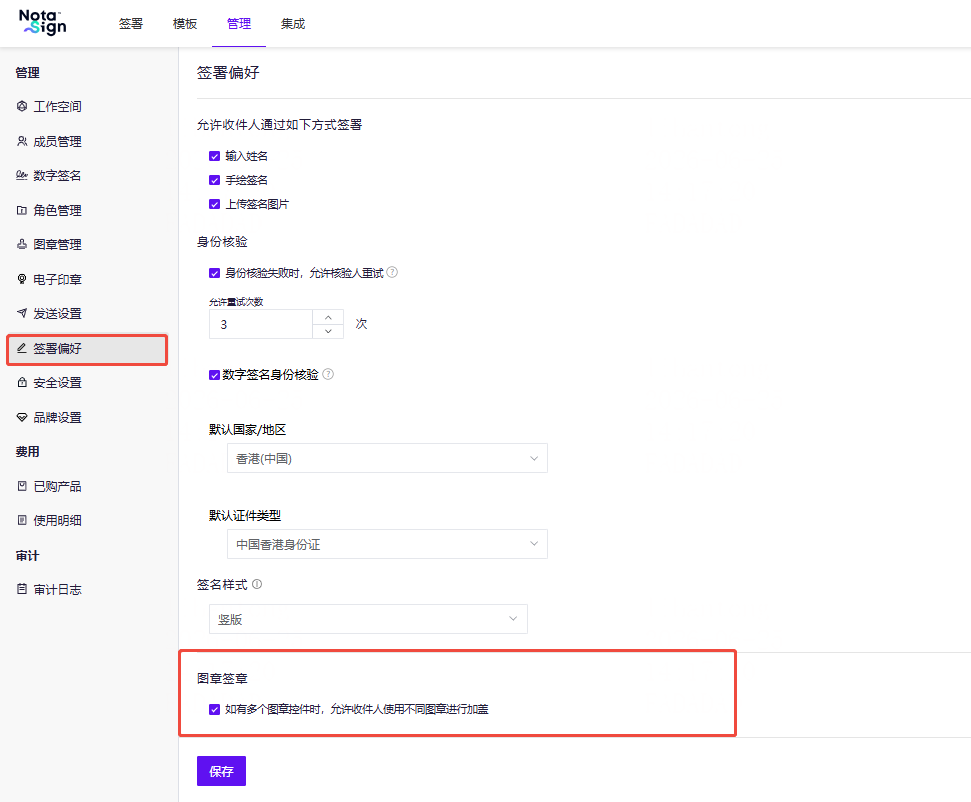
To allow recipients to switch between different seals during signing, senders can check [Allow recipients to use different seals for stamping] in [Manage] - [Signing Preferences].
- When checked: Recipients can click the seal control to open a seal selection pop-up and switch to a different seal;
- When unchecked: Recipients can only select or replace the current seal and cannot switch to a different seal.
Step 3: Place the Seal Control in the Envelope
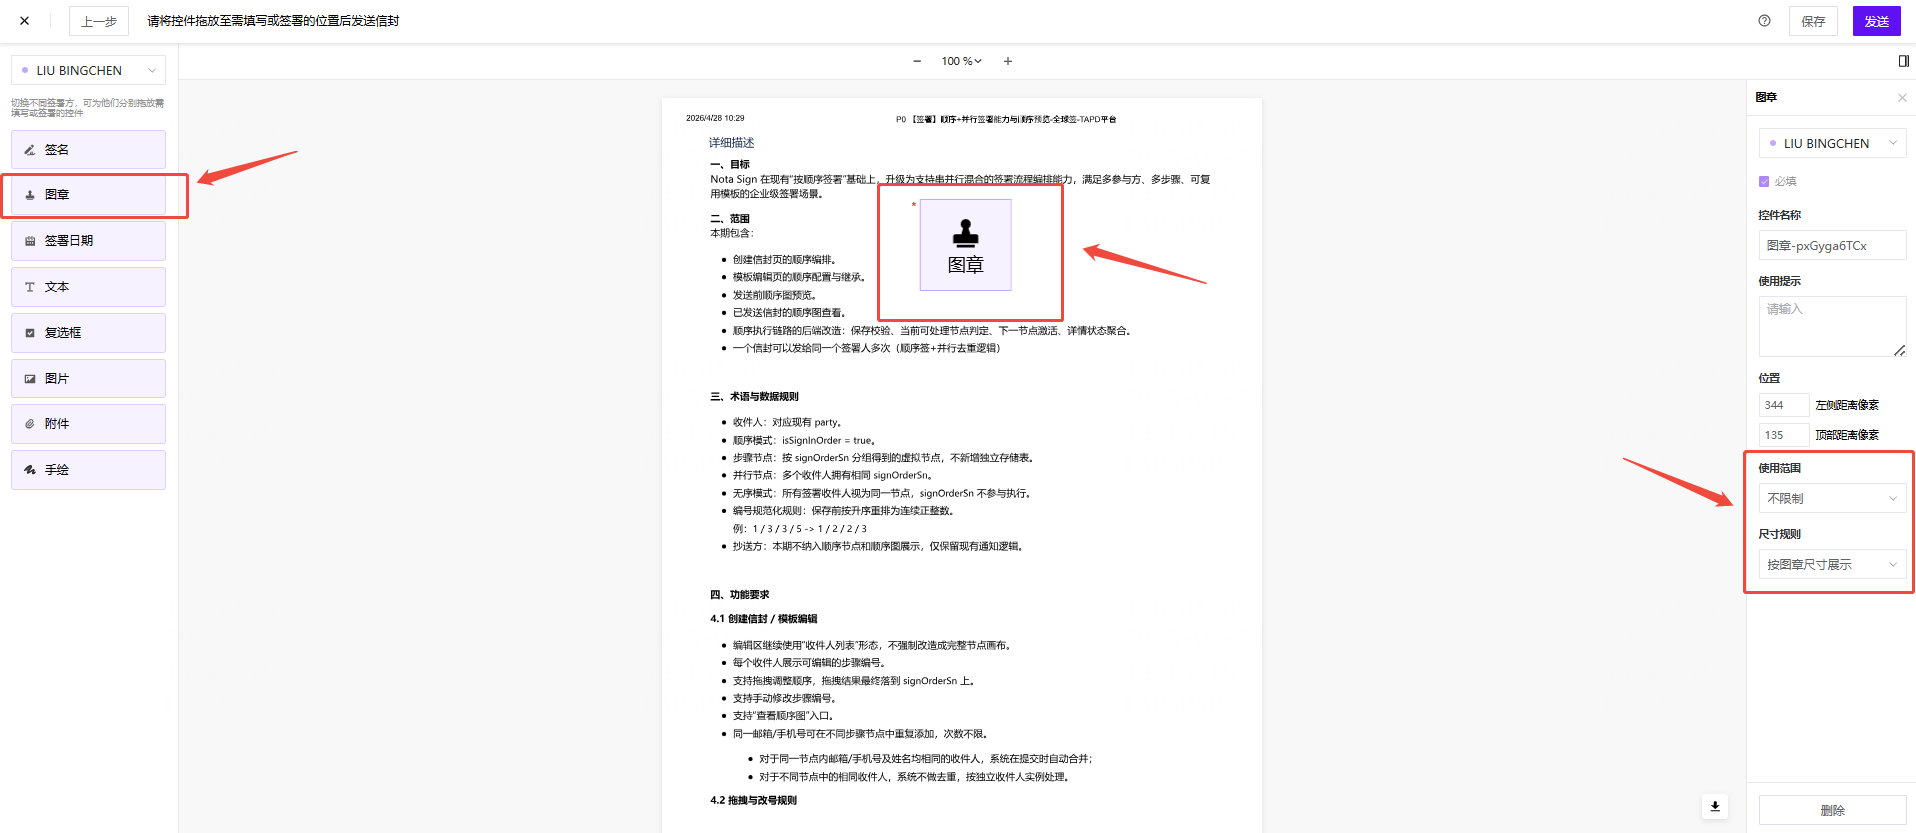
During envelope creation, drag [Seal] to the signing area and configure the following in the right-side settings panel:
- Scope of Use: Adjust seal usage permissions (No Restriction / Authorized Seals Only / Uploaded Seals Only);
- Size Rule: Select “Display at Control Size” or “Display at Actual Seal Size.” This will override the default value in sending settings.
Size Rule Effects:
| Size Rule | Effect |
|---|---|
| Display at Control Size | Seal scales proportionally to fill the control area (consistent with previous behavior) |
| Display at Actual Seal Size | Seal displays at the image’s original size; the seal image and control size may differ |
Use Case: Used for corporate or personal seal application. Supports both authorized seals and uploaded seals, with flexible control over seal size and switching permissions.
Signing with a Seal
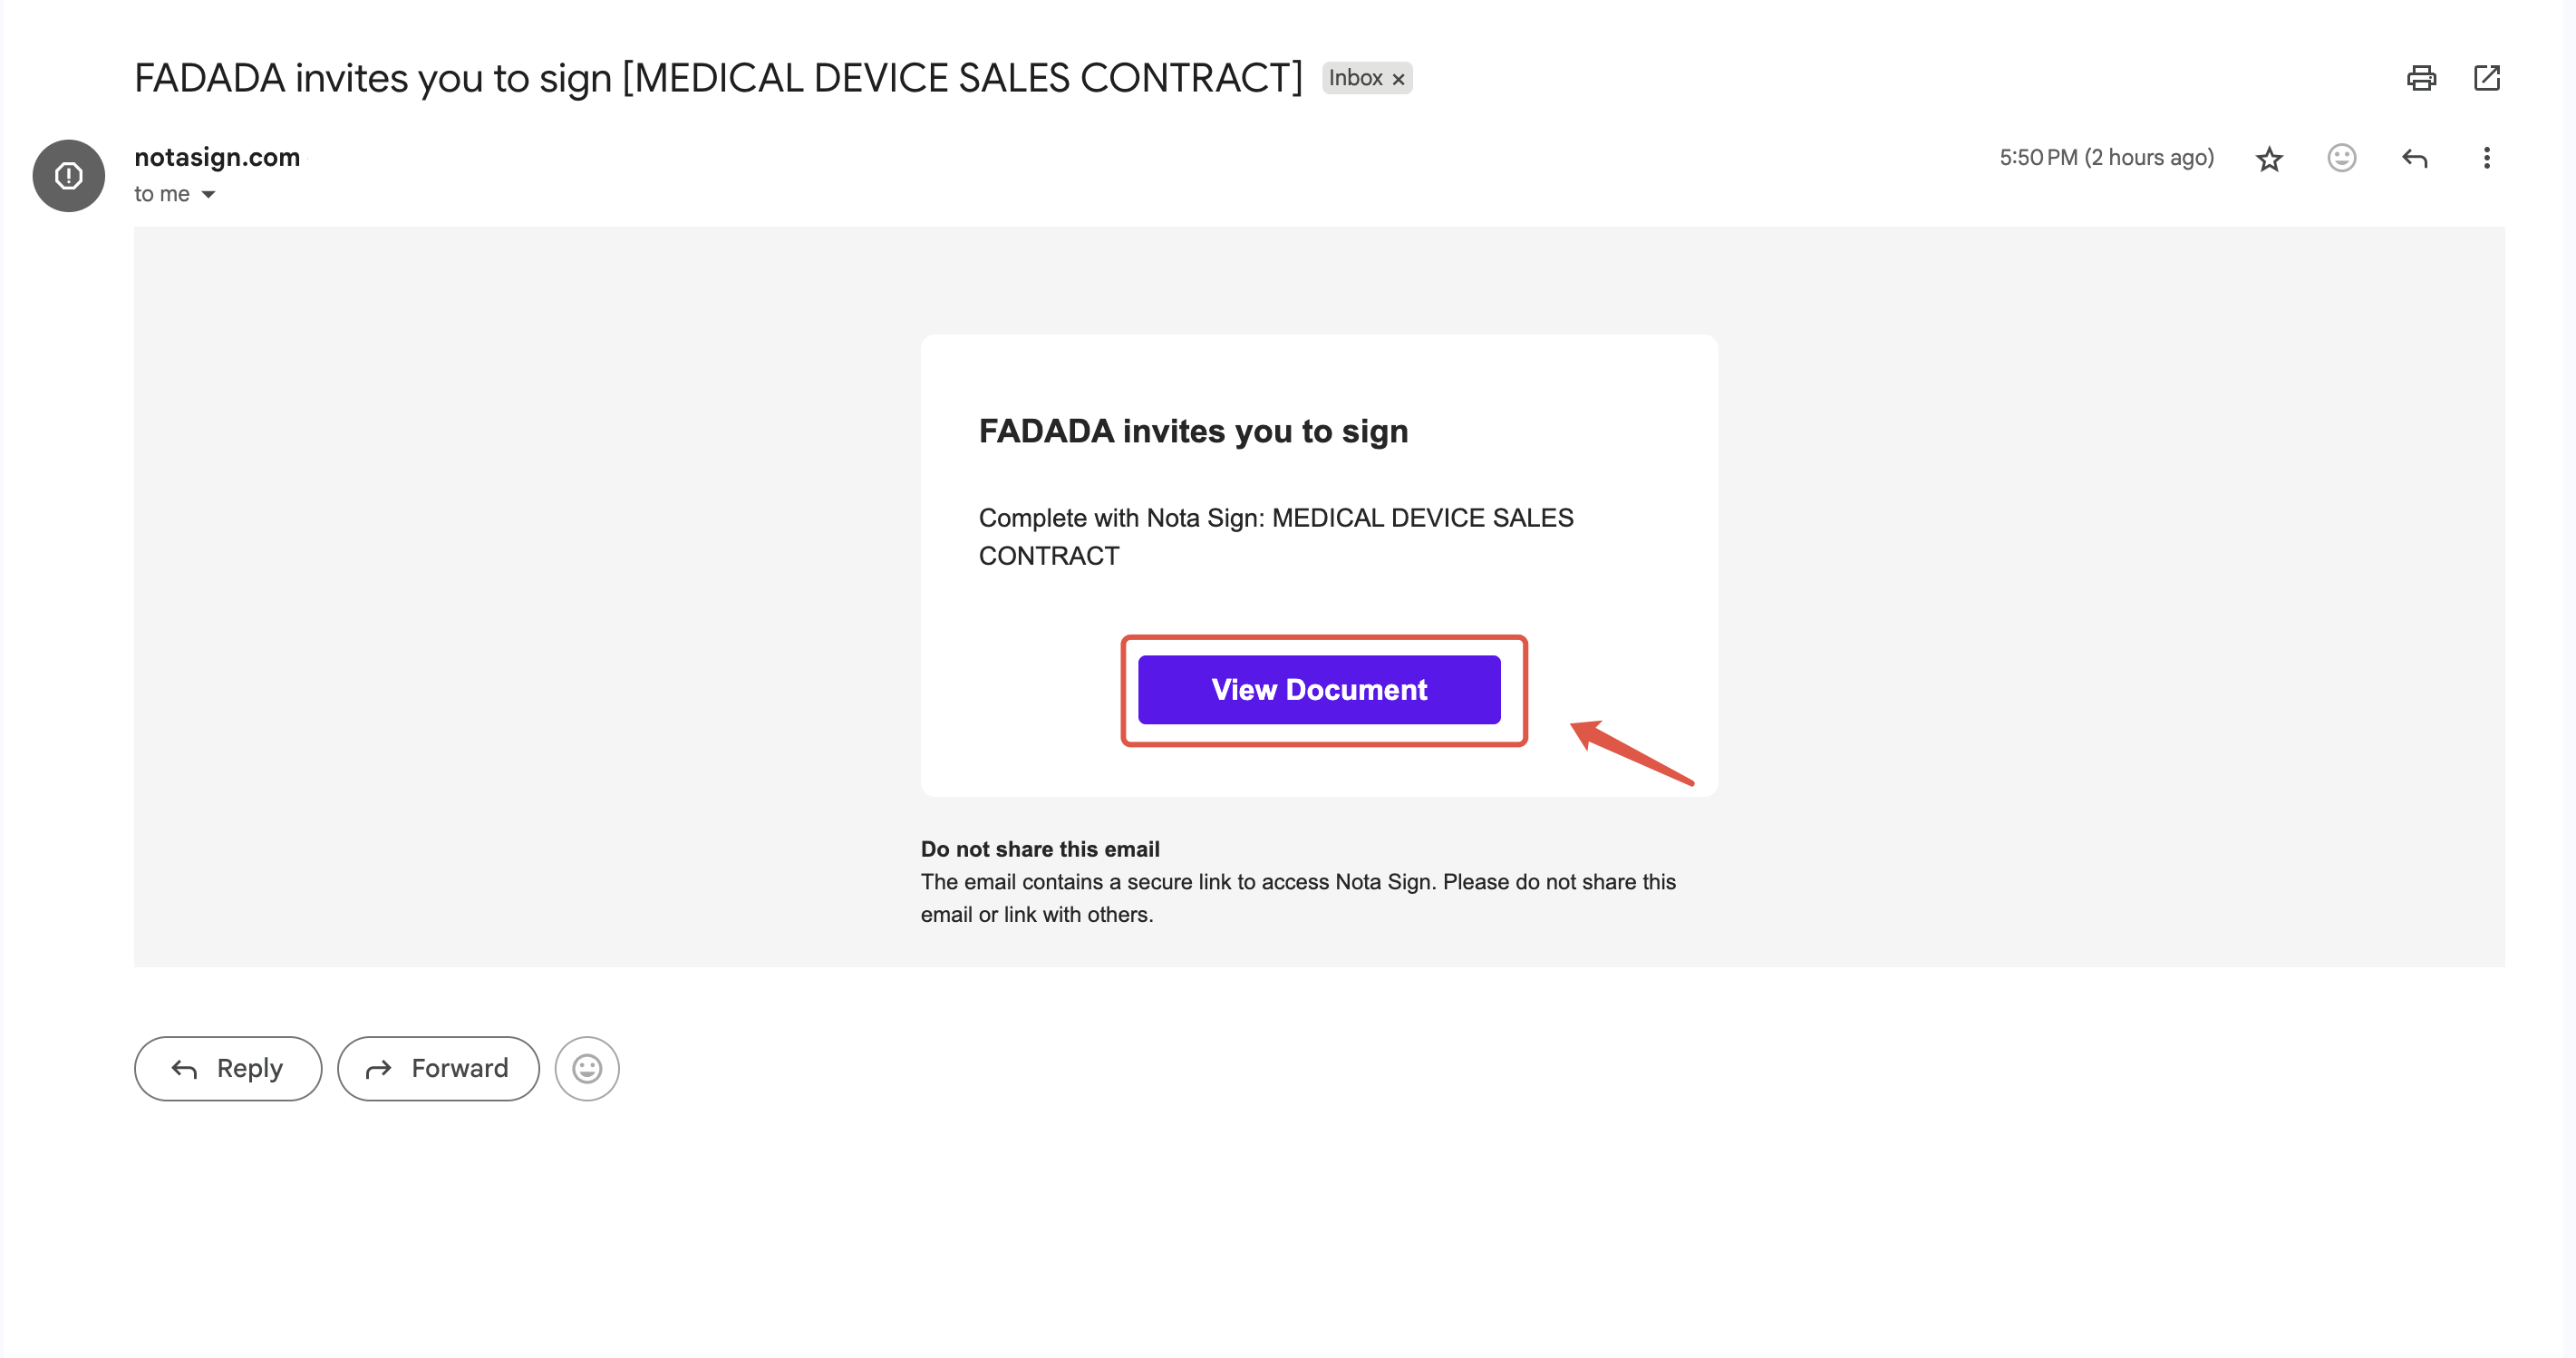
(1) Click [View Document] in the email to view the envelope.
(2) Select or upload a seal.
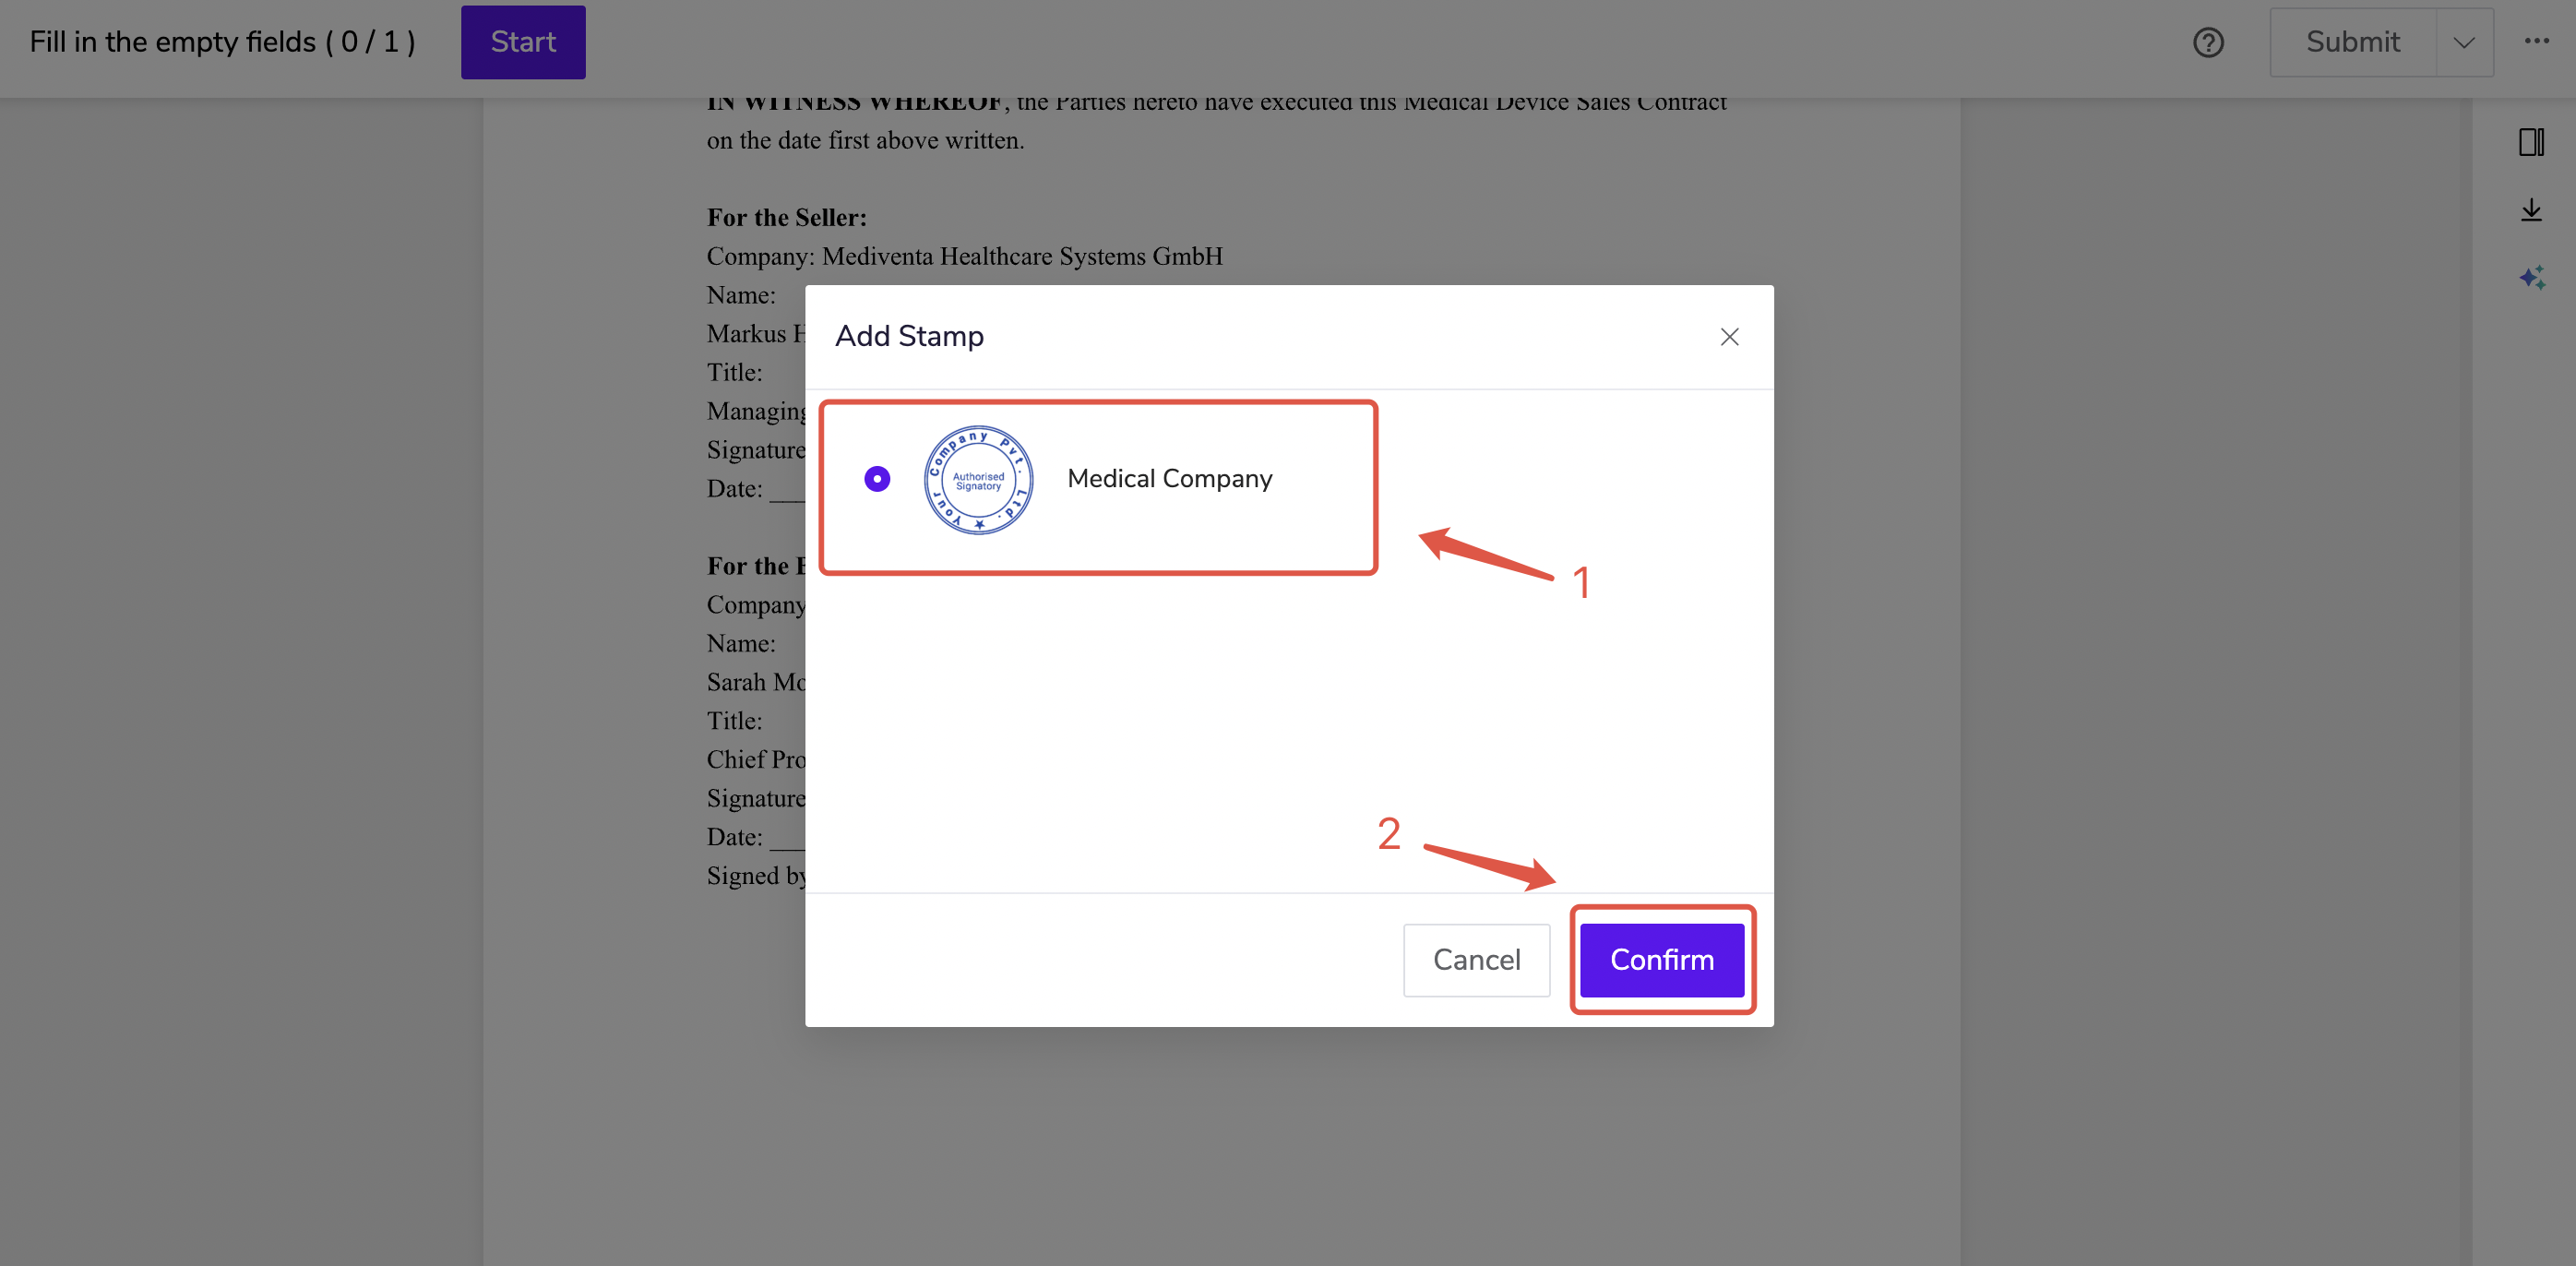
- When the sender sets “No Restriction” on seal usage, recipients can choose to upload a seal or select an authorized electronic seal for signing, then click [Confirm].
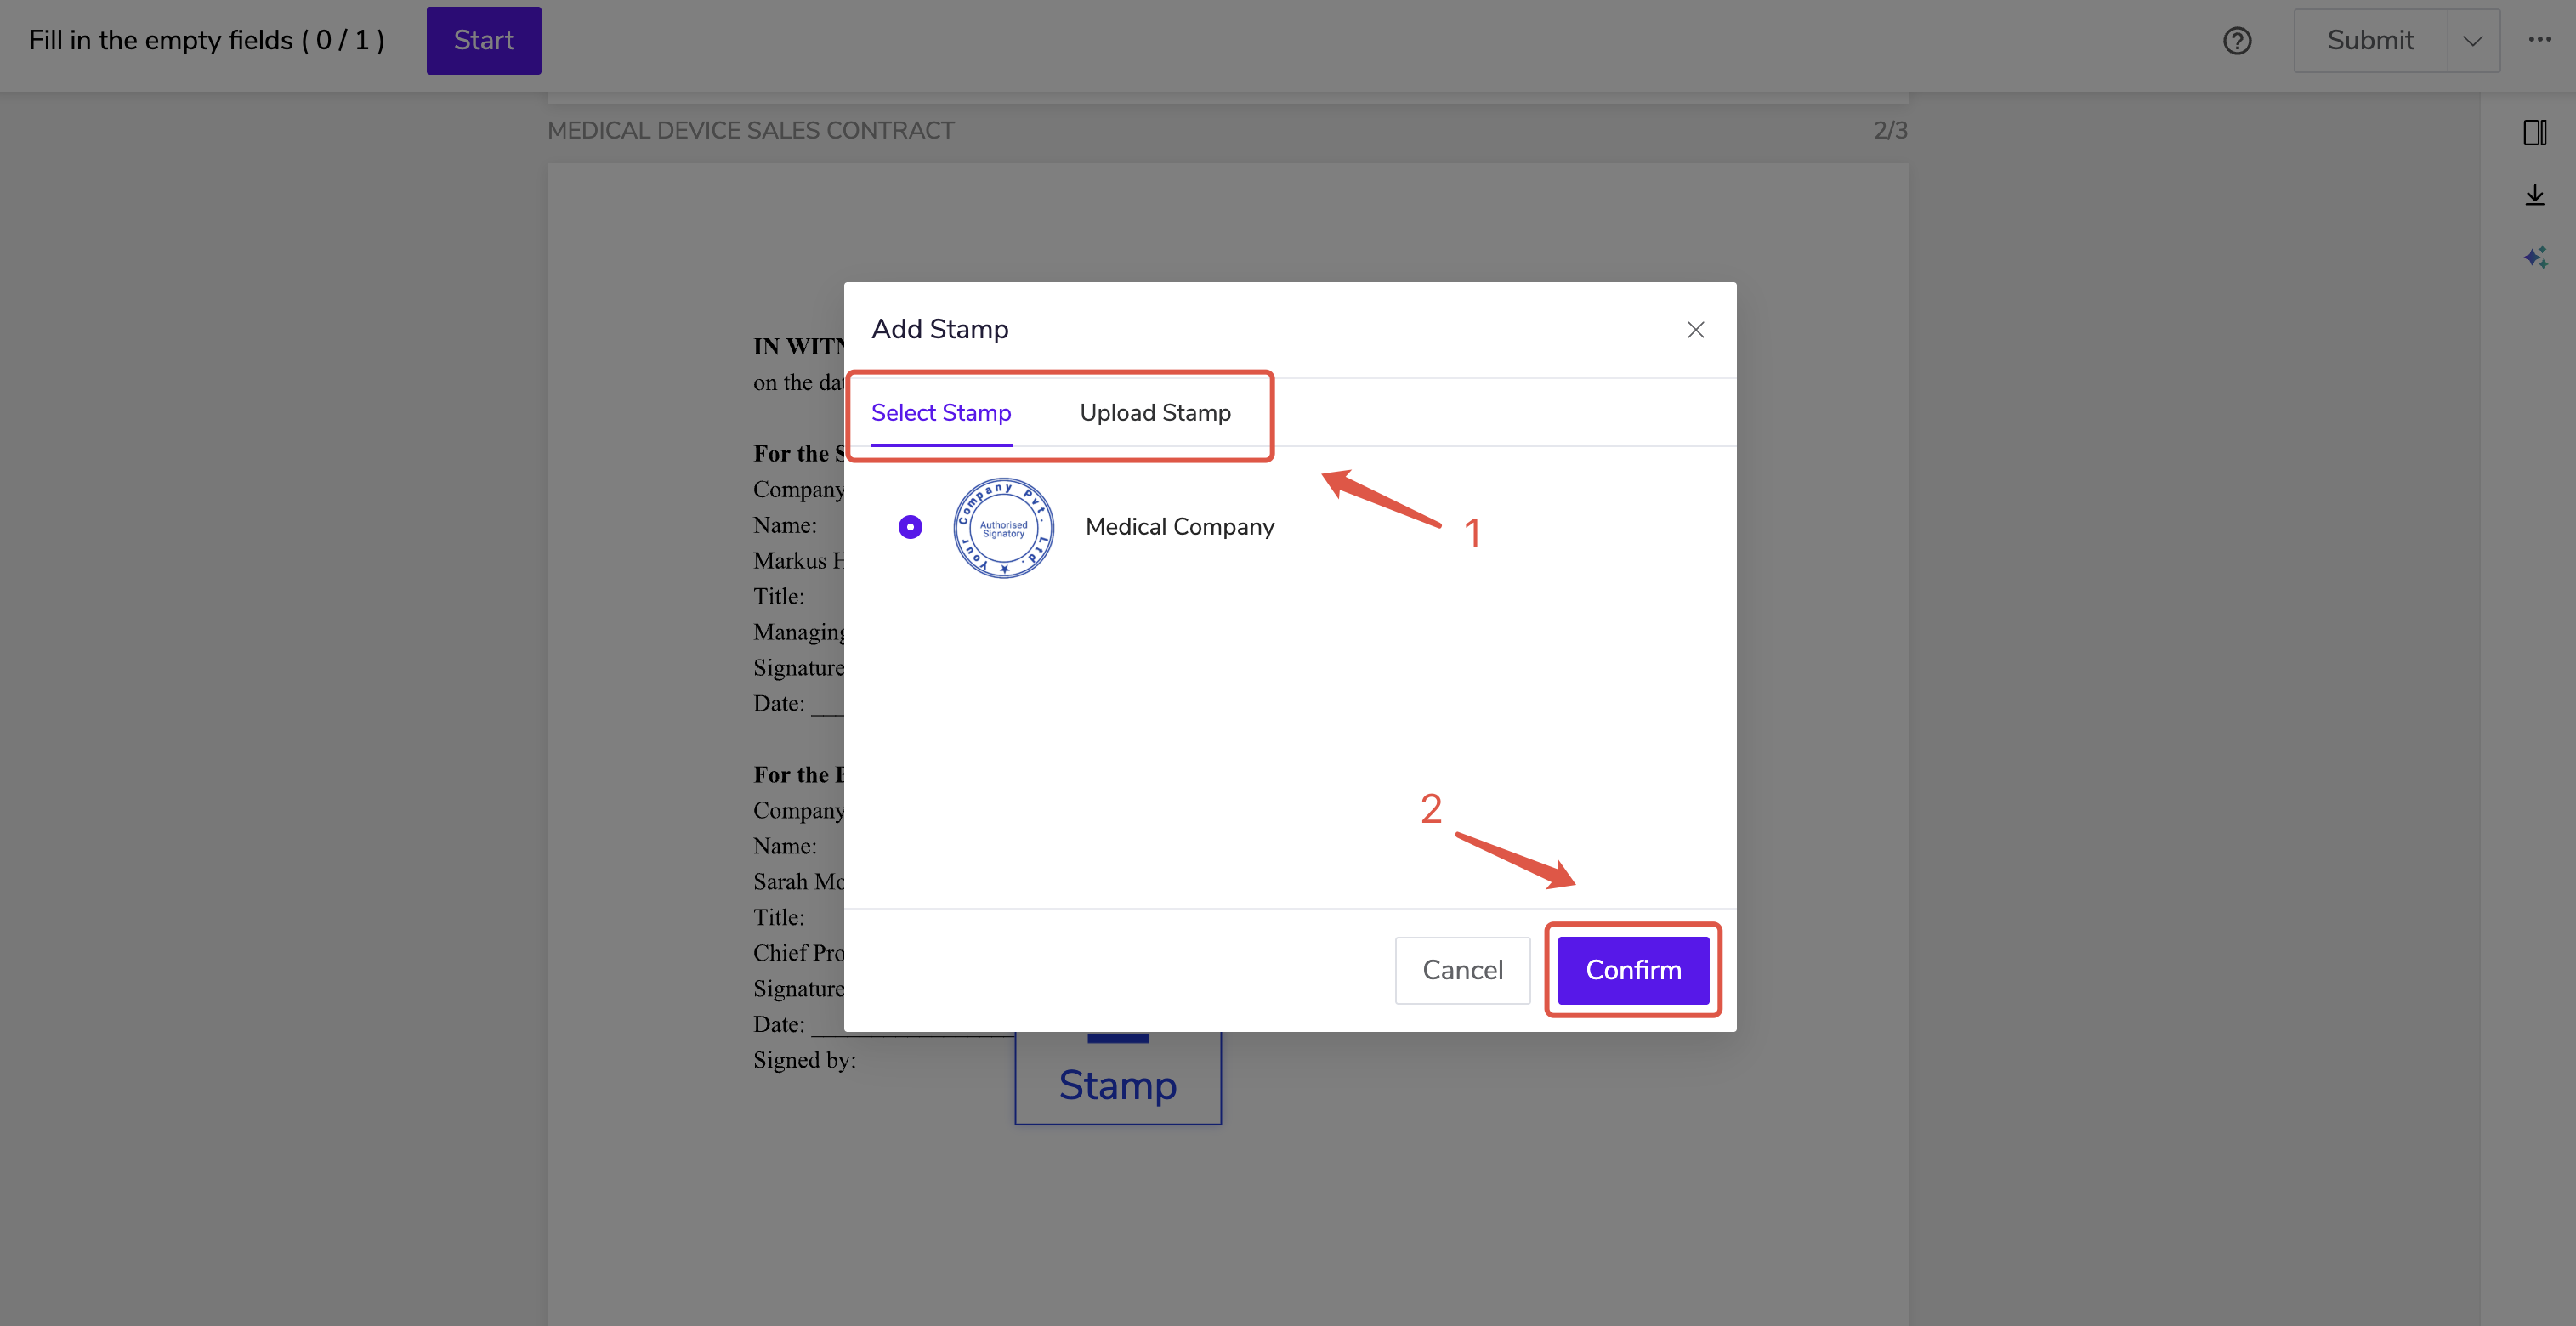
- When the sender sets “Only Allow Authorized Seals,” only authorized electronic seals can be selected for signing. Click [Confirm].
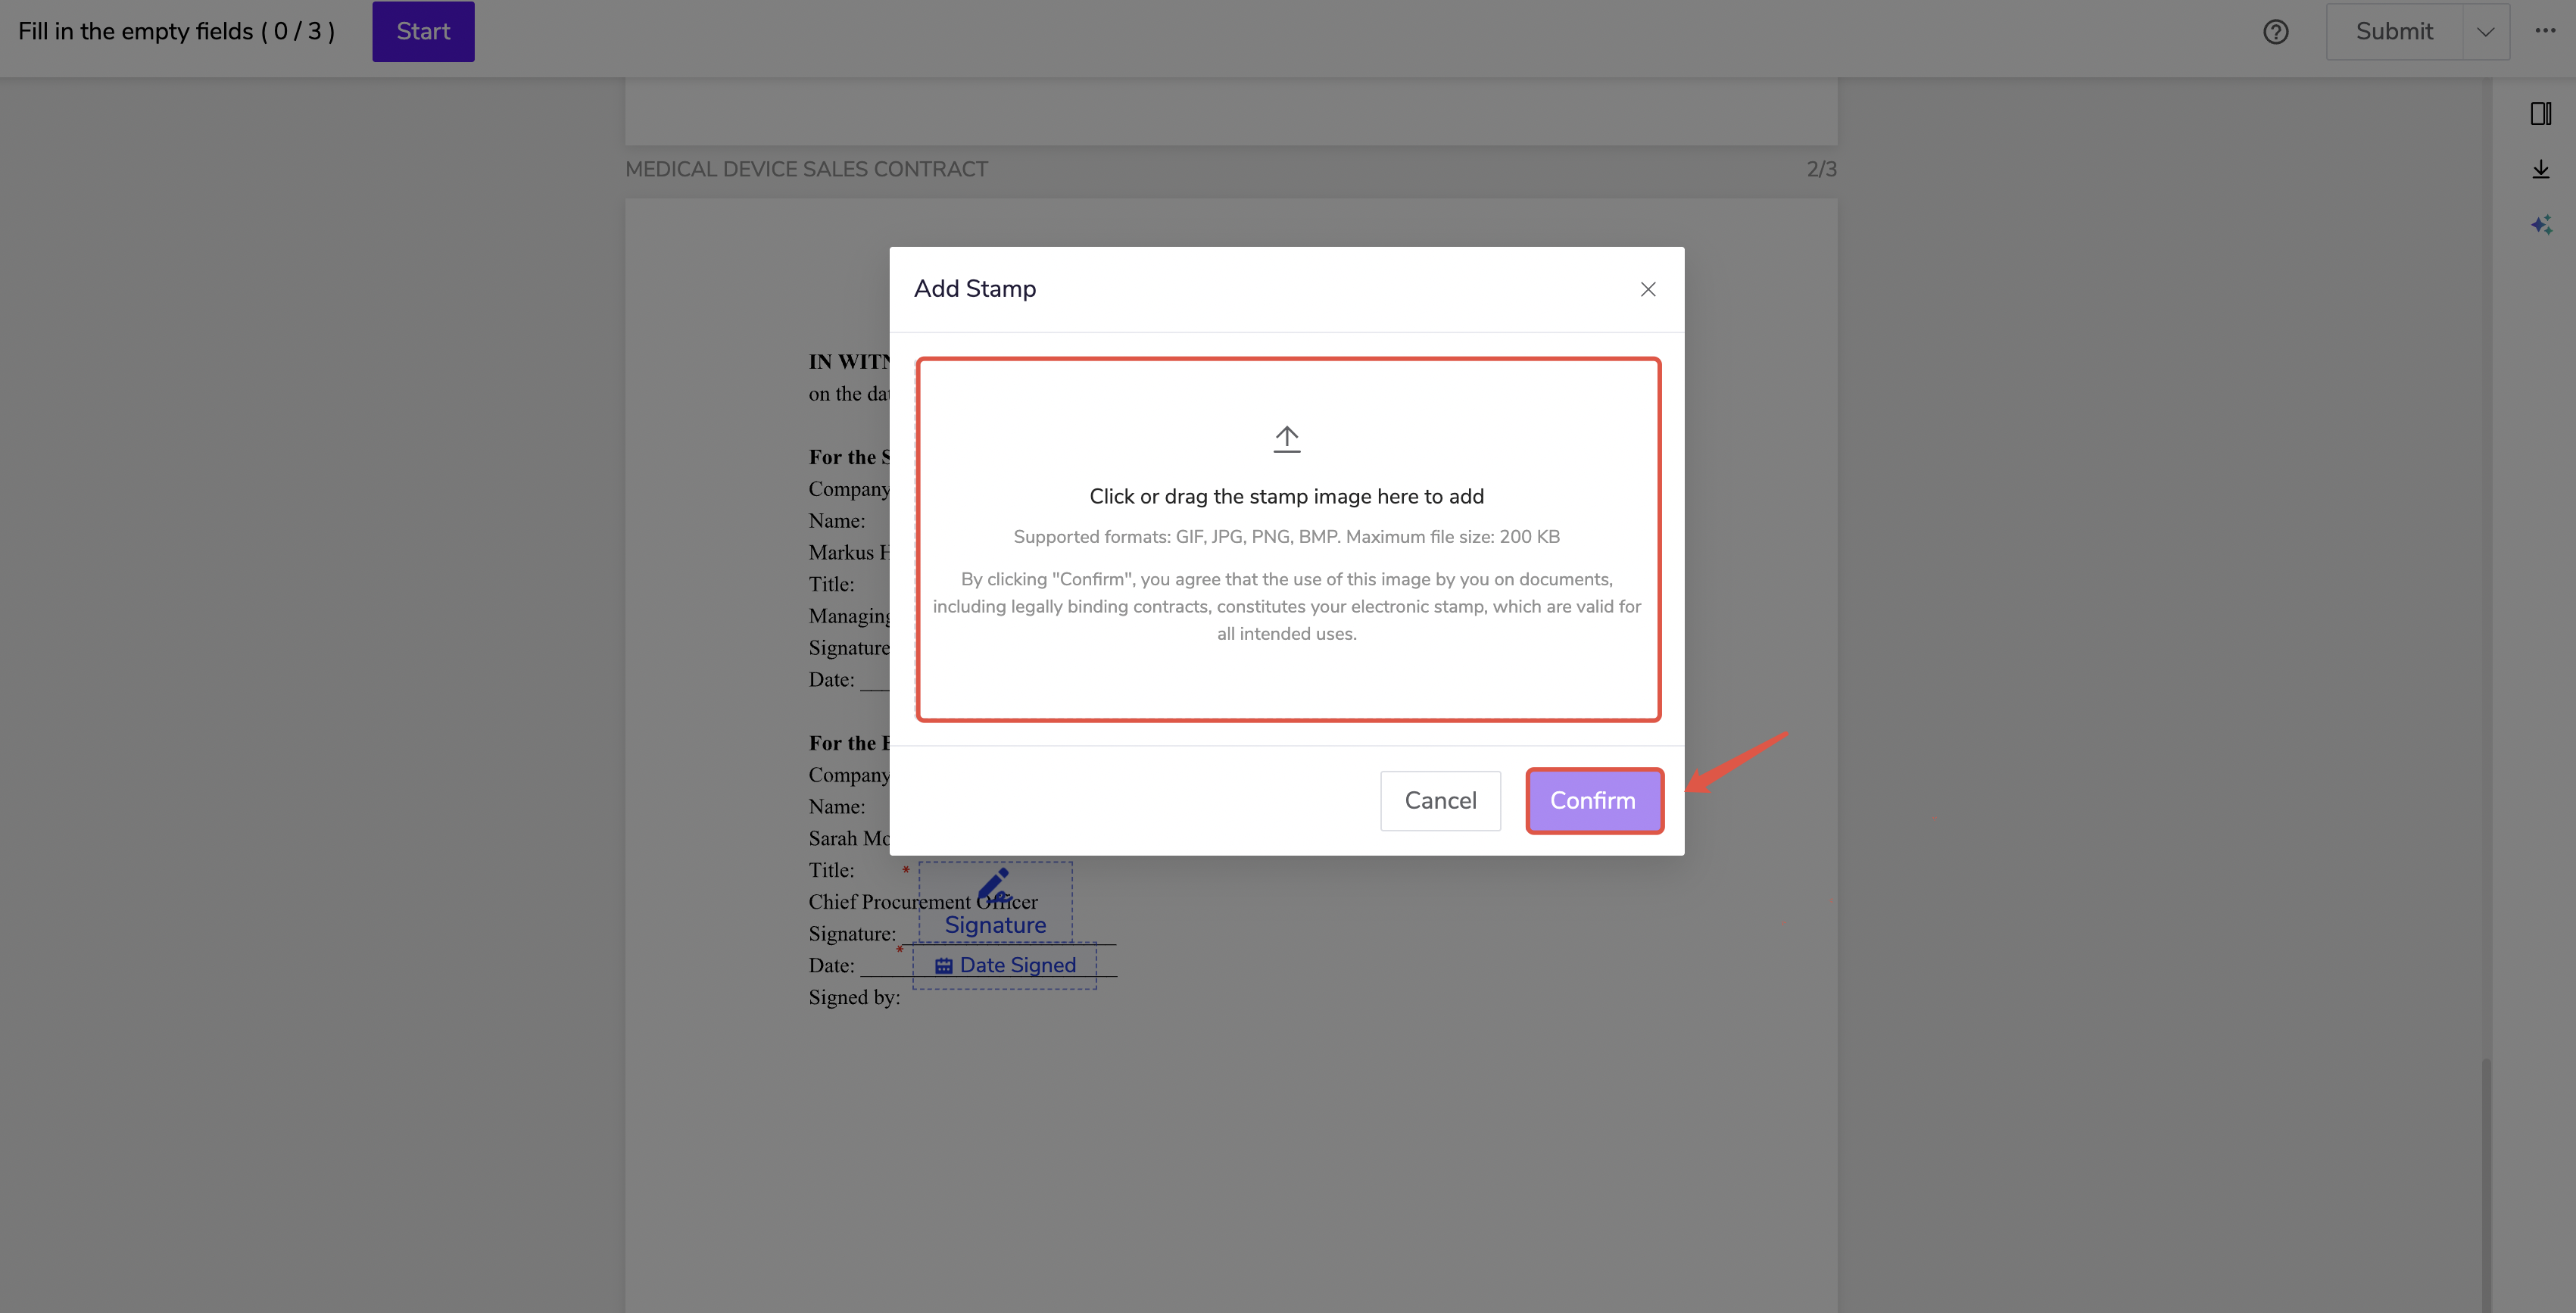
- When the sender sets “Only Allow Uploaded Seals,” only uploaded seals can be used. Drag or click to select, then click [Confirm].
(3) Switch seals (requires the sender to enable [Allow recipients to use different seals] in Signing Preferences in advance).
- Click on a filled seal control; the system displays a seal selection pop-up;
- Select a different seal in the pop-up to replace the current seal;
- If this feature is not enabled, clicking a filled seal will automatically refill the current seal, and switching to a different seal is not possible.
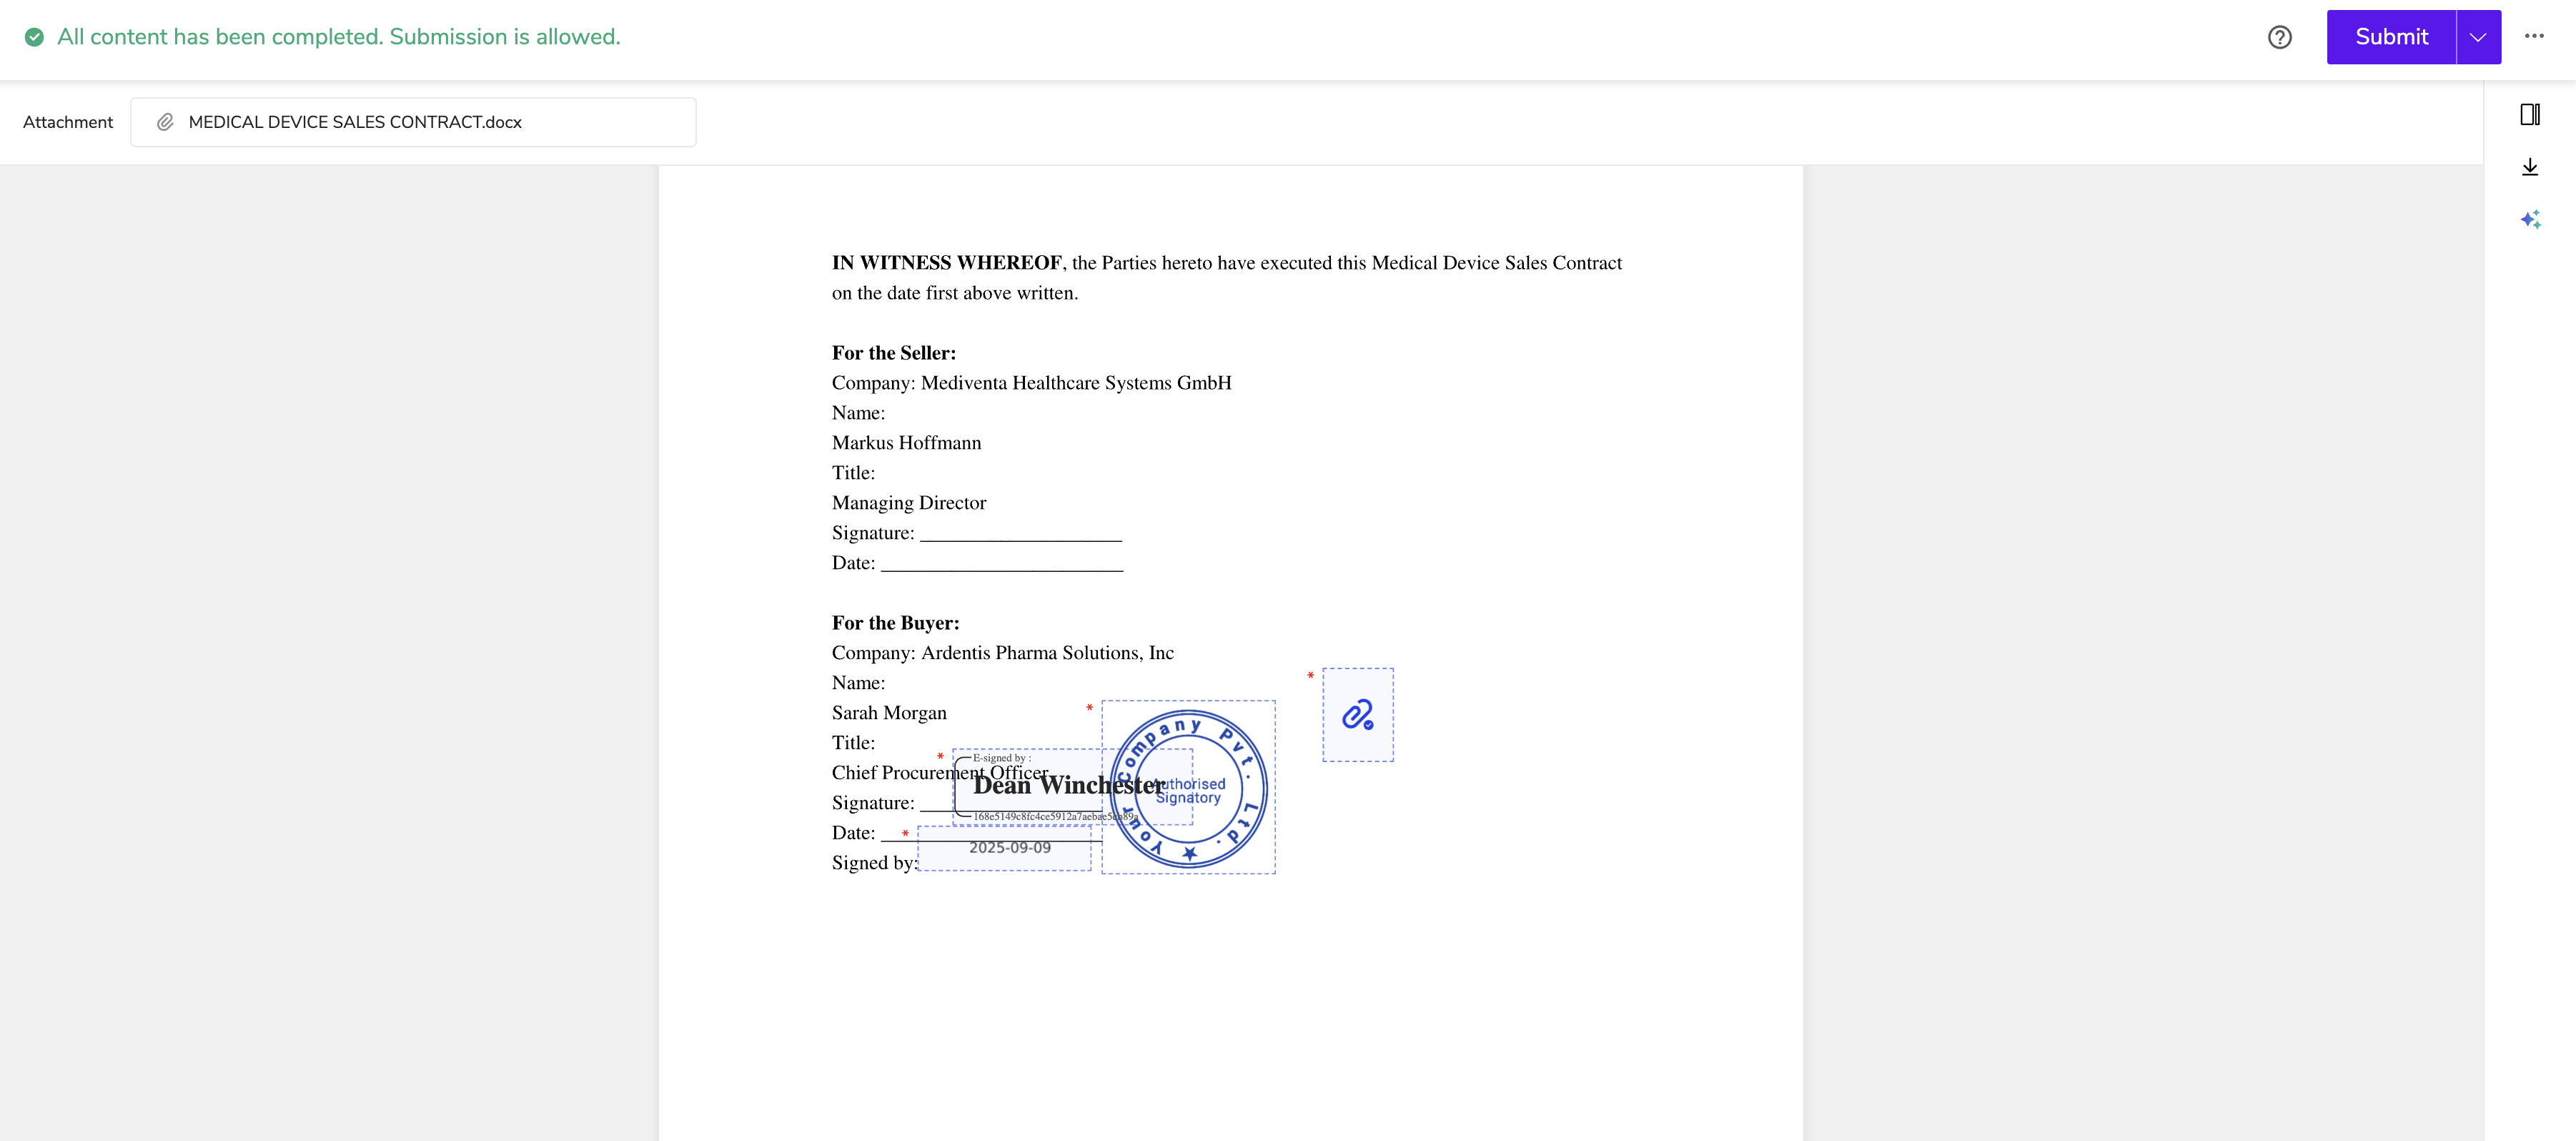
(4) Complete all remaining signatures and click [Submit] to finish signing.
4. Freehand Drawing Control
The freehand drawing control allows recipients to handwrite content at designated positions, suitable for supplementary explanations, purpose descriptions, handwritten confirmations, etc. Unlike the signature control, the freehand drawing control is not necessarily for formal signing but can also be used for filling in short phrases or handwritten notes.
Step 1: Add the Freehand Drawing Control
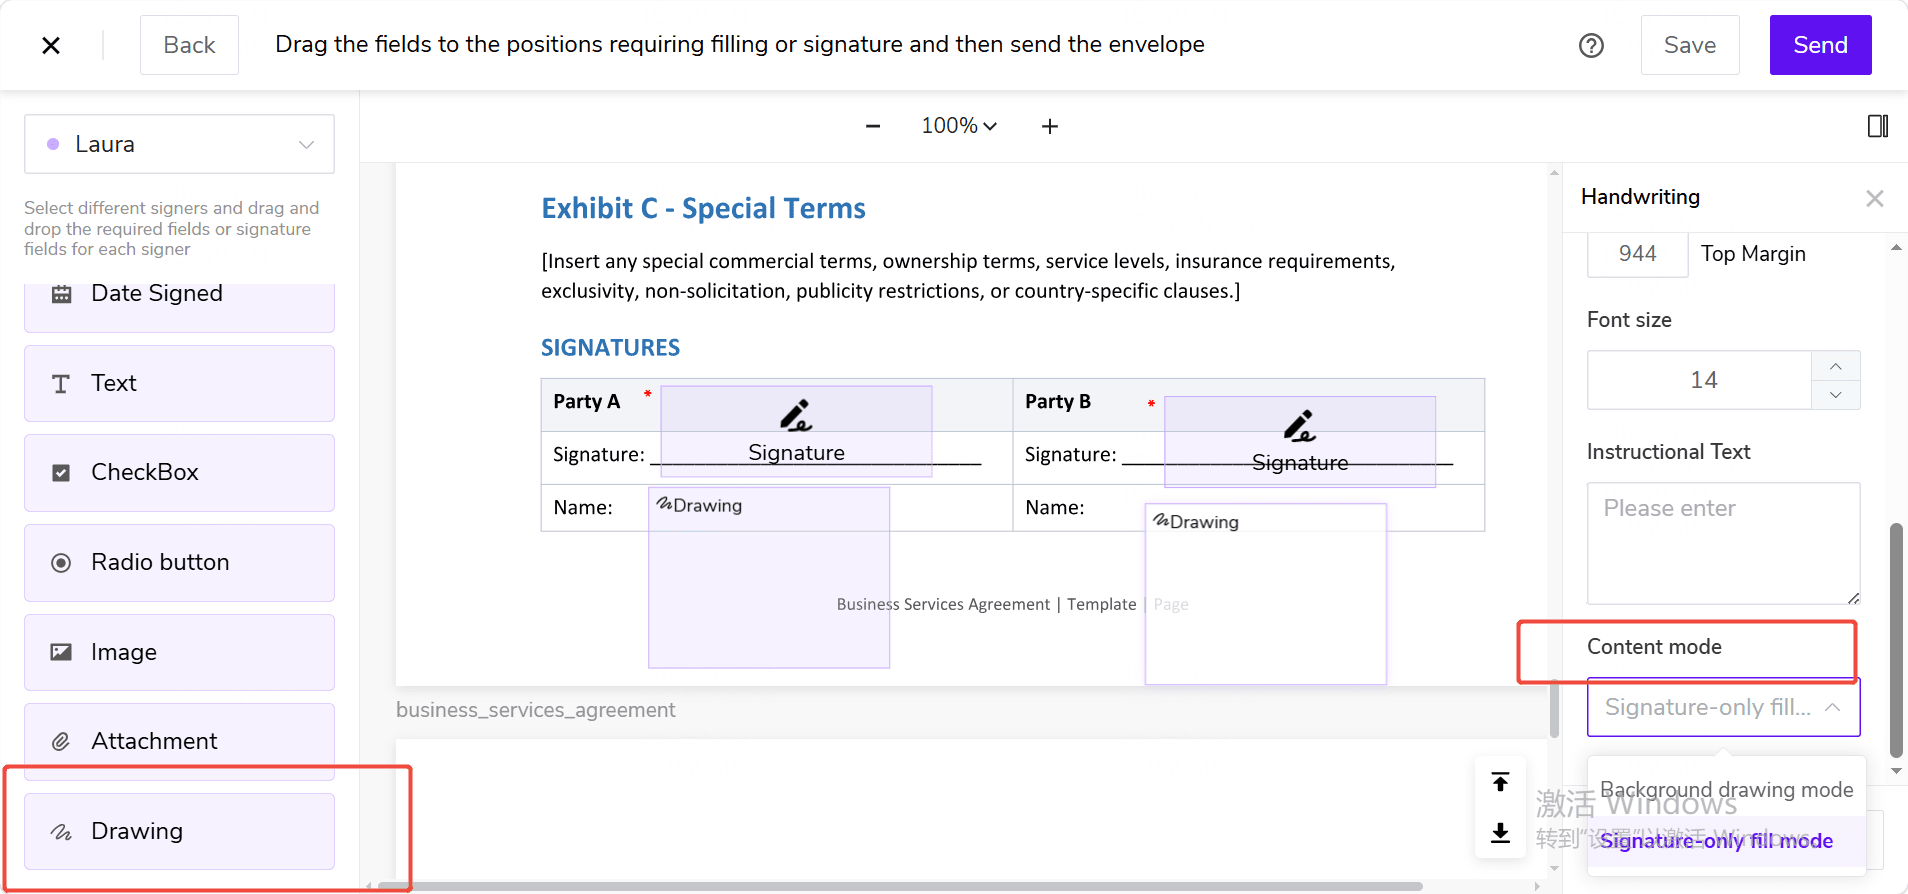
On the control settings page of the envelope, template, or batch task, select the recipient who needs to fill in this control, and drag the [Freehand Drawing] control from the left control panel to the designated position in the document.
Step 2: Adjust the Control
After clicking the added freehand drawing control, you can configure the control name, required status, tooltip, instructional text, etc. on the right-side properties panel.
The freehand drawing control supports two content modes:
- Background Drawing Mode: Recipients draw in the control area, and the system retains both the document background and the drawing content in the control area. Suitable for scenarios where recipients need to circle, annotate, or add comments on the original document content.
- Signature Only Fill Mode: After the recipient completes the drawing, the system retains only valid signatures, removes the PDF background, and centers the signatures within the control area. Suitable for scenarios where recipients only need to handwrite text, short phrases, or notes.
If you want recipients to annotate the original document content, choose [Background Drawing Mode]. If you only need recipients to handwrite text or notes, we recommend choosing [Signature Only Fill Mode].
Senders can also adjust the size of the freehand drawing control according to the fill-in areas in the document. For narrower handwriting areas, the control can be set to a lower height, making it suitable for single-line fill-in areas.
We recommend setting the control area slightly larger than the expected handwriting content to avoid recipients’ handwriting being too small or incomplete.
Step 3: Save and Send
After confirming the position, size, and content mode of the freehand drawing control, save the control settings and proceed to send the envelope.
Note: The freehand drawing control is for handwriting content and is not equivalent to a signature control. For formal signing confirmation, we recommend using a signature control. Newly added freehand drawing controls will adopt the default content mode from the sending settings, and senders can also adjust this on individual controls. When the sender has configured a “Freehand Drawing Control” in the signing envelope, recipients can choose to draw their signature.
Use Case: Used when recipients need to sign using a handwritten signature style.
III. Fill-in Controls
1. Text Control
Used for entering key information such as name, address, ID number, etc. Please fill in accurately according to the sender’s preset prompts.
After dragging the “Text” control from the left menu into the document, you can adjust its properties in the settings panel on the right: If “Multi-line Text” is unchecked, the control defaults to single-line mode. If “Multi-line Text” is checked, the control allows signers to use line breaks and enter longer text passages.
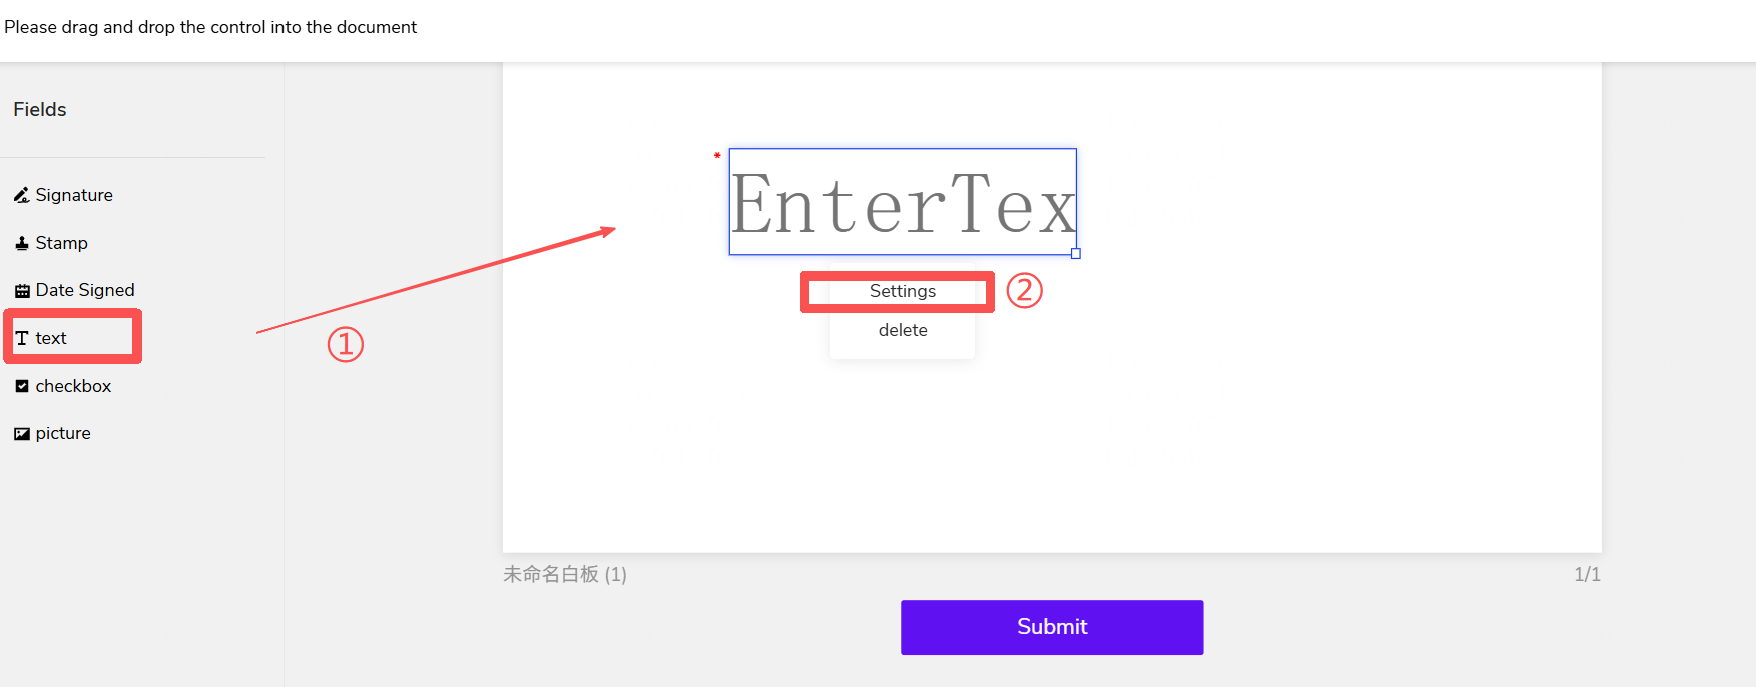
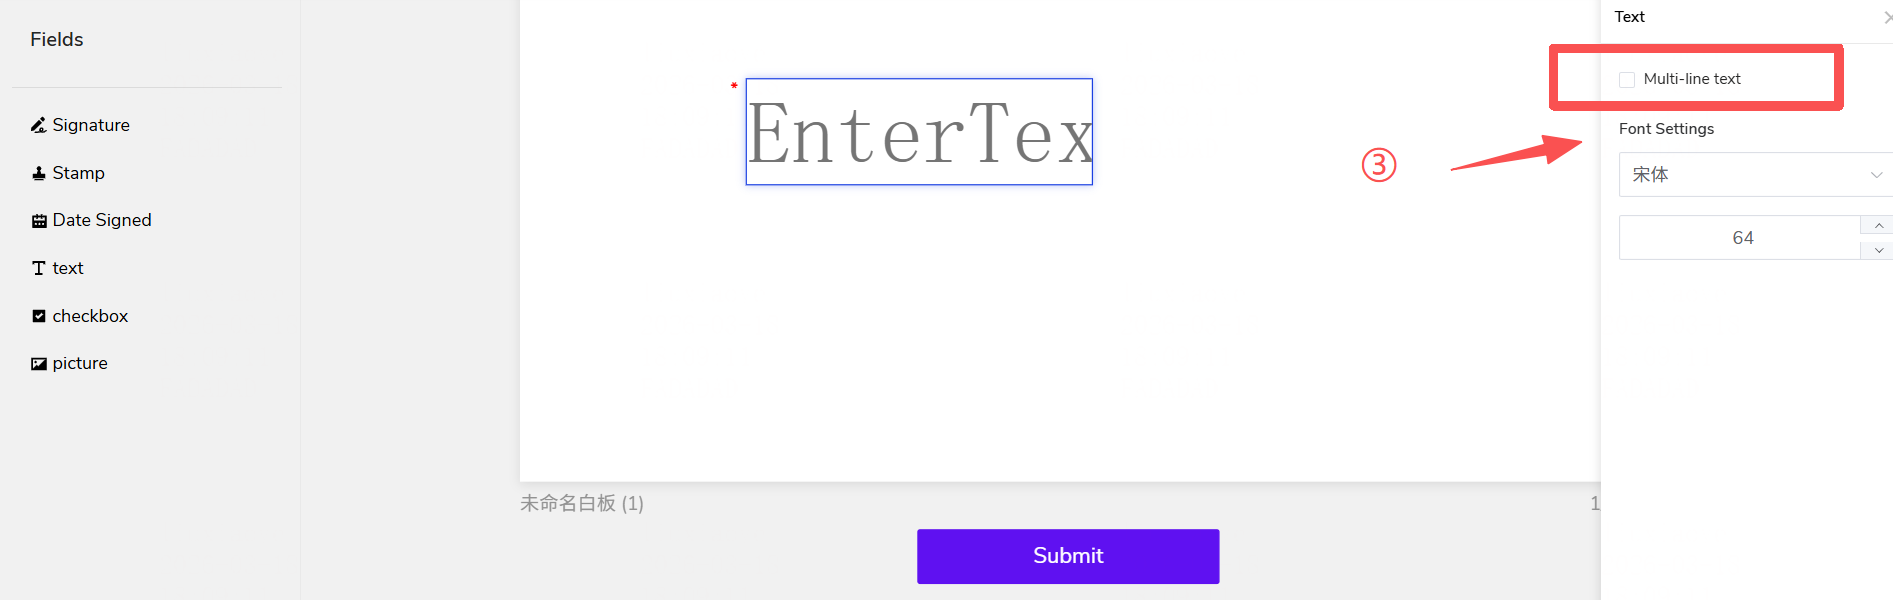
When using the Text Fill-in Control, the designated recipient must complete this control before the signing process can continue.
Use Case: Used when recipients need to enter text information such as name, address, ID number, remarks, etc.
2. Radio Button Control
Used for scenarios where only one option needs to be selected from multiple choices, such as gender, marital status, yes/no confirmation, plan selection, etc.
After dragging the “Radio Button” control from the left menu into the document, senders can configure the following in the right-side properties panel:
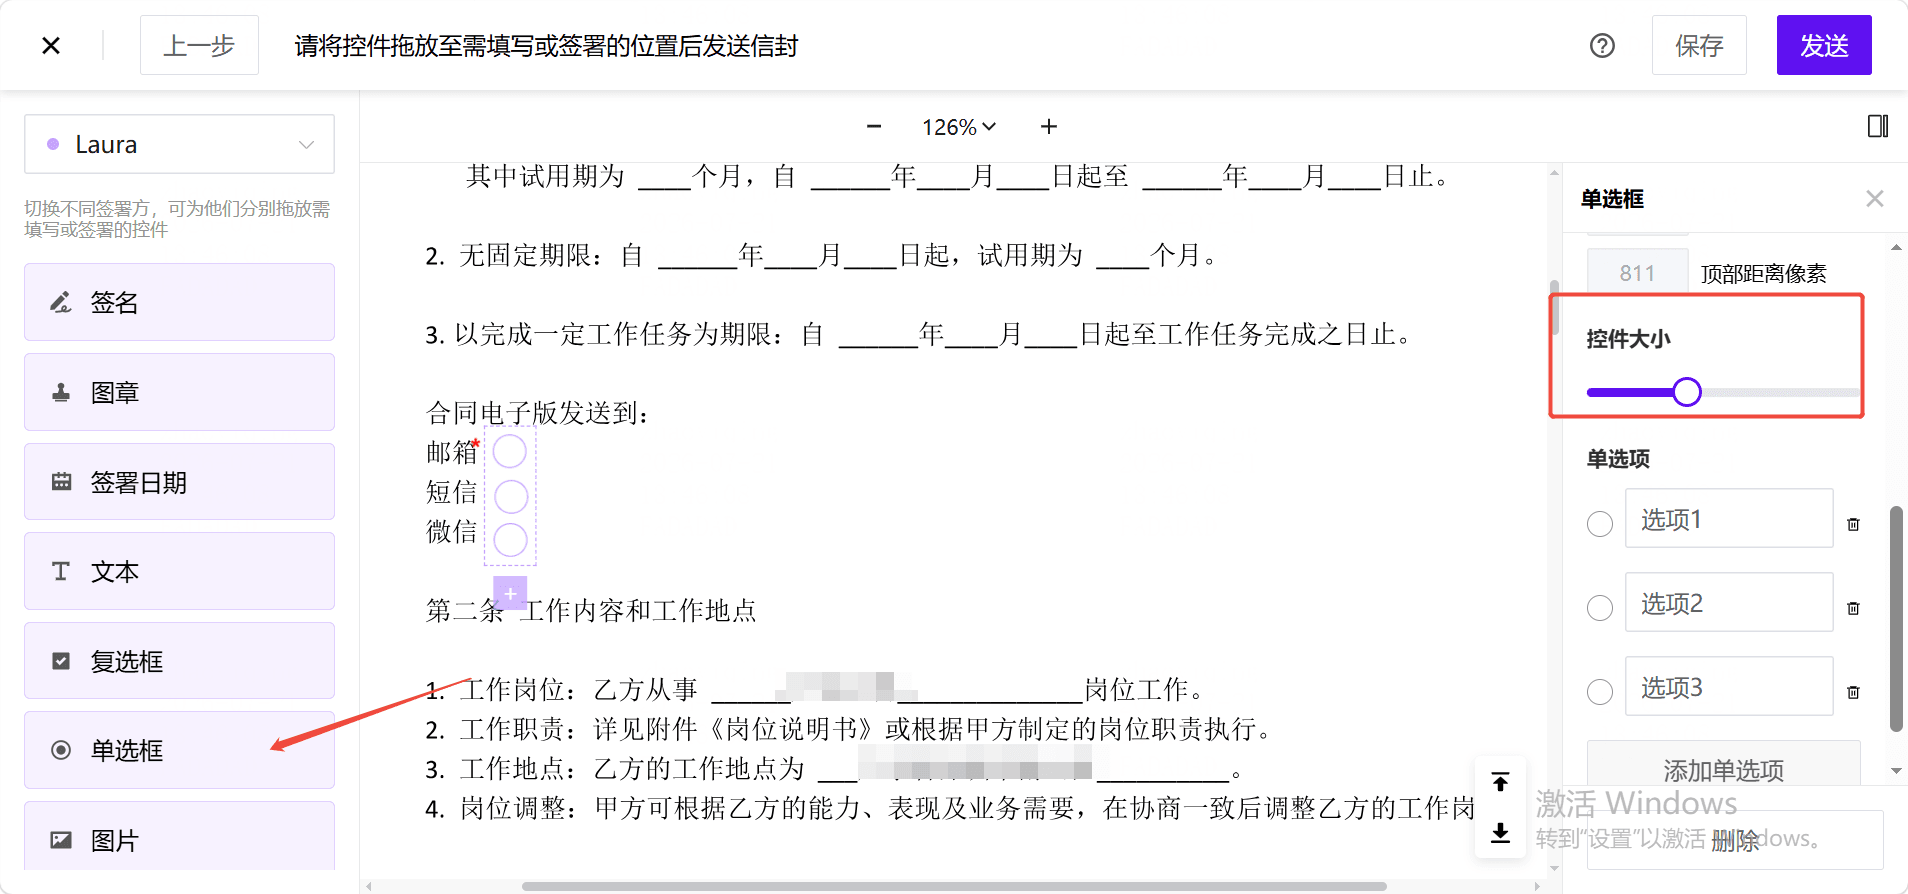
- Assigned Recipient: Specify who fills in this radio button group;
- Required: At least one option must be selected before submission for required groups;
- Control Name: Helps identify the control content;
- Tooltip: Set instructional guidance text;
- Control Size: Slide left or right to adjust the control size;
- Radio Options: Add/delete/edit the specific text content of each radio option, with each option not exceeding 50 characters.
Configuration Notes:
- Add/Delete Radio Options: Click “+ Add Radio Option” at the bottom to add a new row. The button becomes disabled when the maximum of 50 options is reached. Click the delete icon on the right side of a radio option to remove it; at least 2 options must remain.
- Adjust Layout: Each radio option can be independently dragged within the current page. When resizing, the entire group scales proportionally; individual radio options cannot be resized independently. Dragging any radio option to another page moves the entire radio button group to the target page.
3. Checkbox Control
Used for scenarios where one or more options can be selected from multiple choices, such as terms confirmation, additional services selection, etc.
After dragging the “Checkbox” control from the left menu into the document, senders can configure the following in the right-side properties panel:
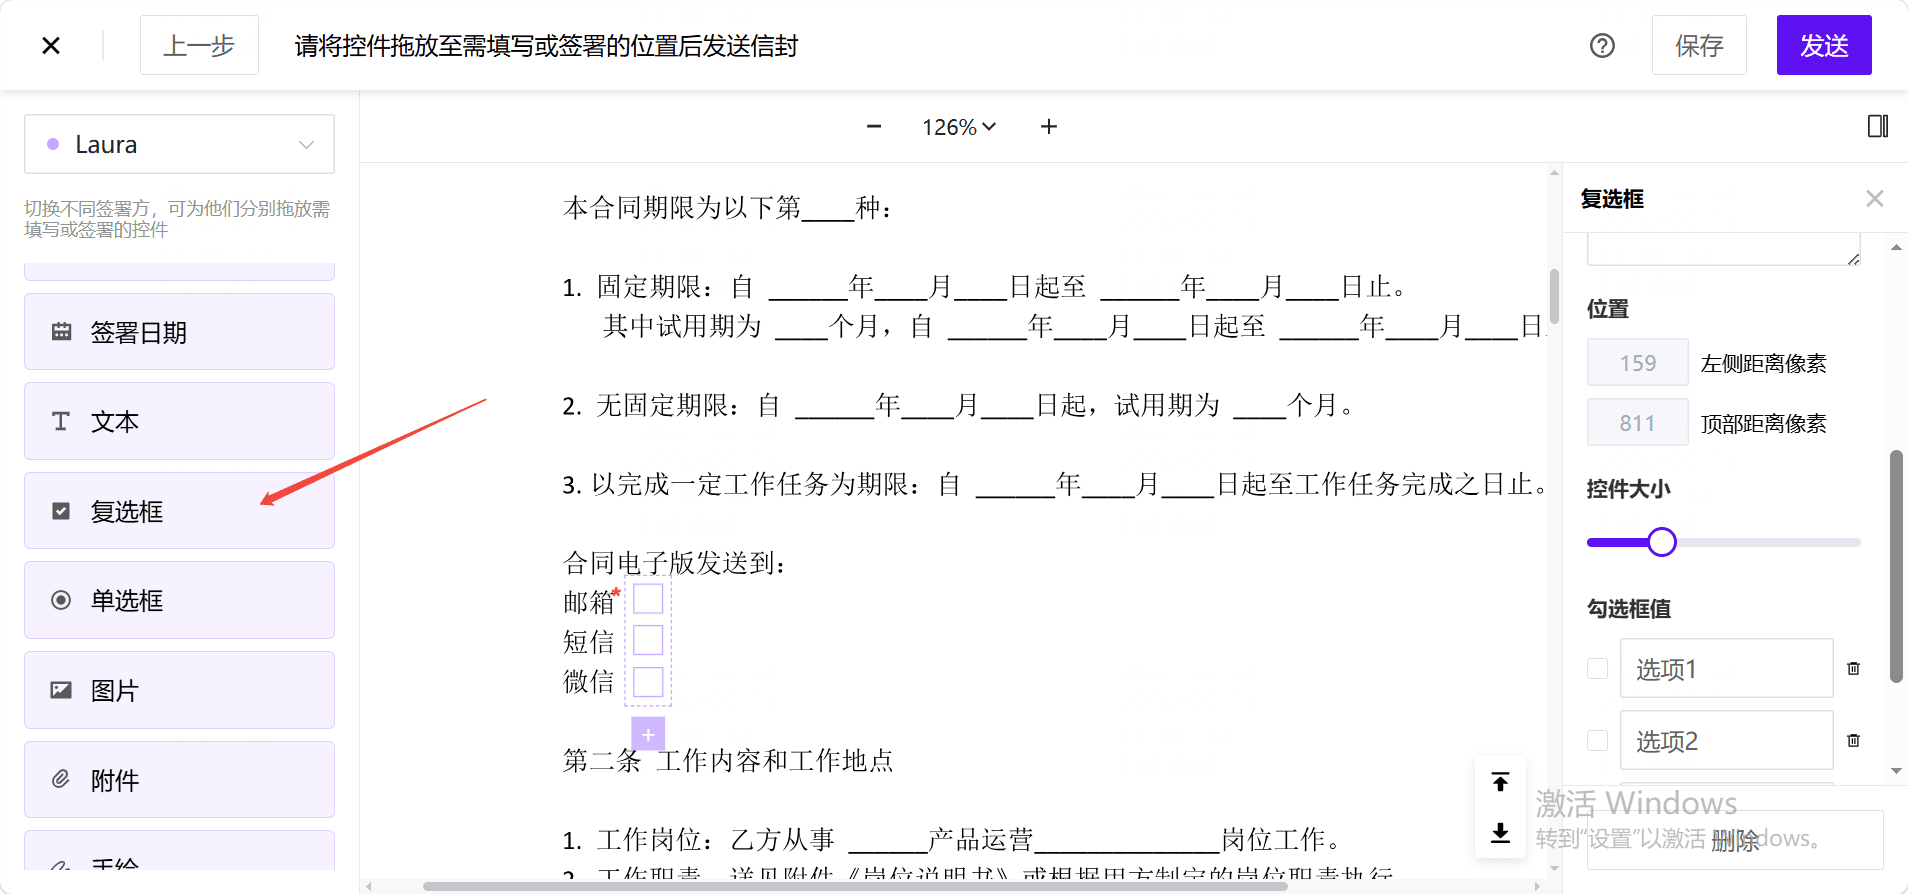
- Assigned Recipient: Specify who fills in this checkbox group;
- Required: At least one option must be checked before submission for required groups;
- Control Name: Helps identify the control content;
- Tooltip: Set instructional guidance text;
- Control Size: Slide left or right to adjust the control size;
- Checkbox Options: Add/delete/edit the specific text content of each checkbox option, with each option not exceeding 50 characters.
4. Image Control
Use the image control for uploading identification documents, business licenses, etc.
Use Case: Used when recipients need to upload image files such as ID cards, business licenses, etc.
5. Attachment Control
Used to upload supplementary documents related to the signing file.
When creating an envelope, senders can enable the attachment control and set upload permissions for recipients. Recipients can upload specified supplementary files during the signing process, ensuring the completeness and compliance of signed document content.
Typical Use Cases:
- Collecting identification documents, business licenses, and other credential files from recipients;
- Requiring recipients to provide supplementary materials related to the contract (such as quotes, supporting documents, etc.);
- Uniformly collecting attachment materials for archiving and audit during business processing.
After enabling the attachment control, attachment data is saved together with the signed documents and can be accessed in the history and audit reports, meeting enterprise compliance and archiving requirements.
Configuration Steps:
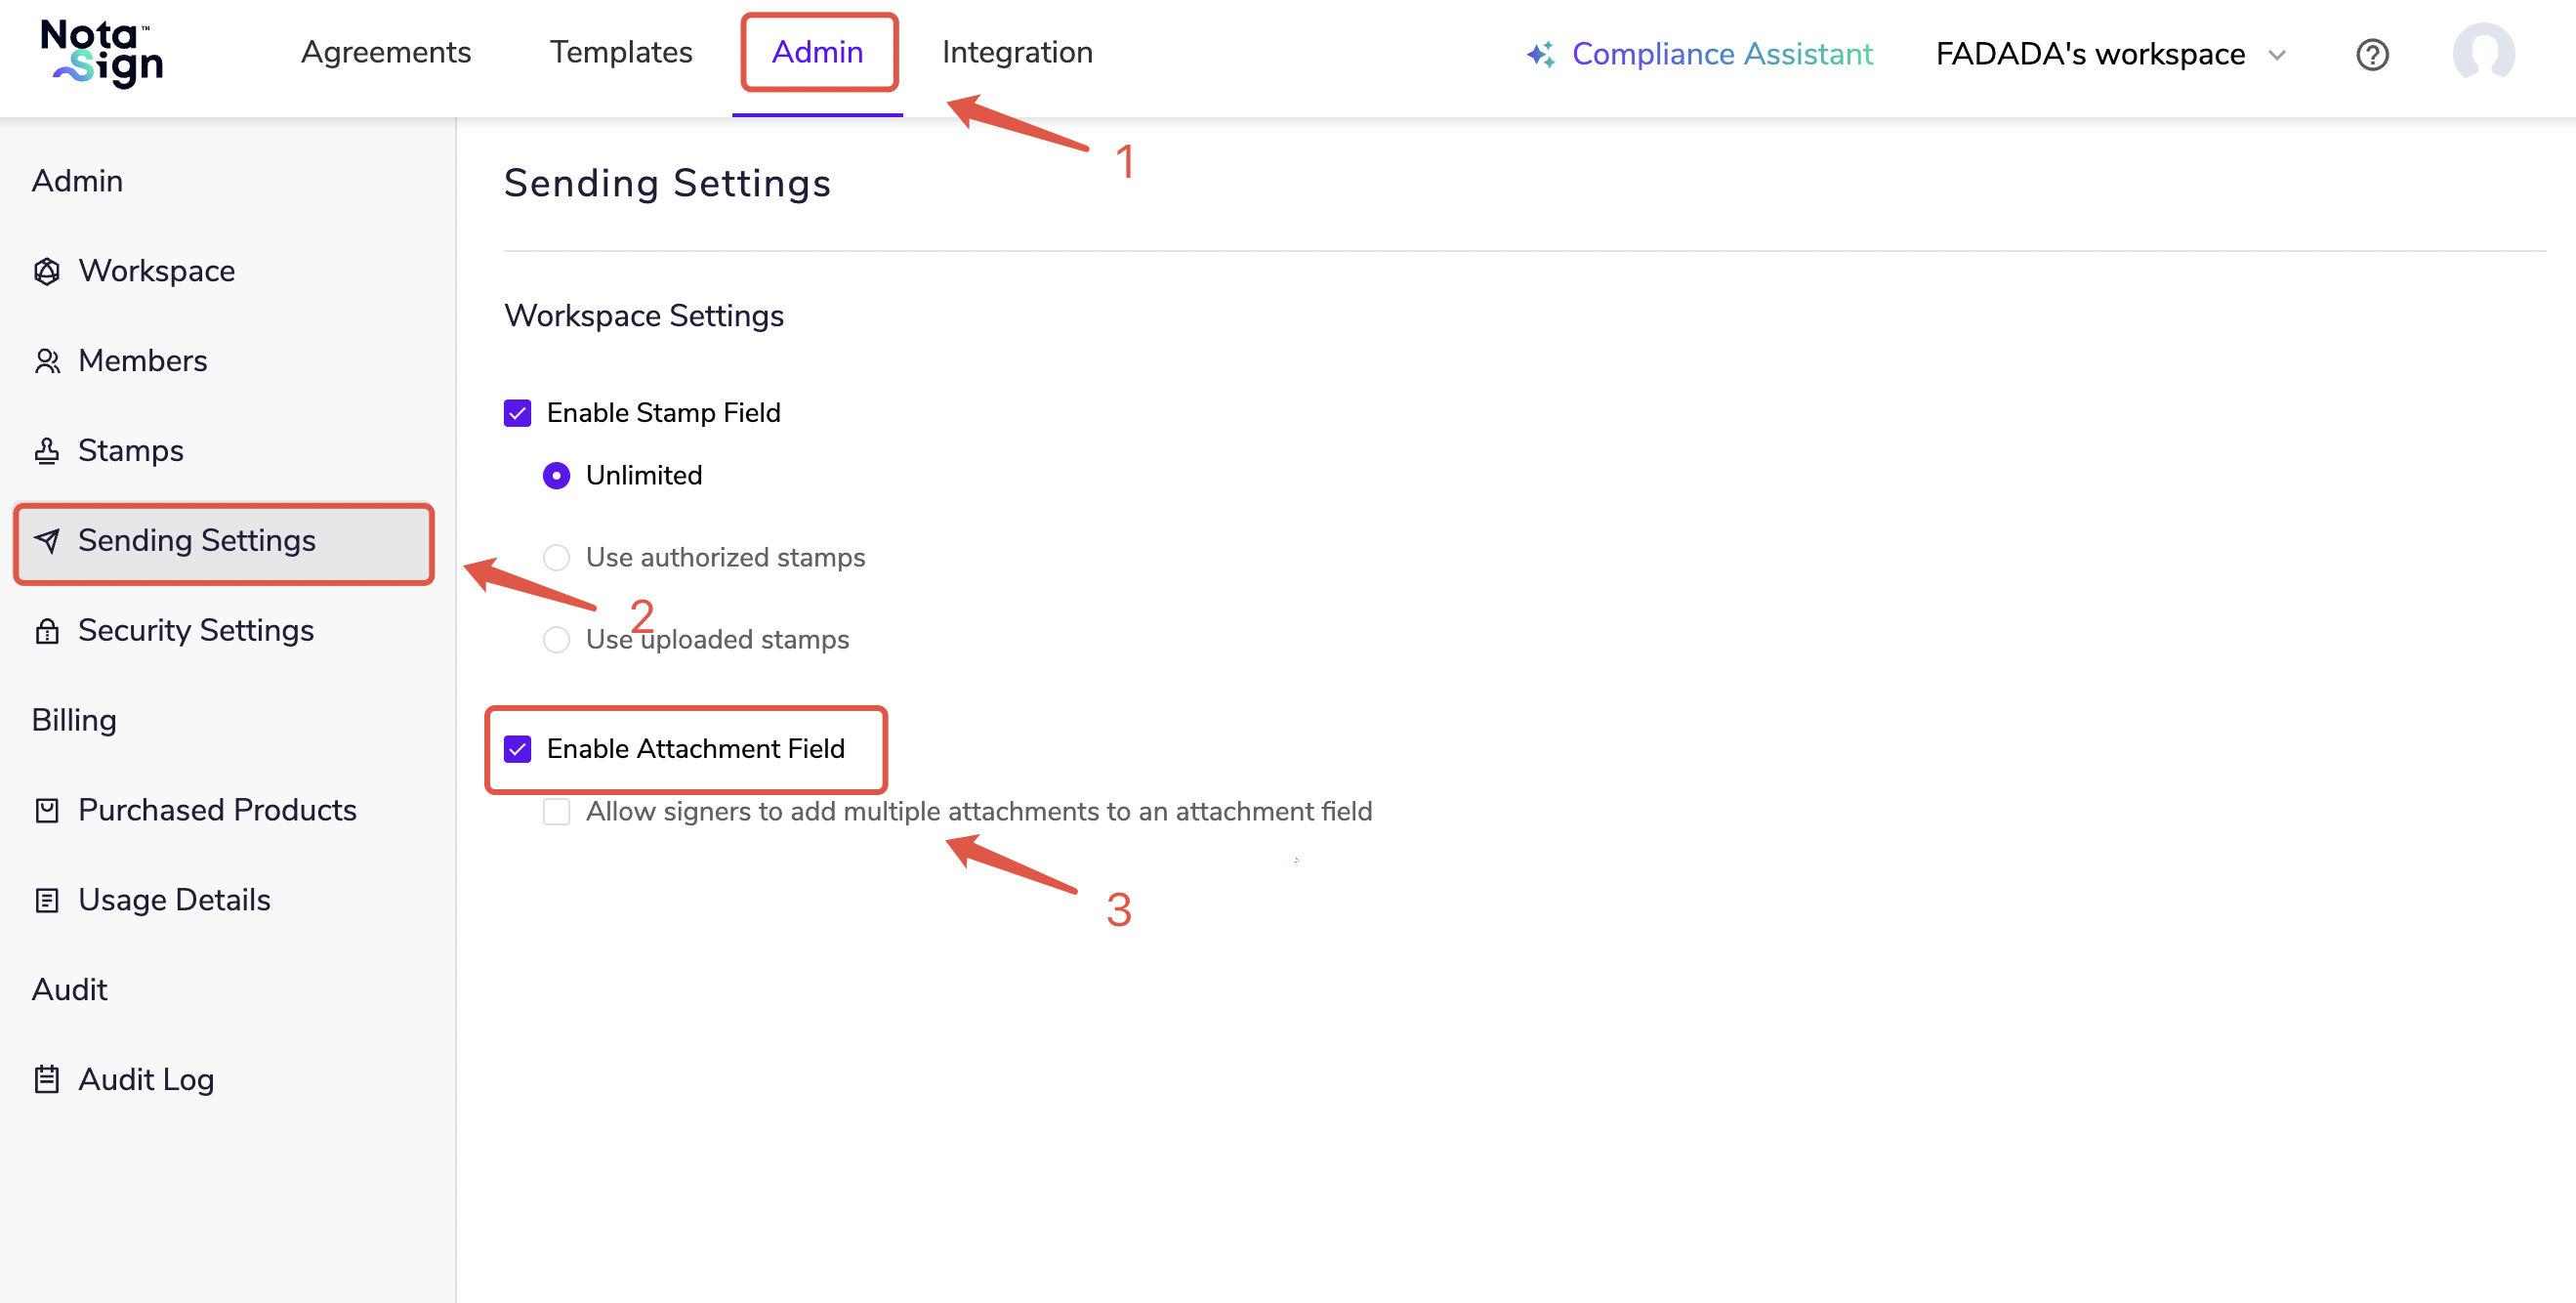
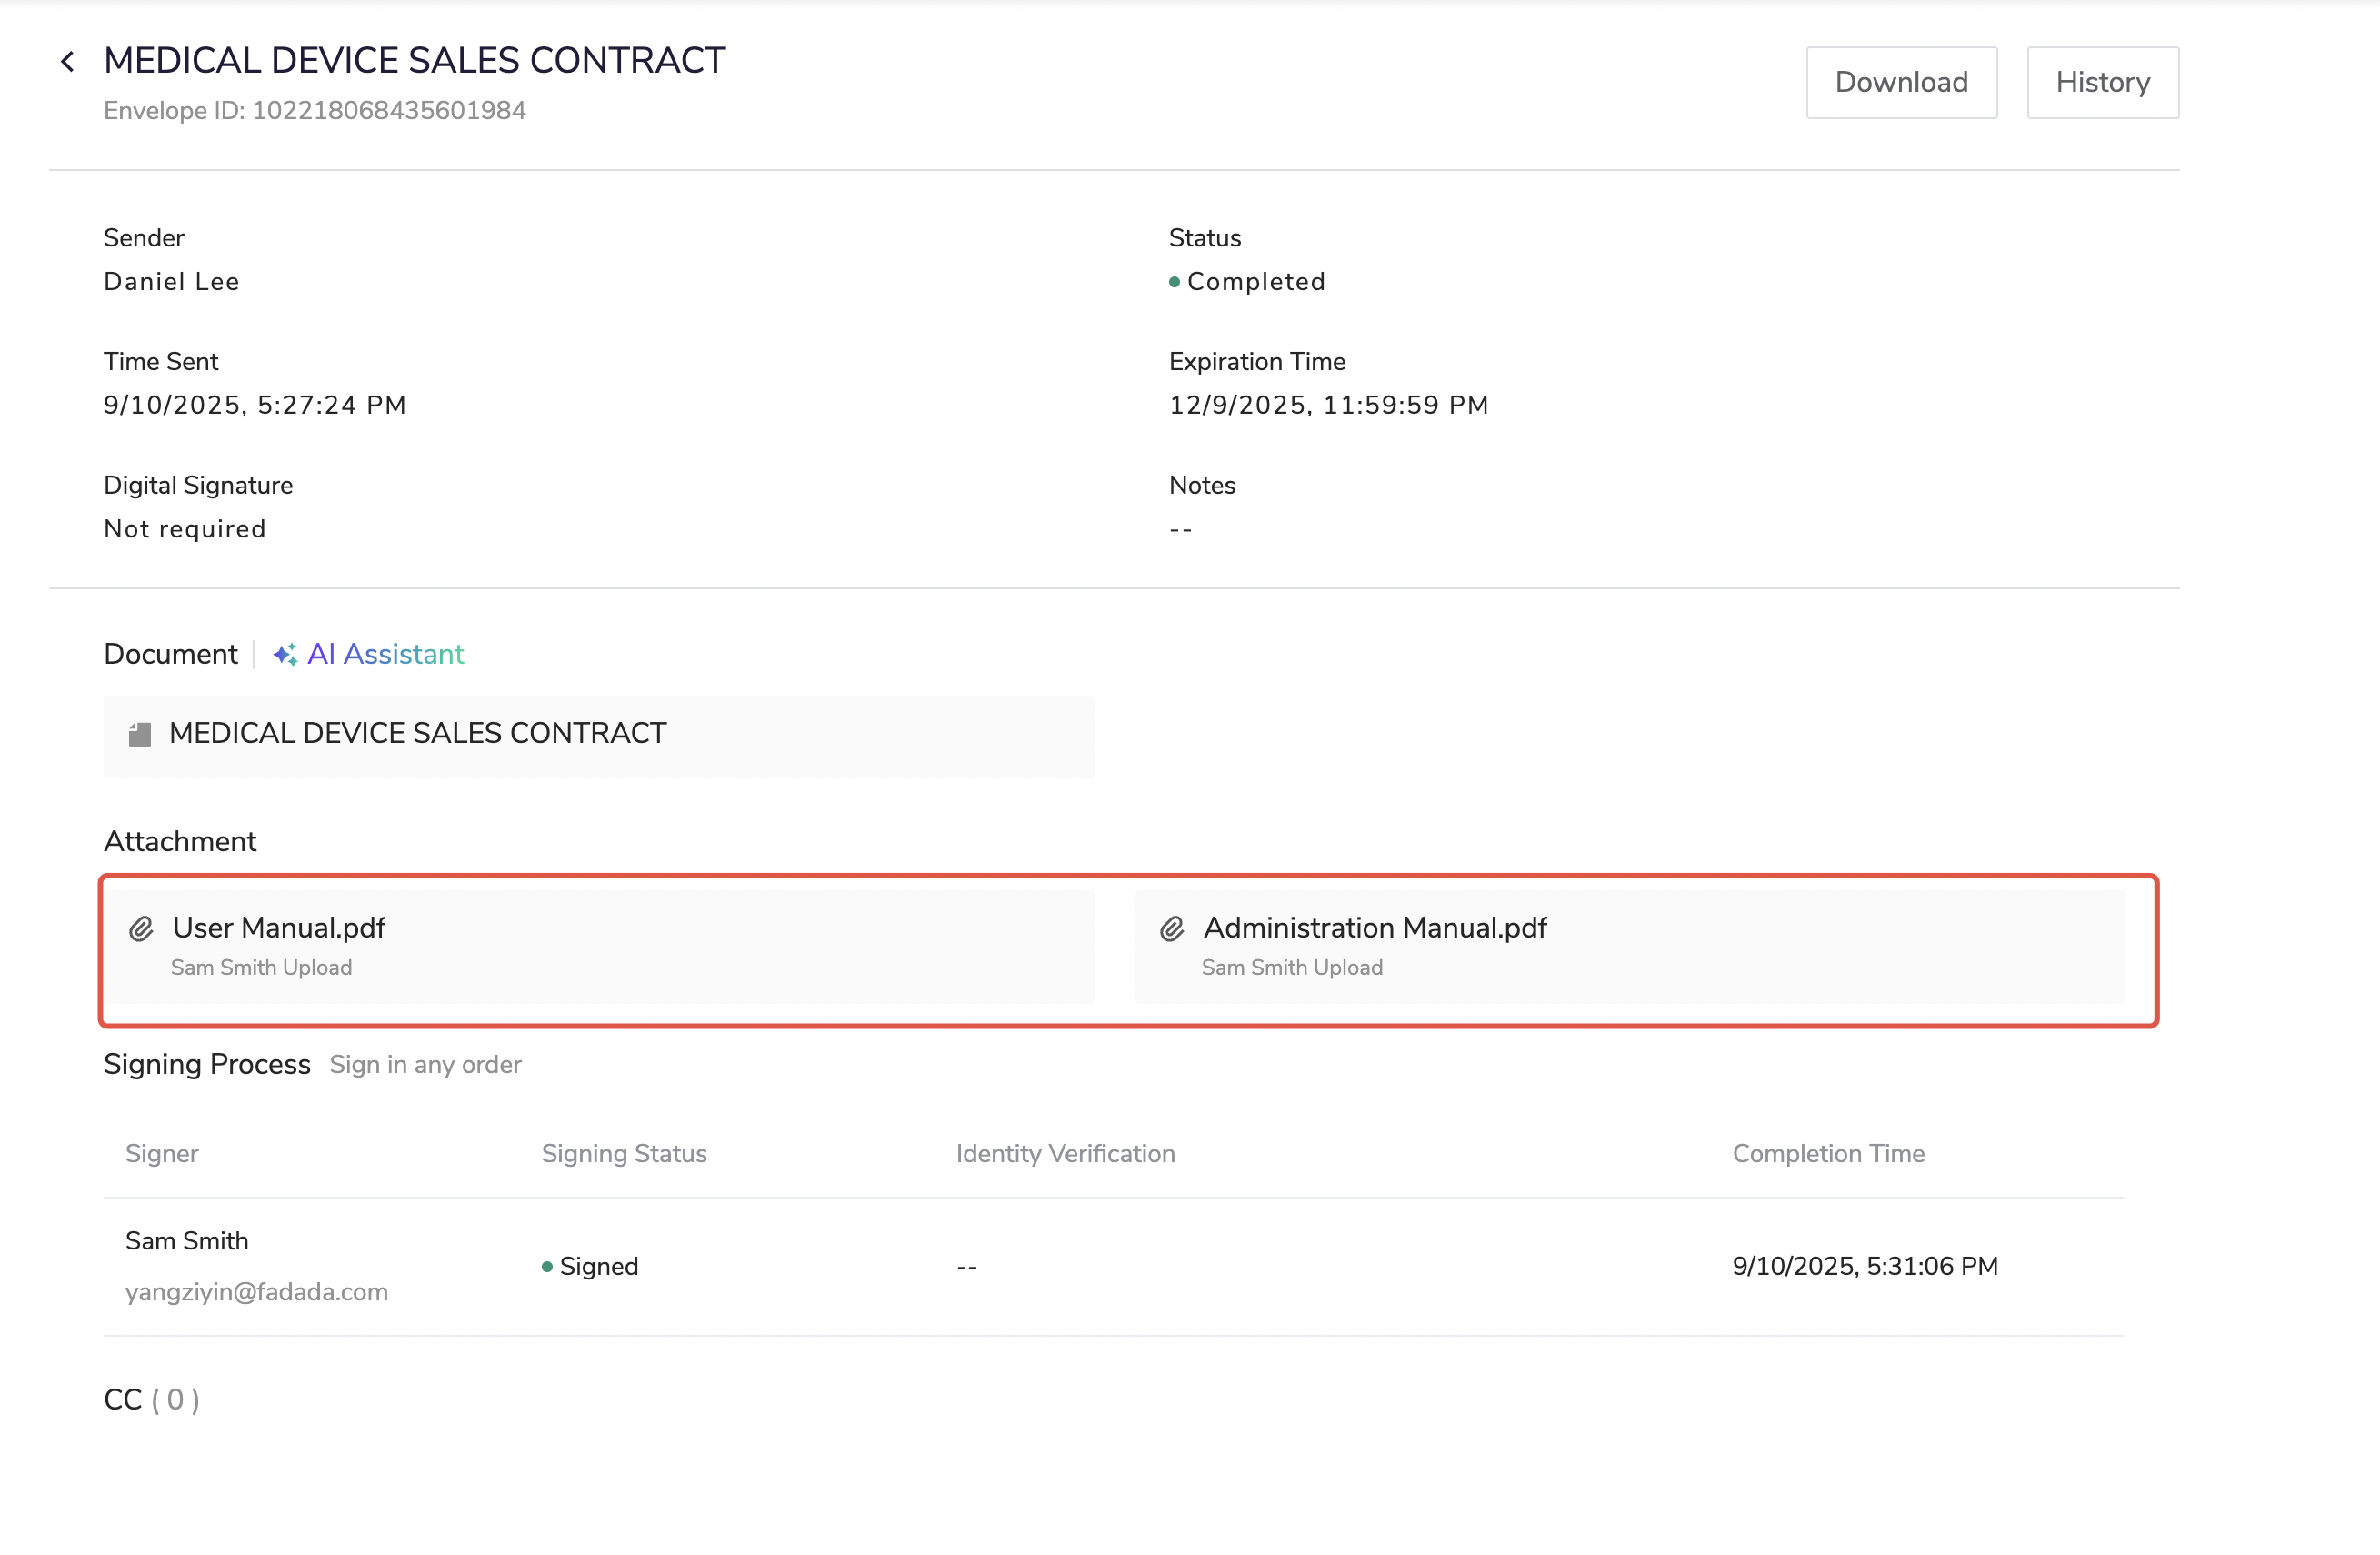
Senders must first enable the attachment control and set the number of allowed attachments in [Manage] - [Sending Settings]:
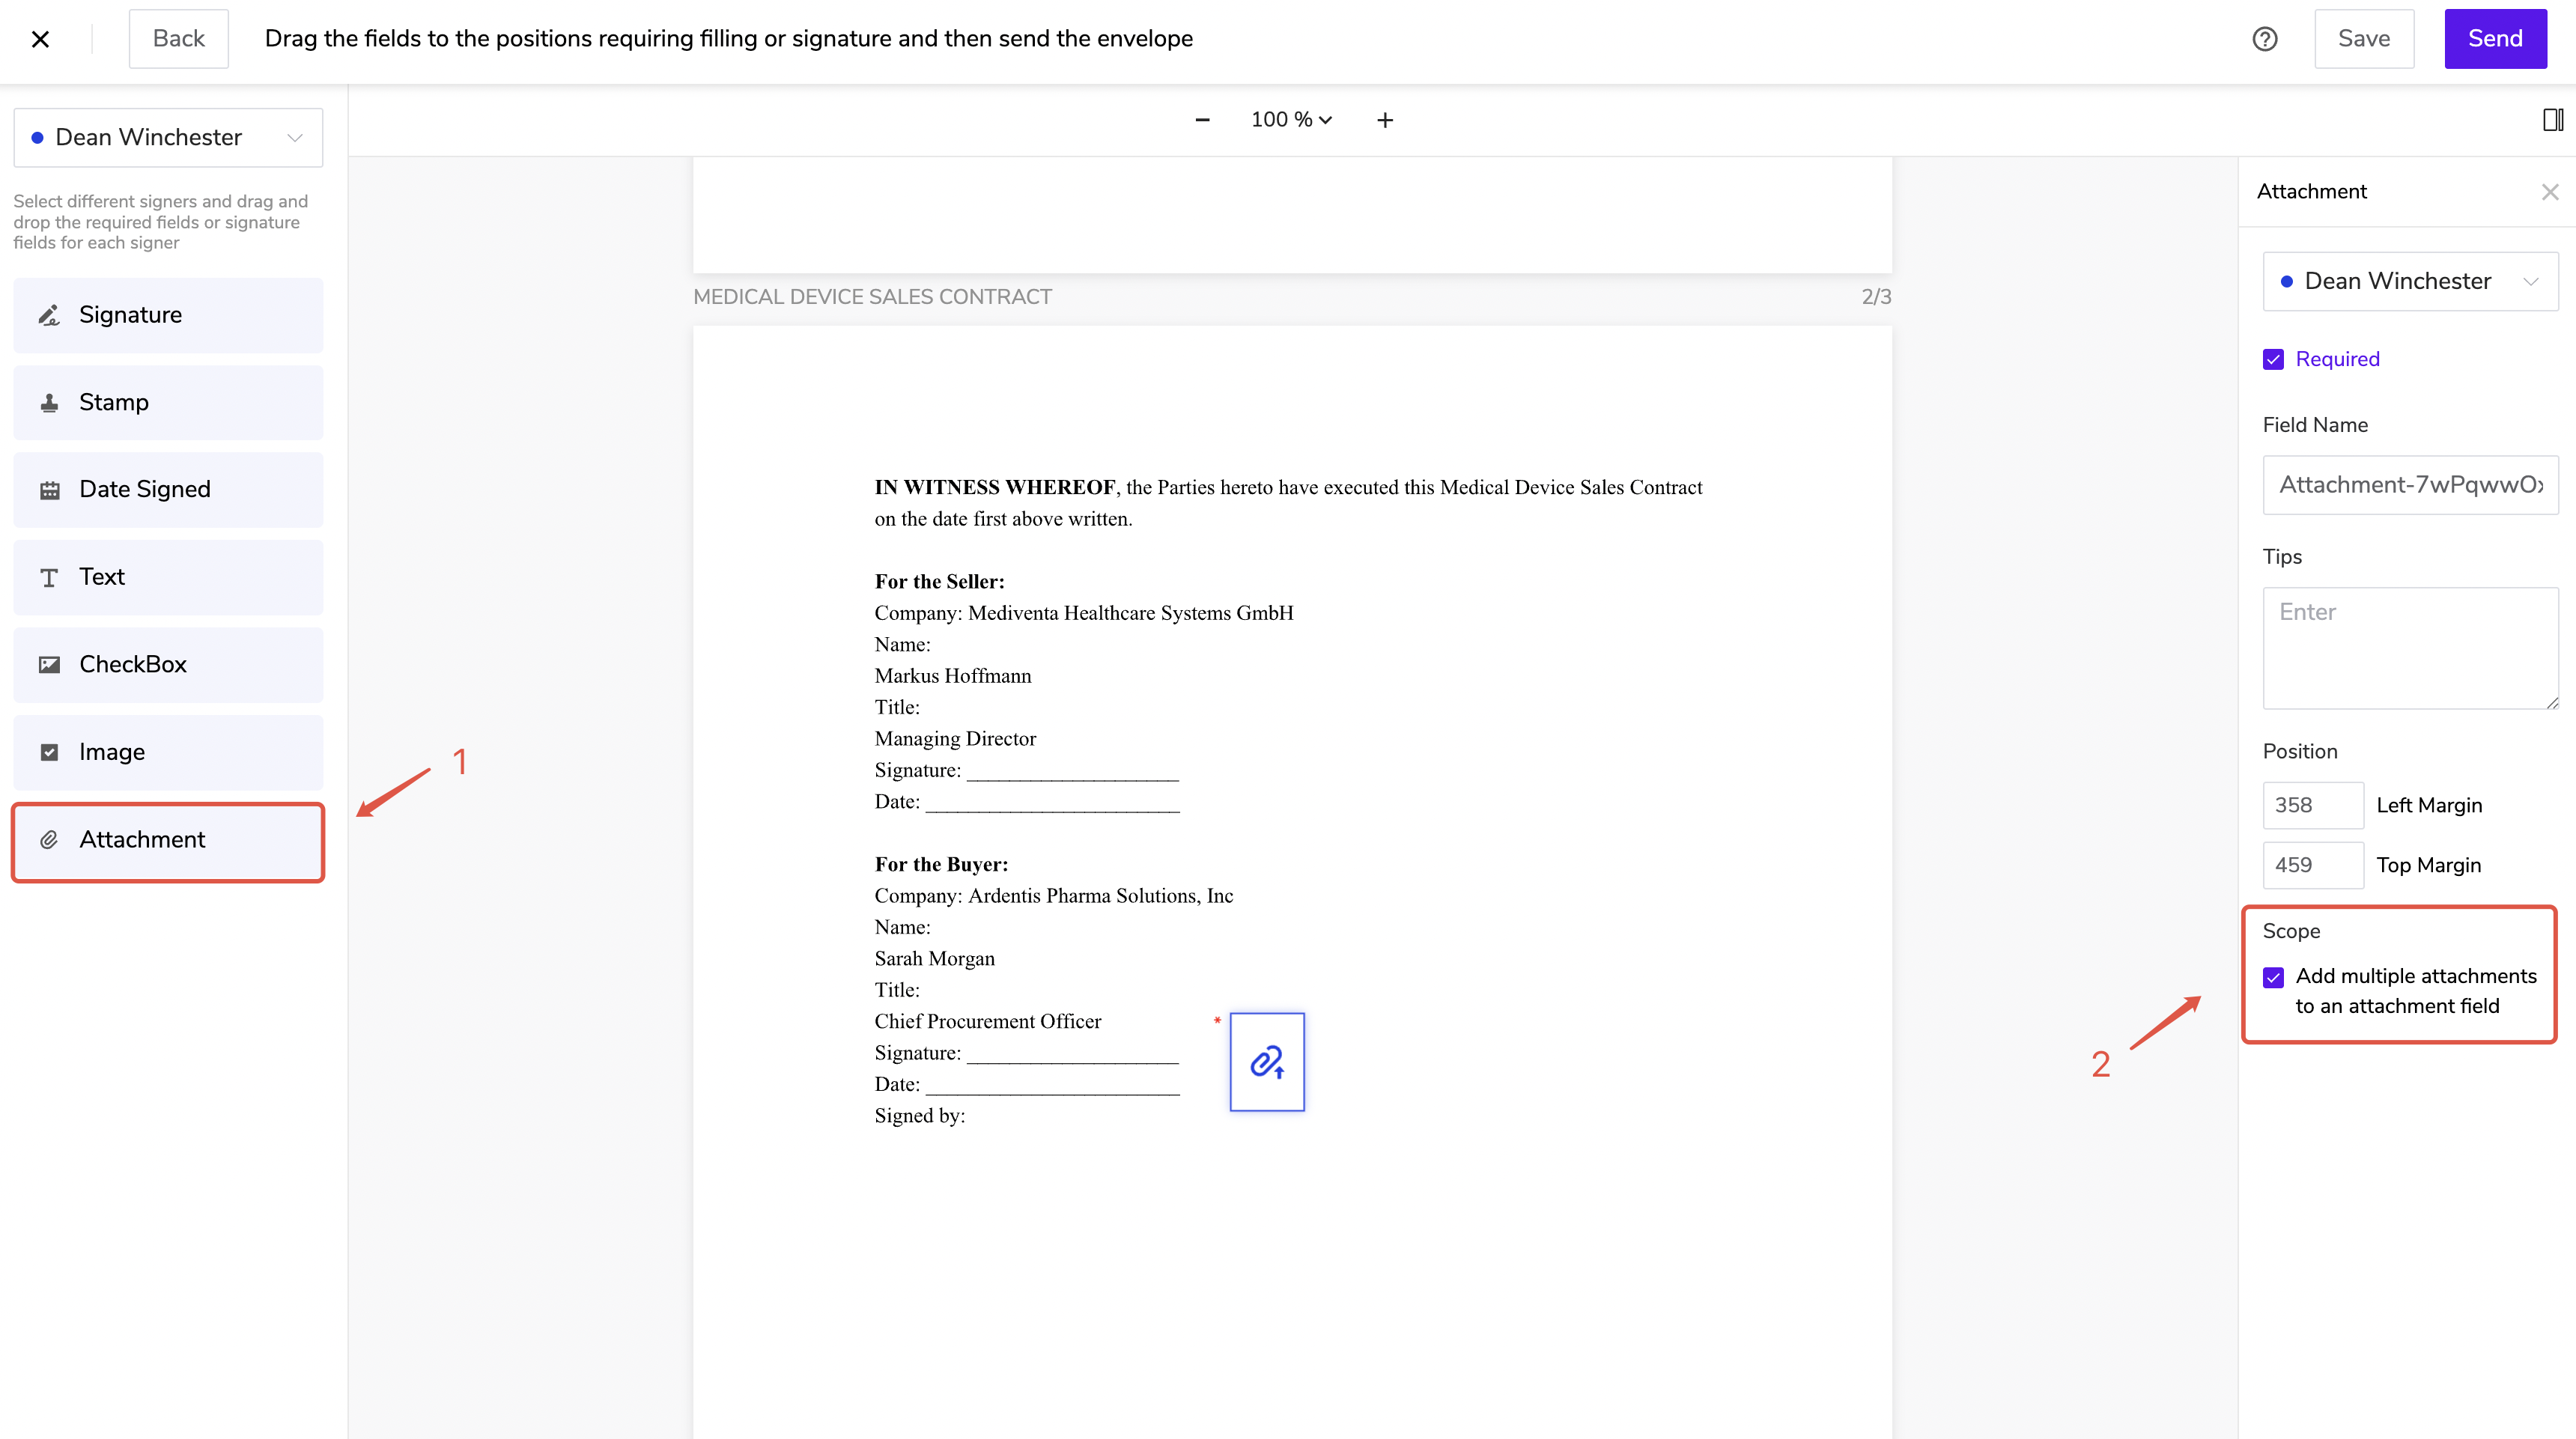
Then drag [Attachment] to the signing area during envelope creation:
(1) How Recipients Upload Attachments
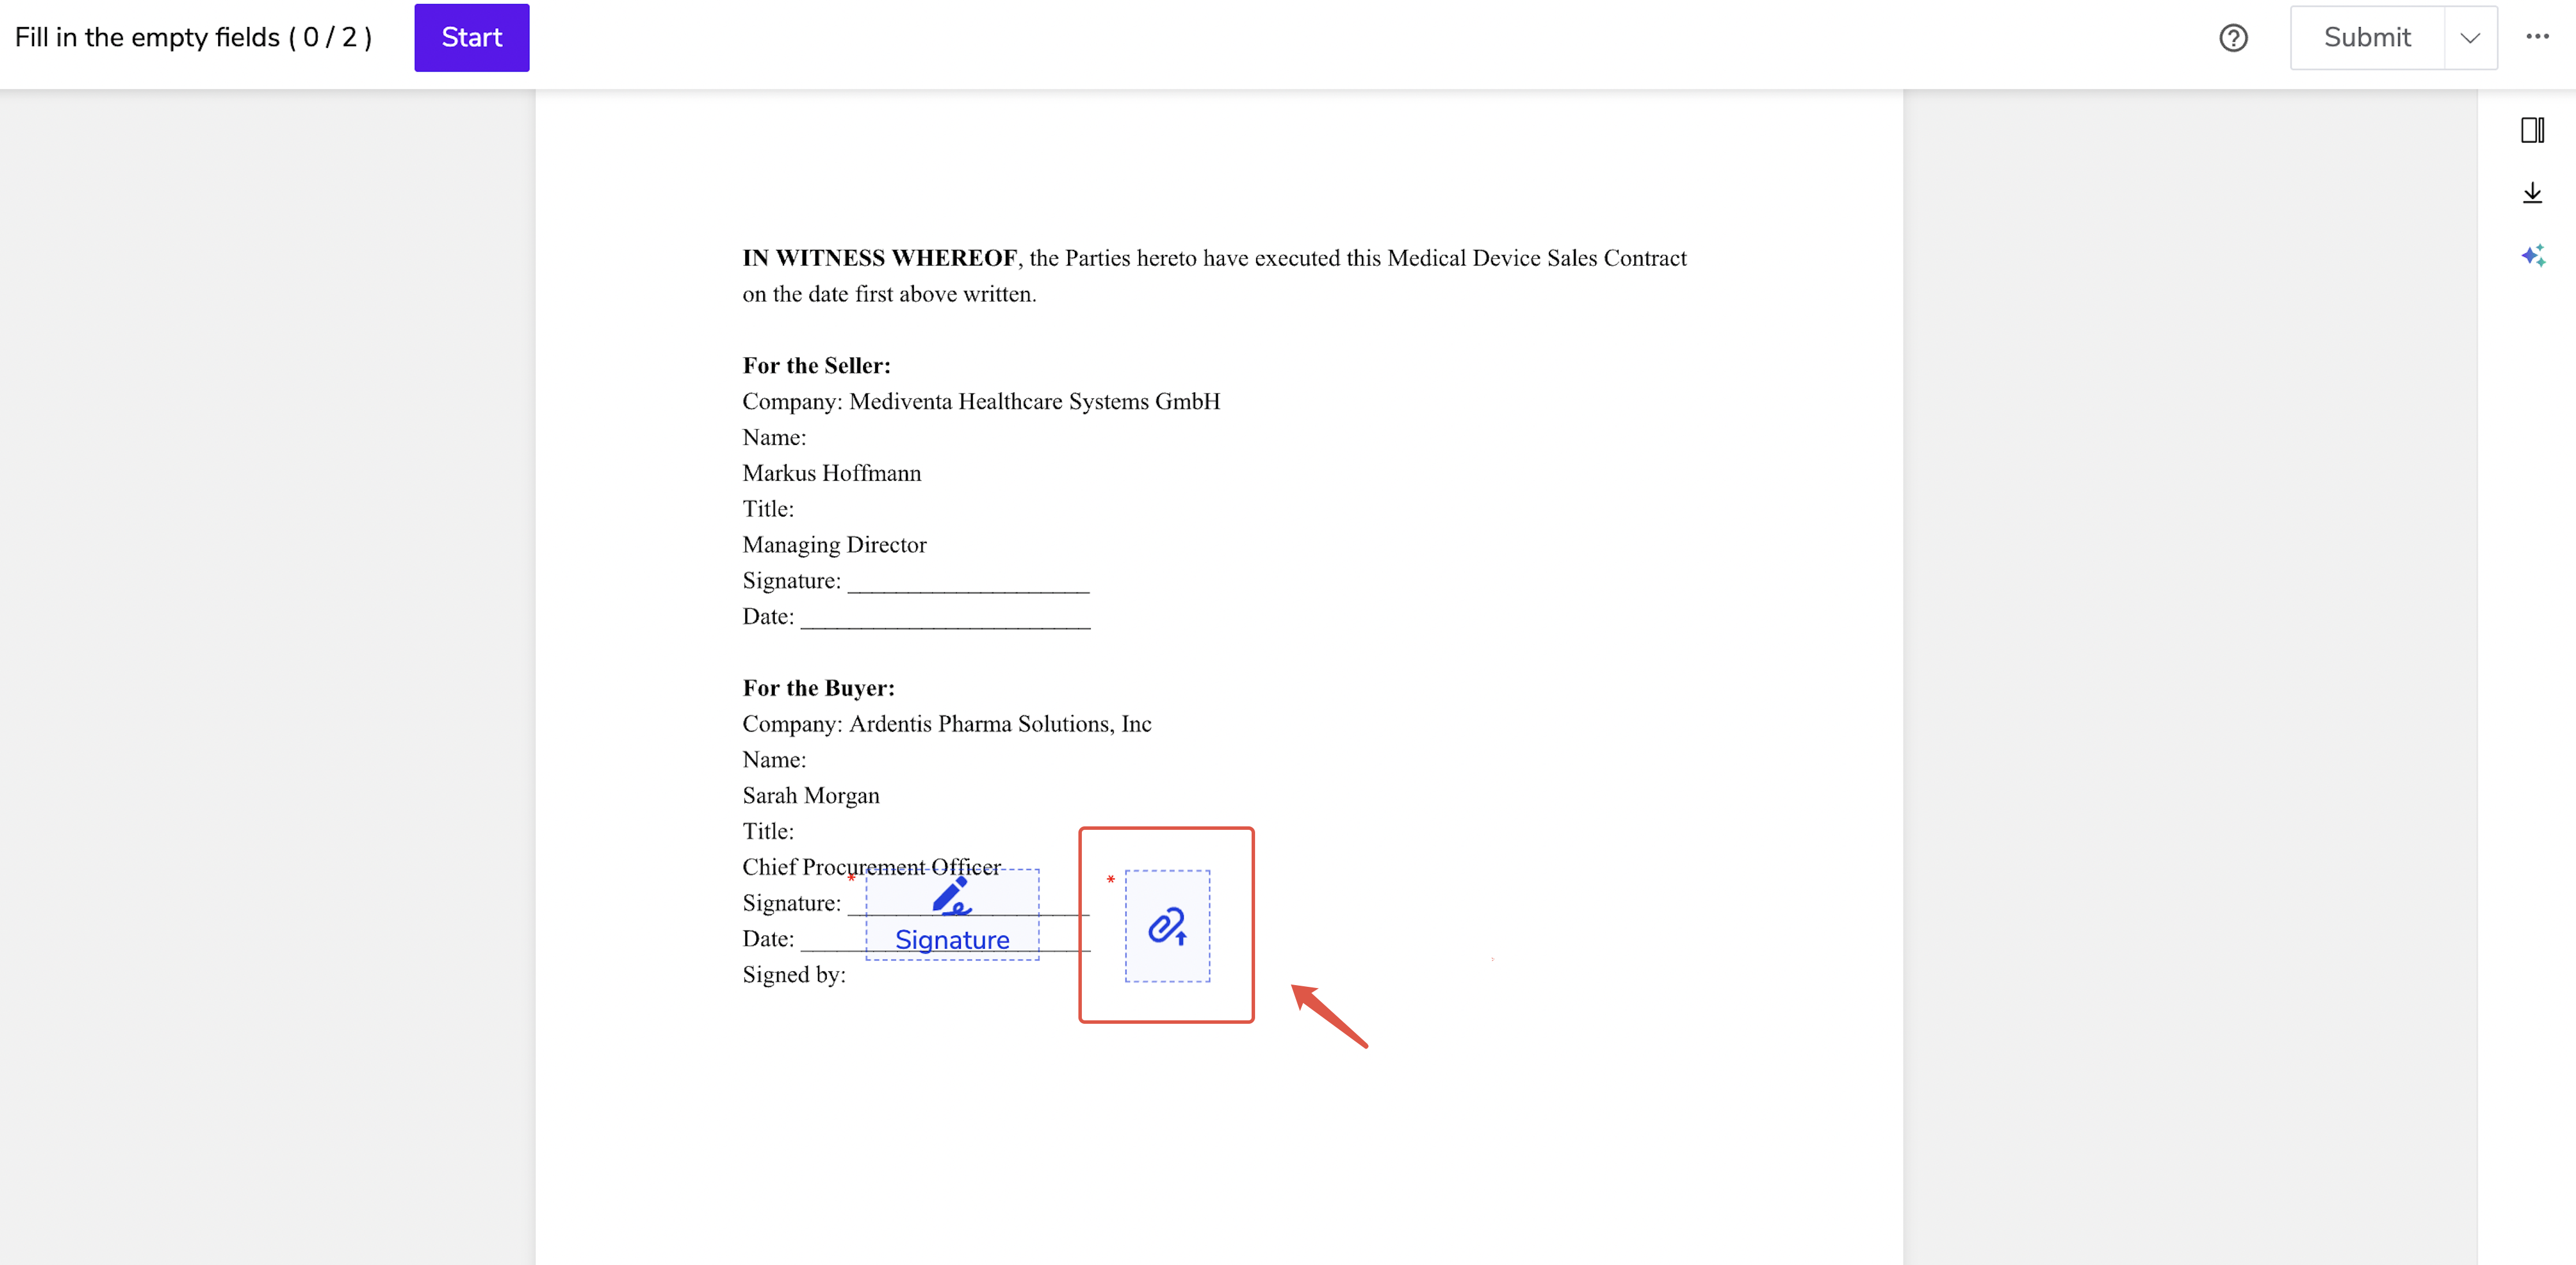
- Click [View Document] in the email to view the envelope;
- After opening the envelope, click [Upload Attachment];
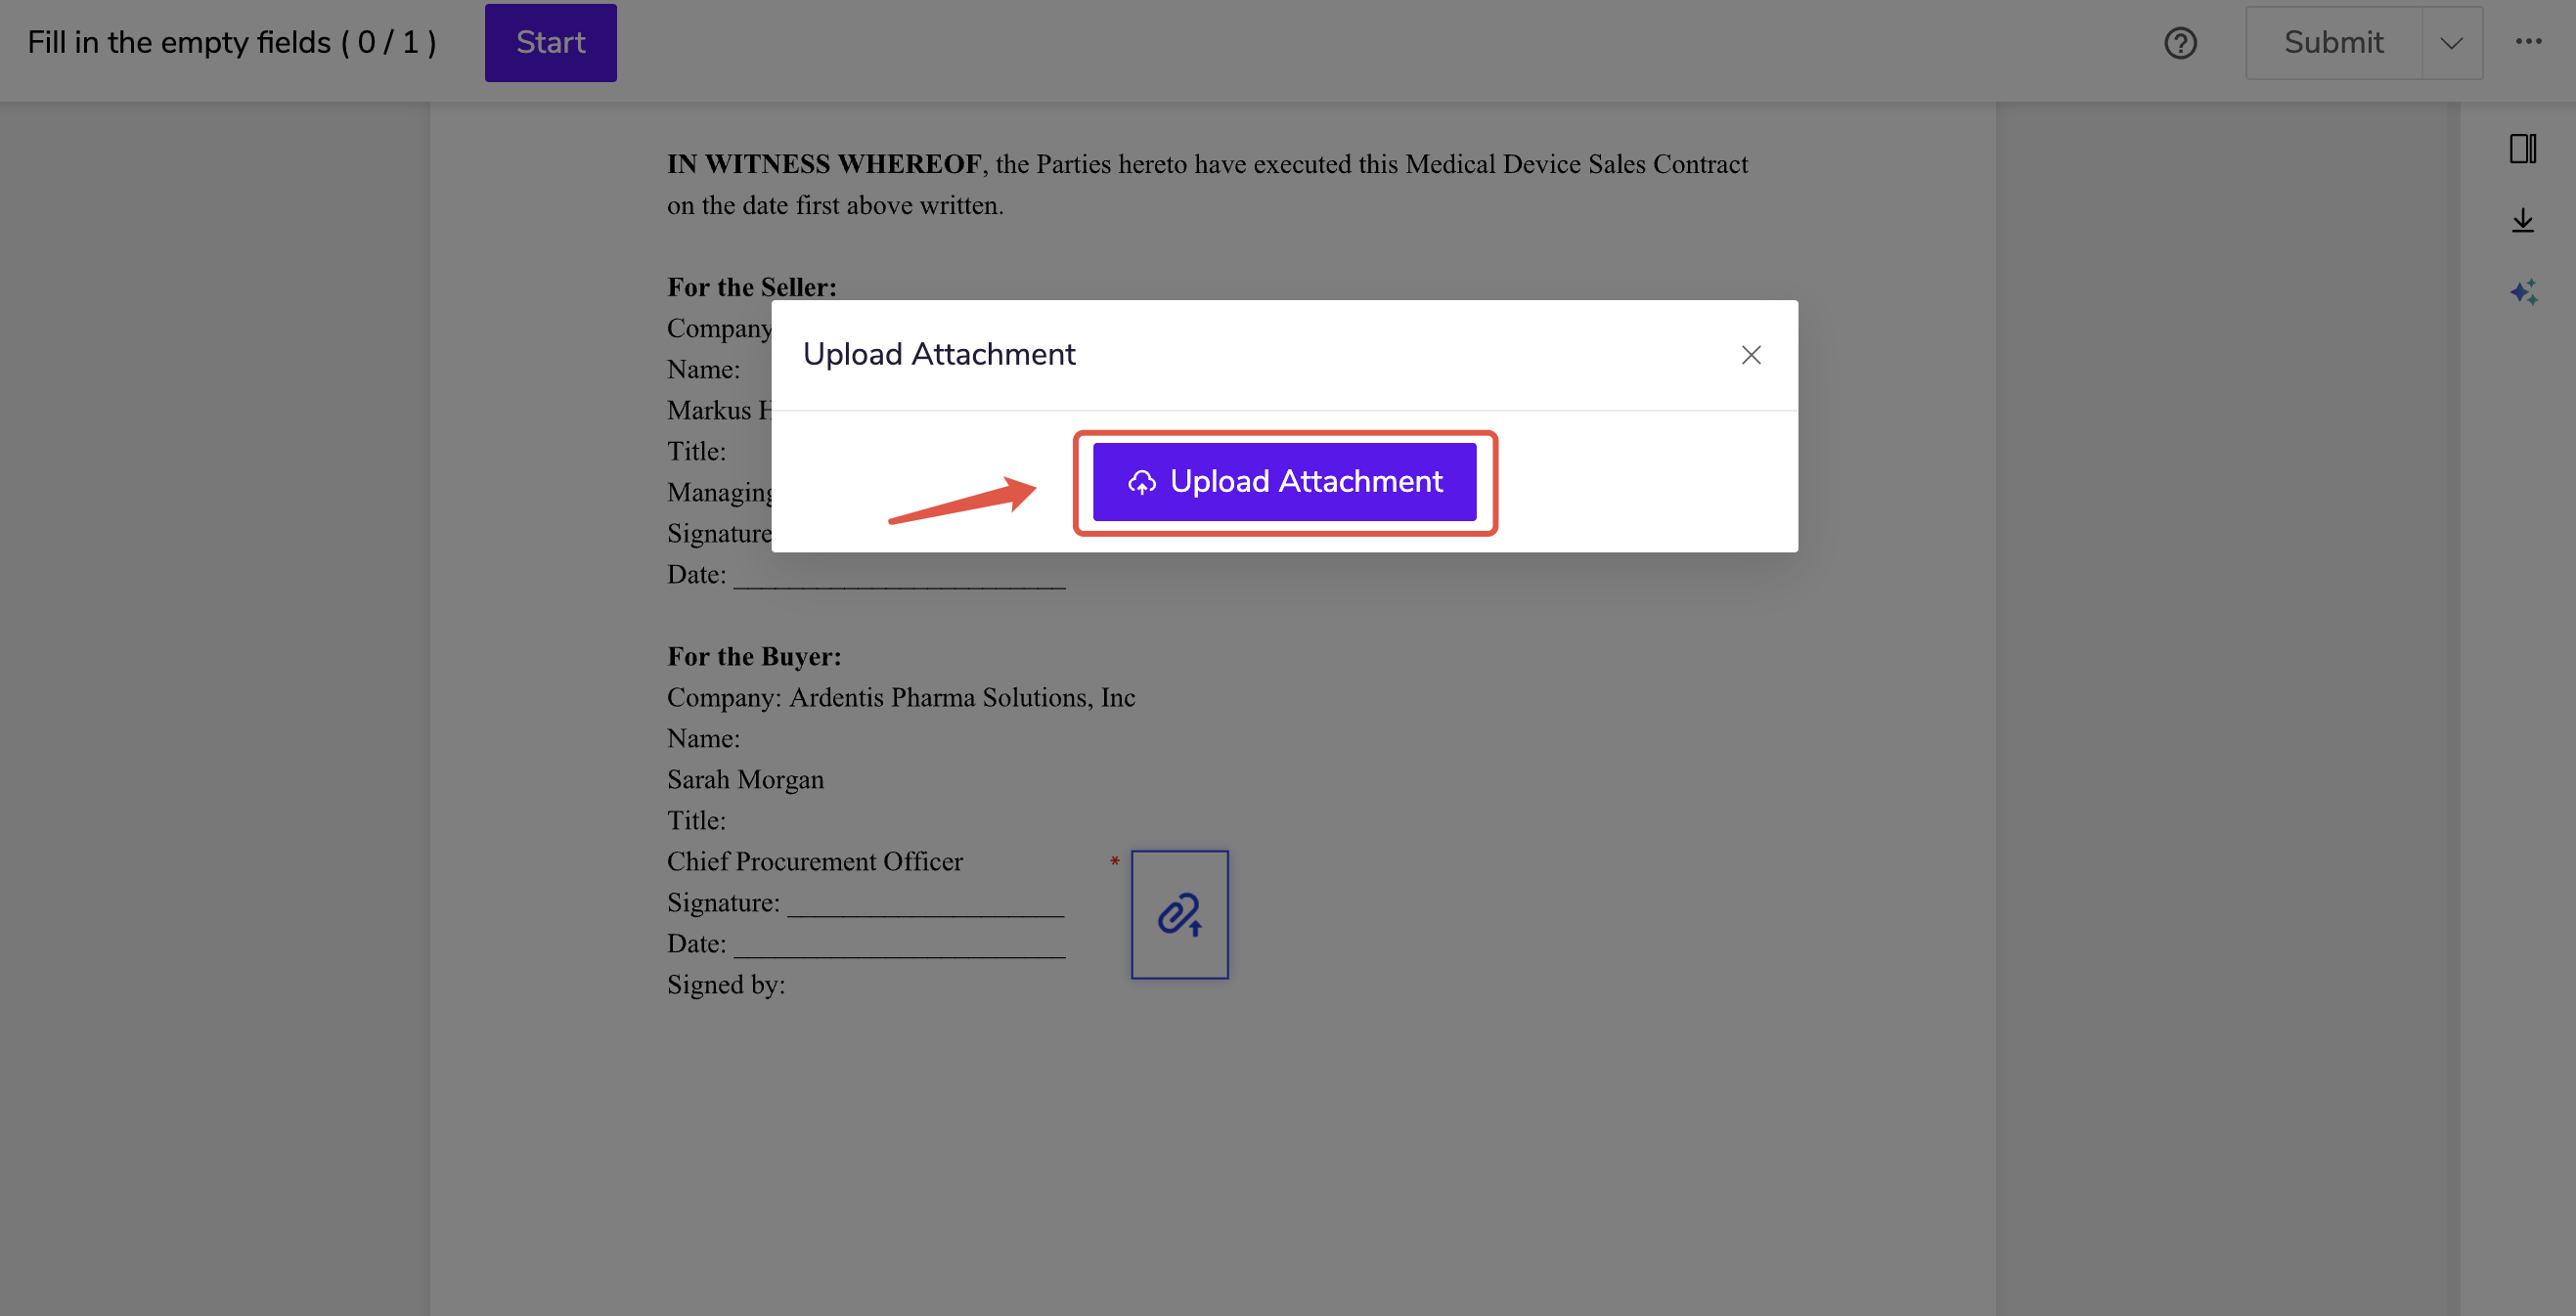
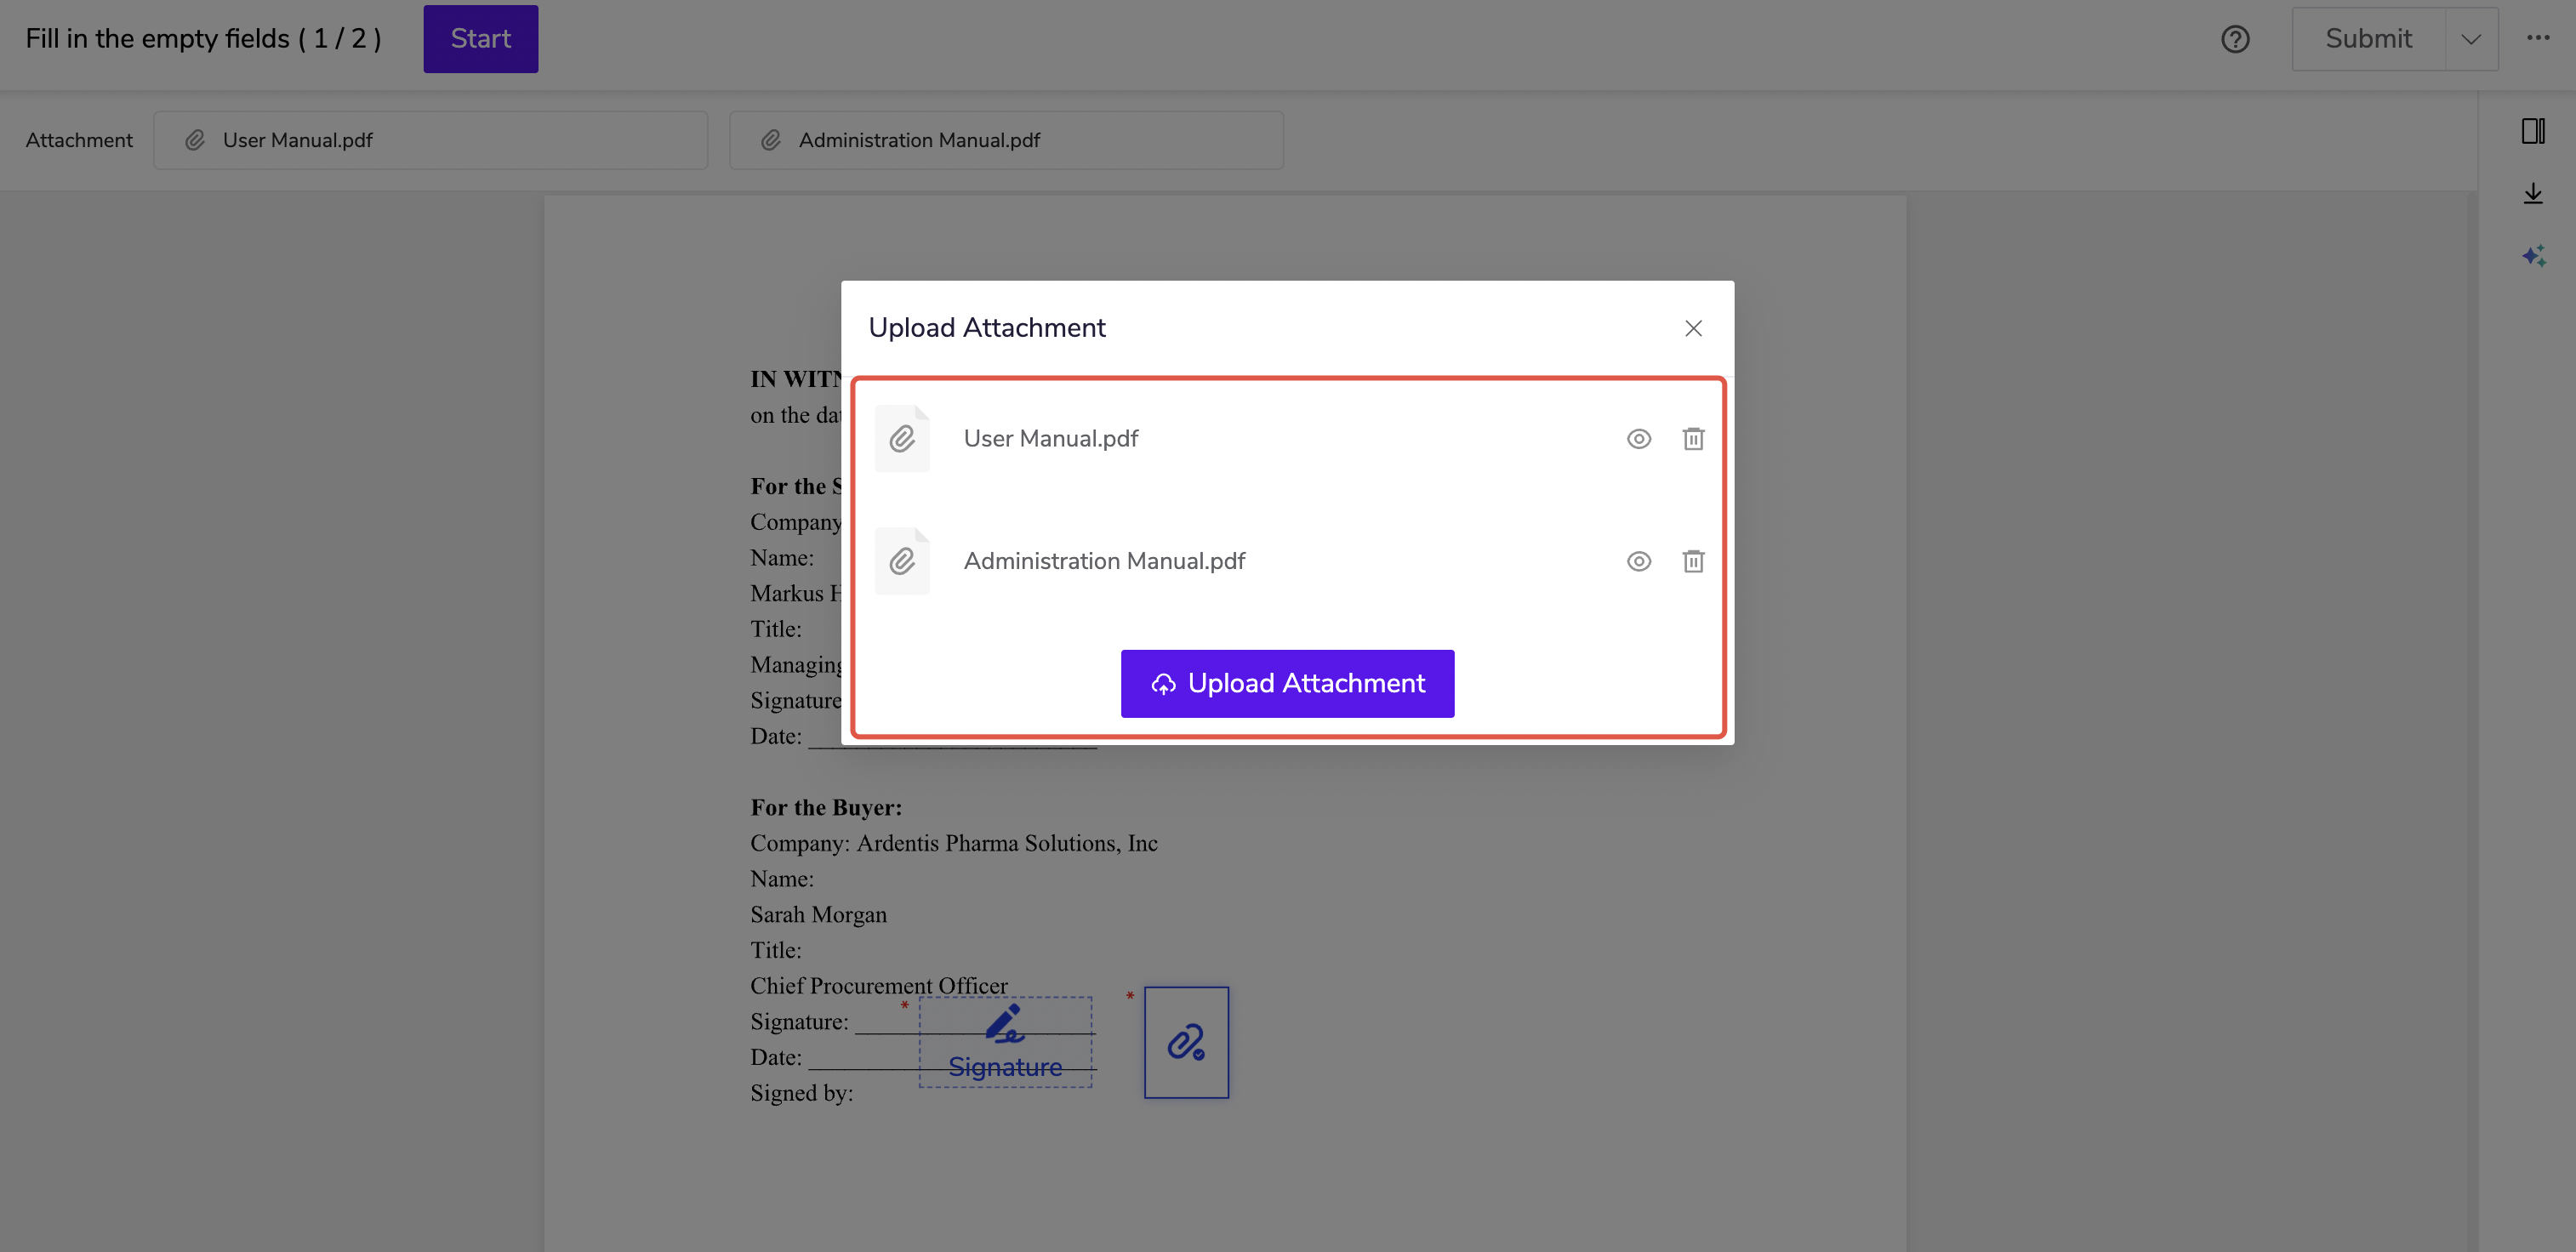
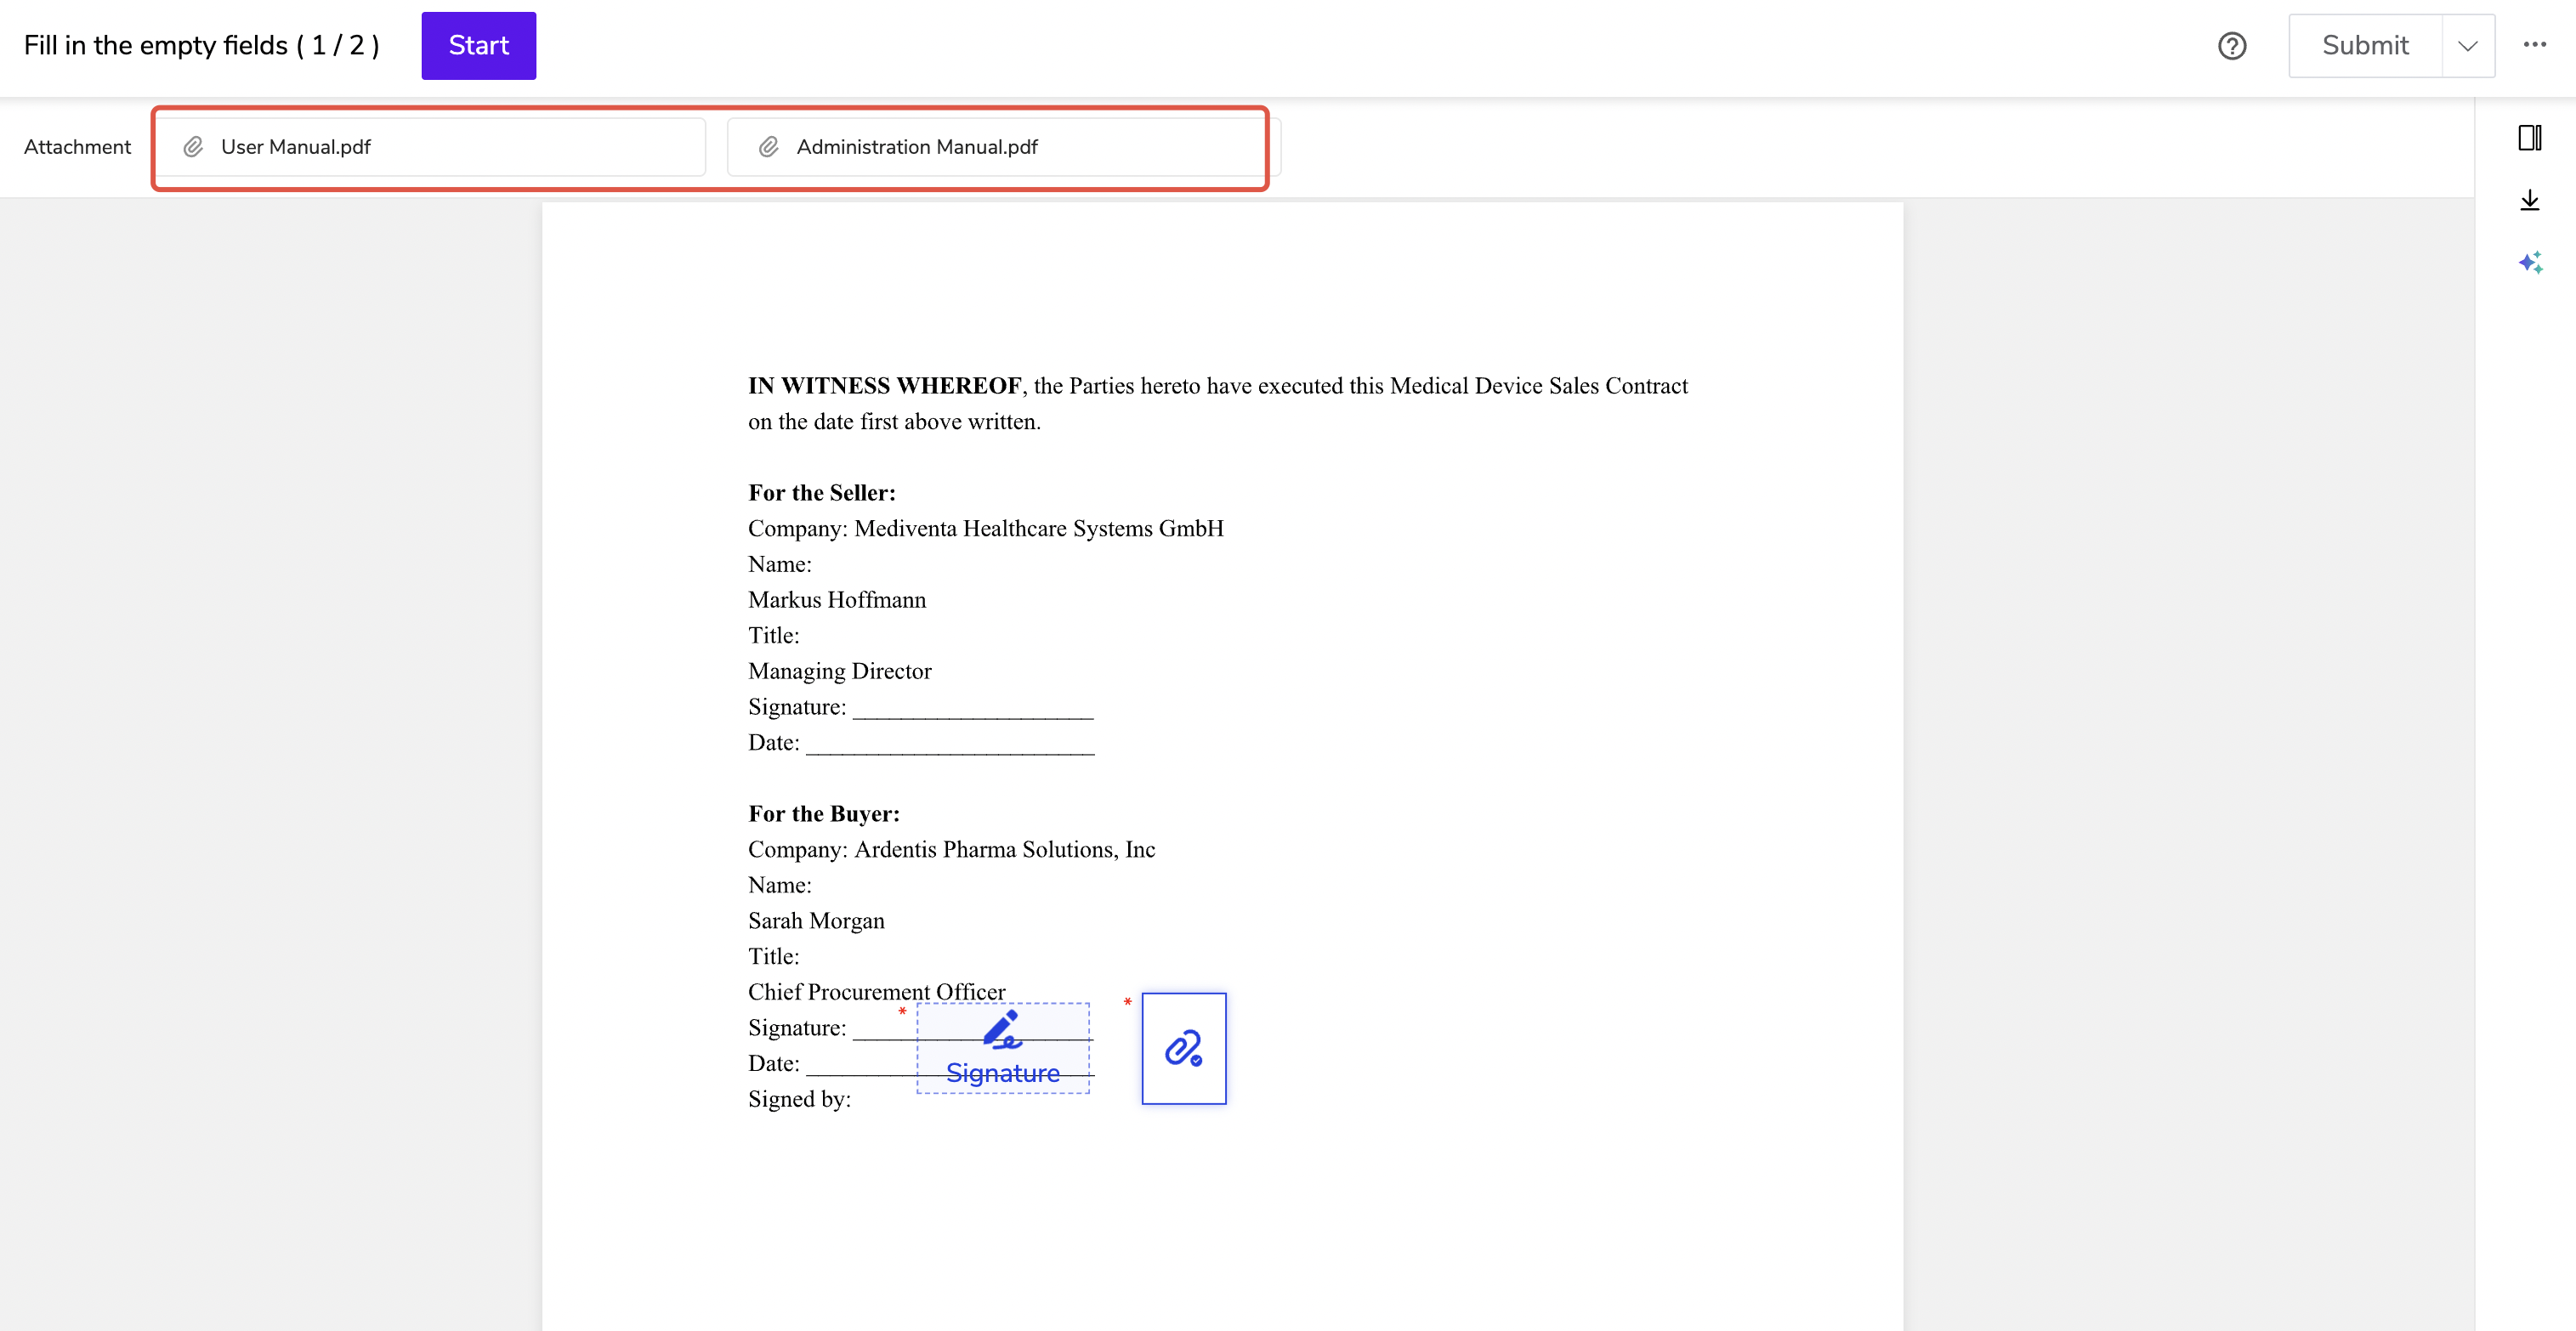
- View uploaded attachments in the menu bar.
(2) How Senders Download Attachments
After the envelope is sent, senders can download attachments from the email or envelope signing records.
Download from Email:
After the recipient completes signing, the sender can download attachments from the signing completion notification email.
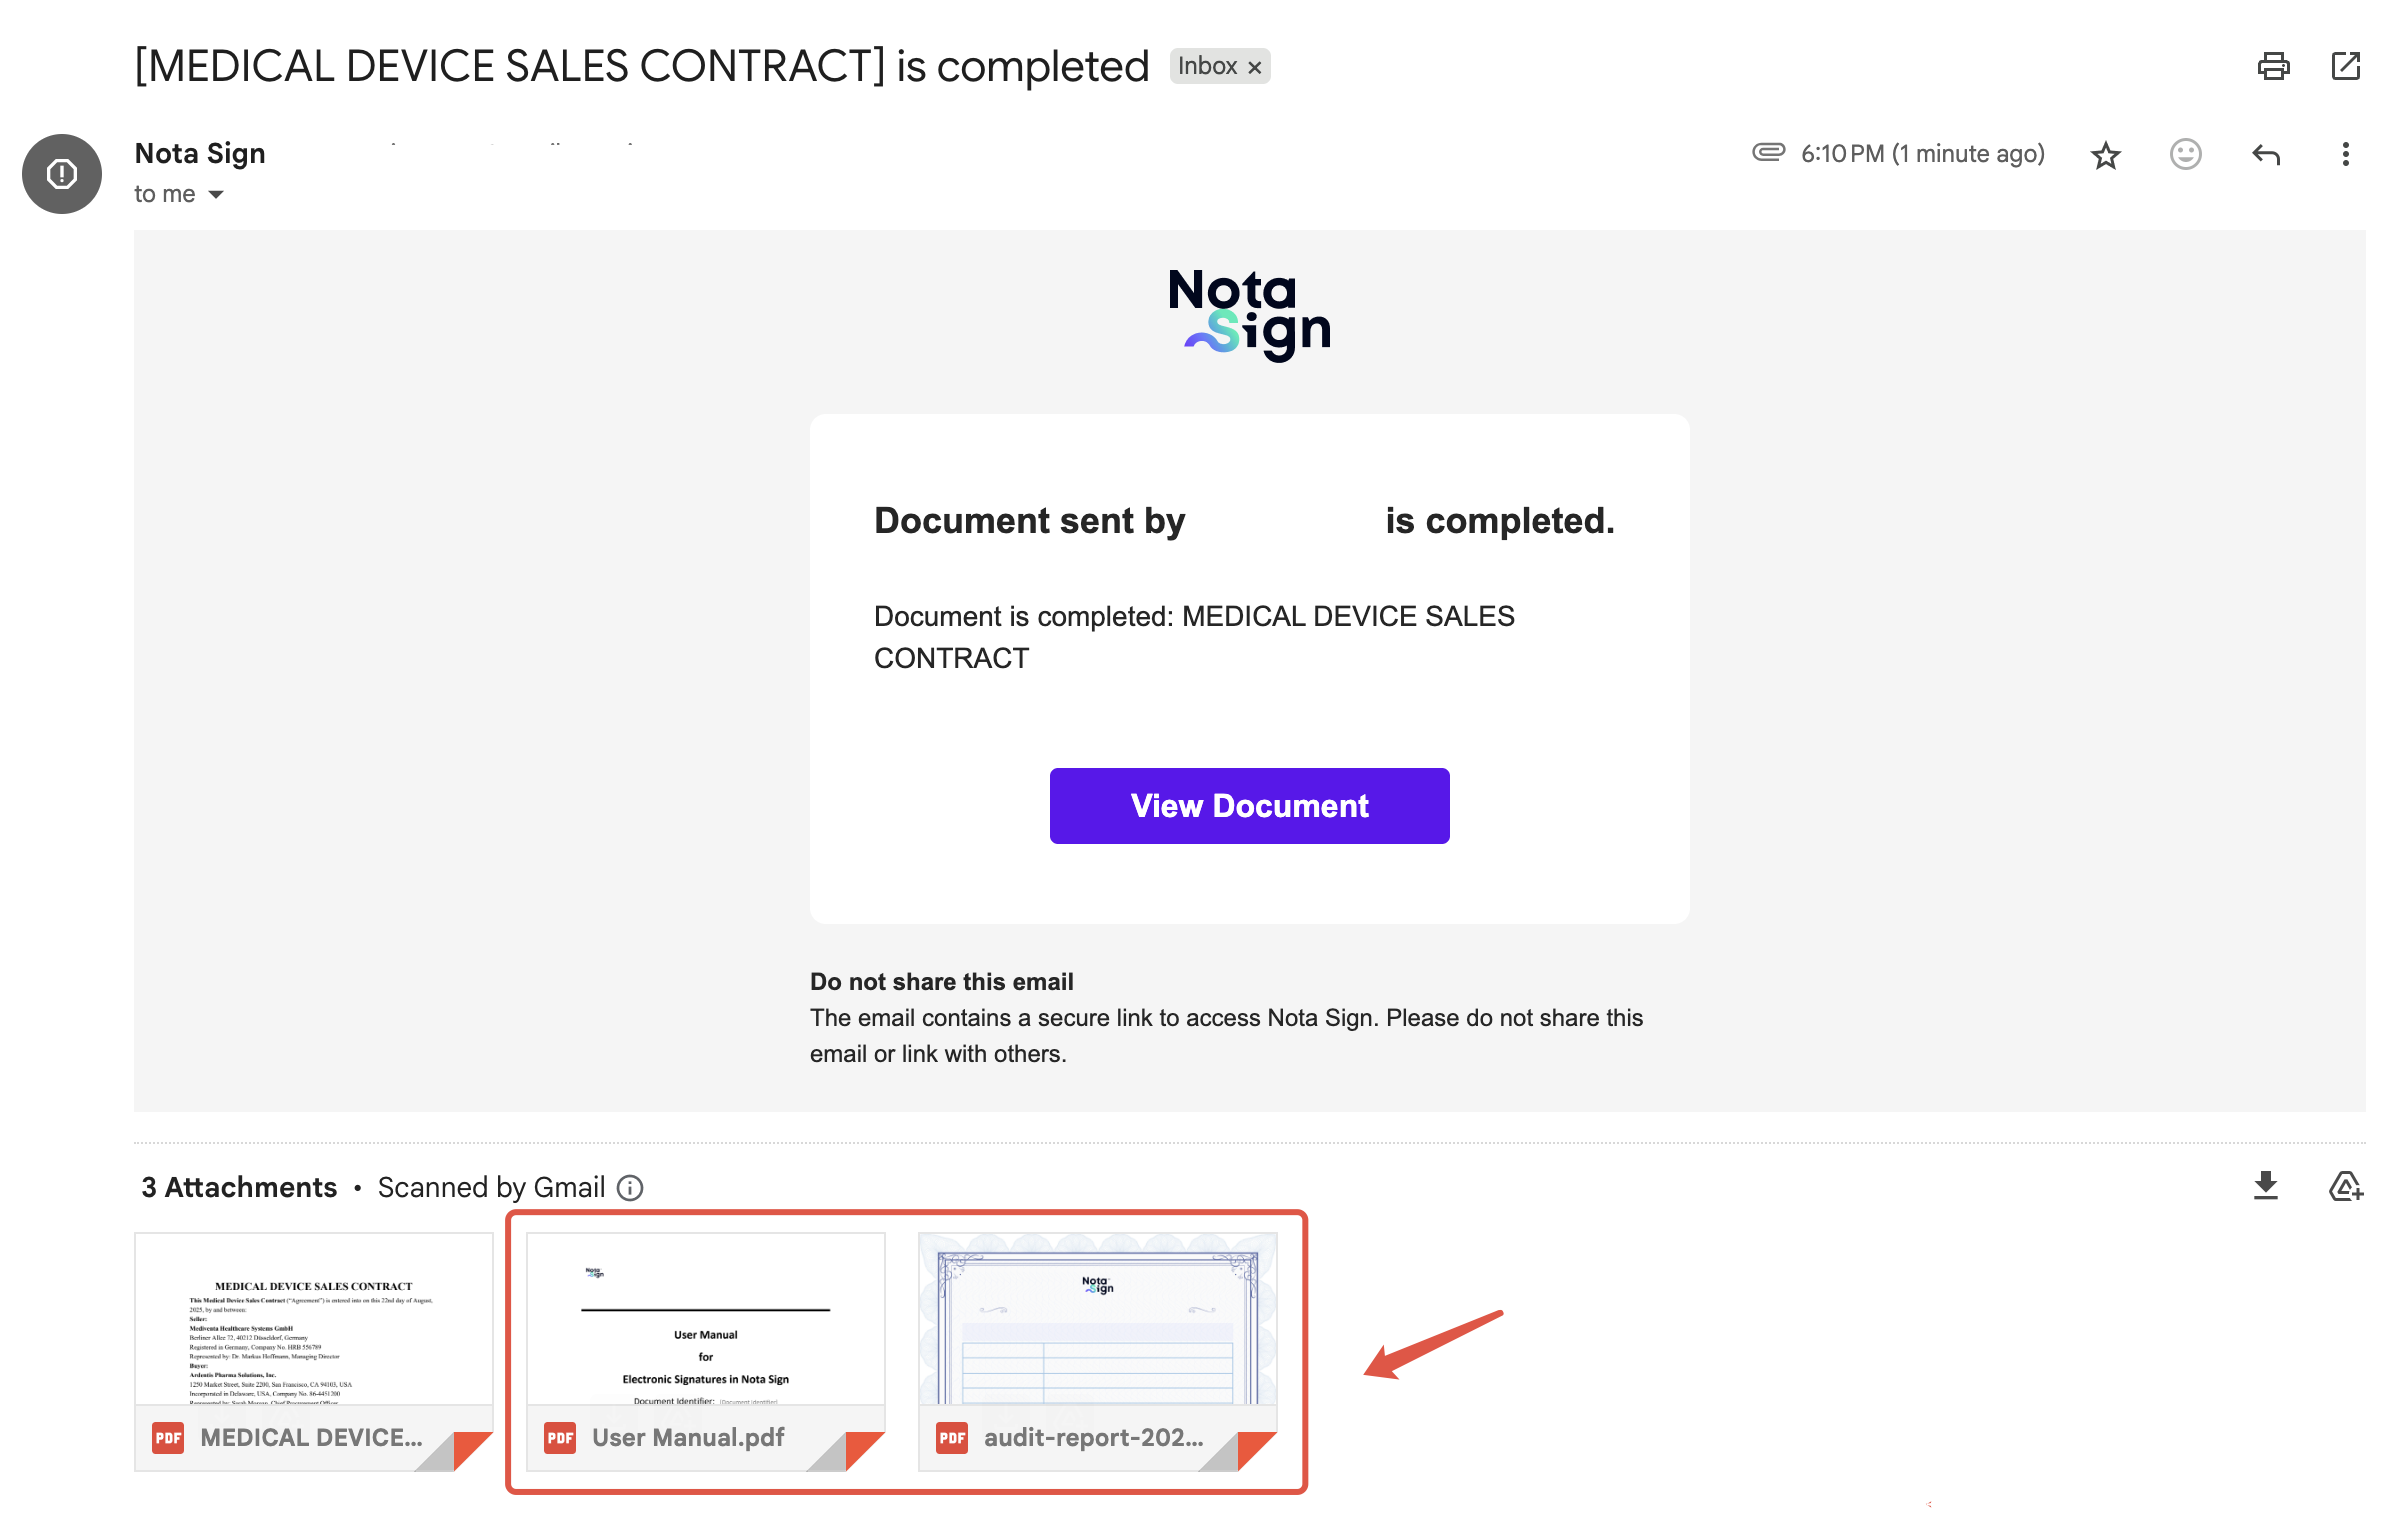
Download from Envelope Signing Records:
- Click [View];
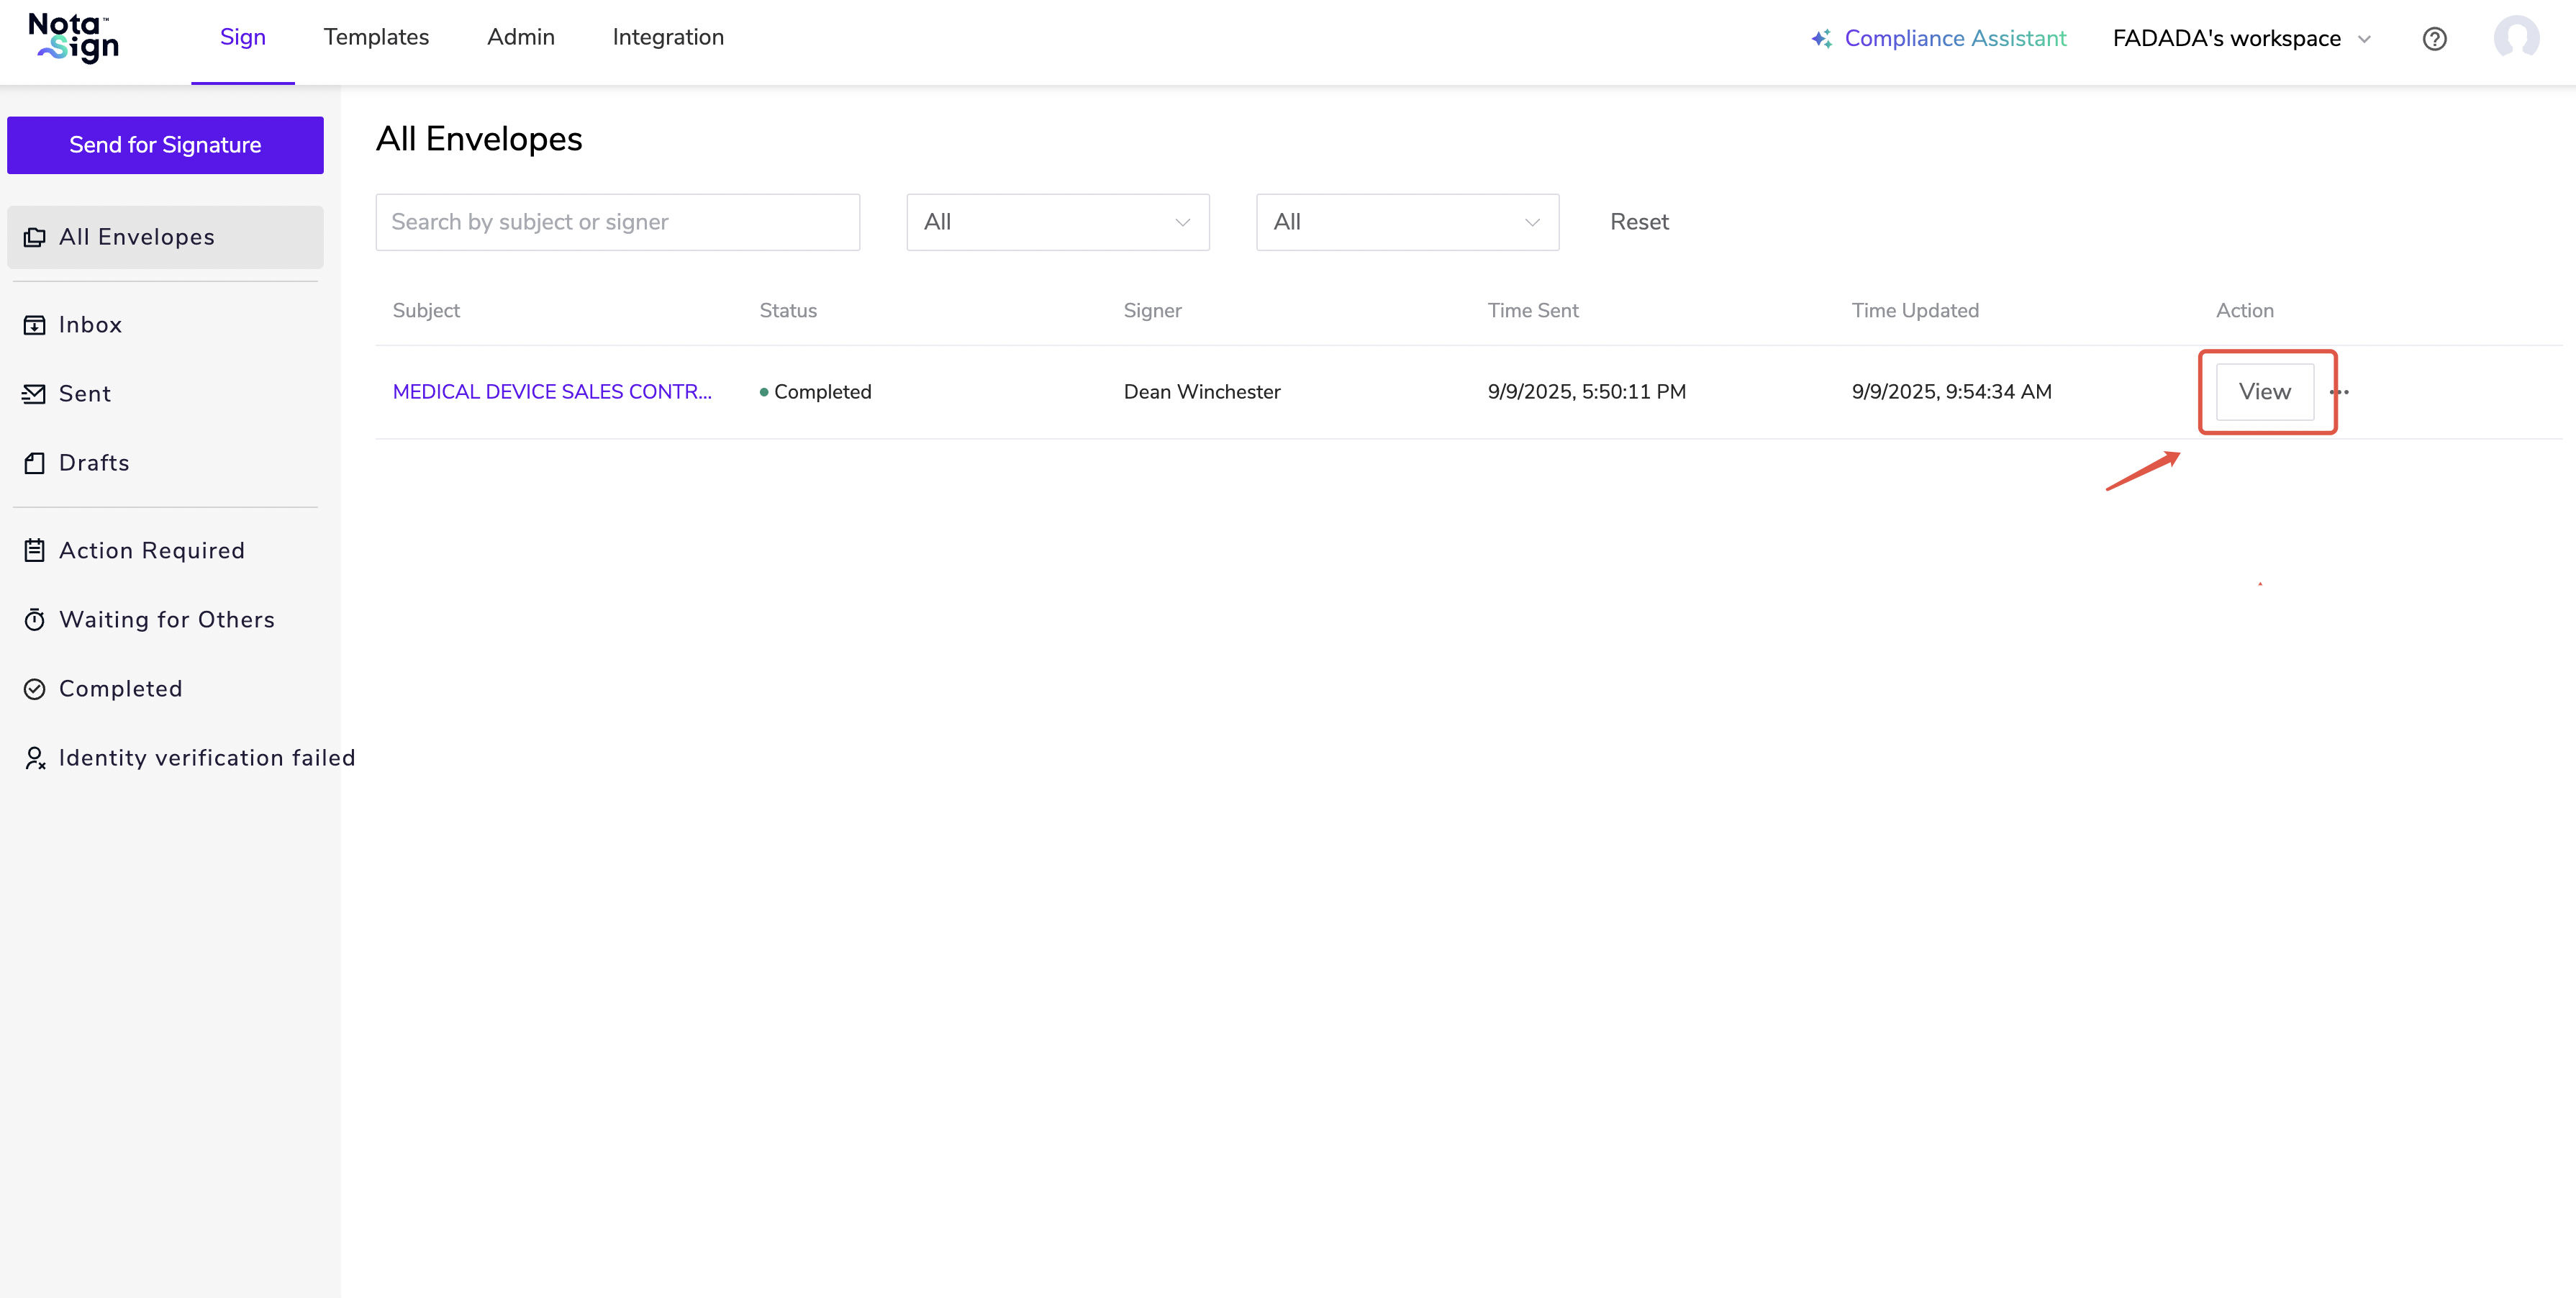
- Download the attachments.
IV. Special Controls
1. Electronic Seal Control
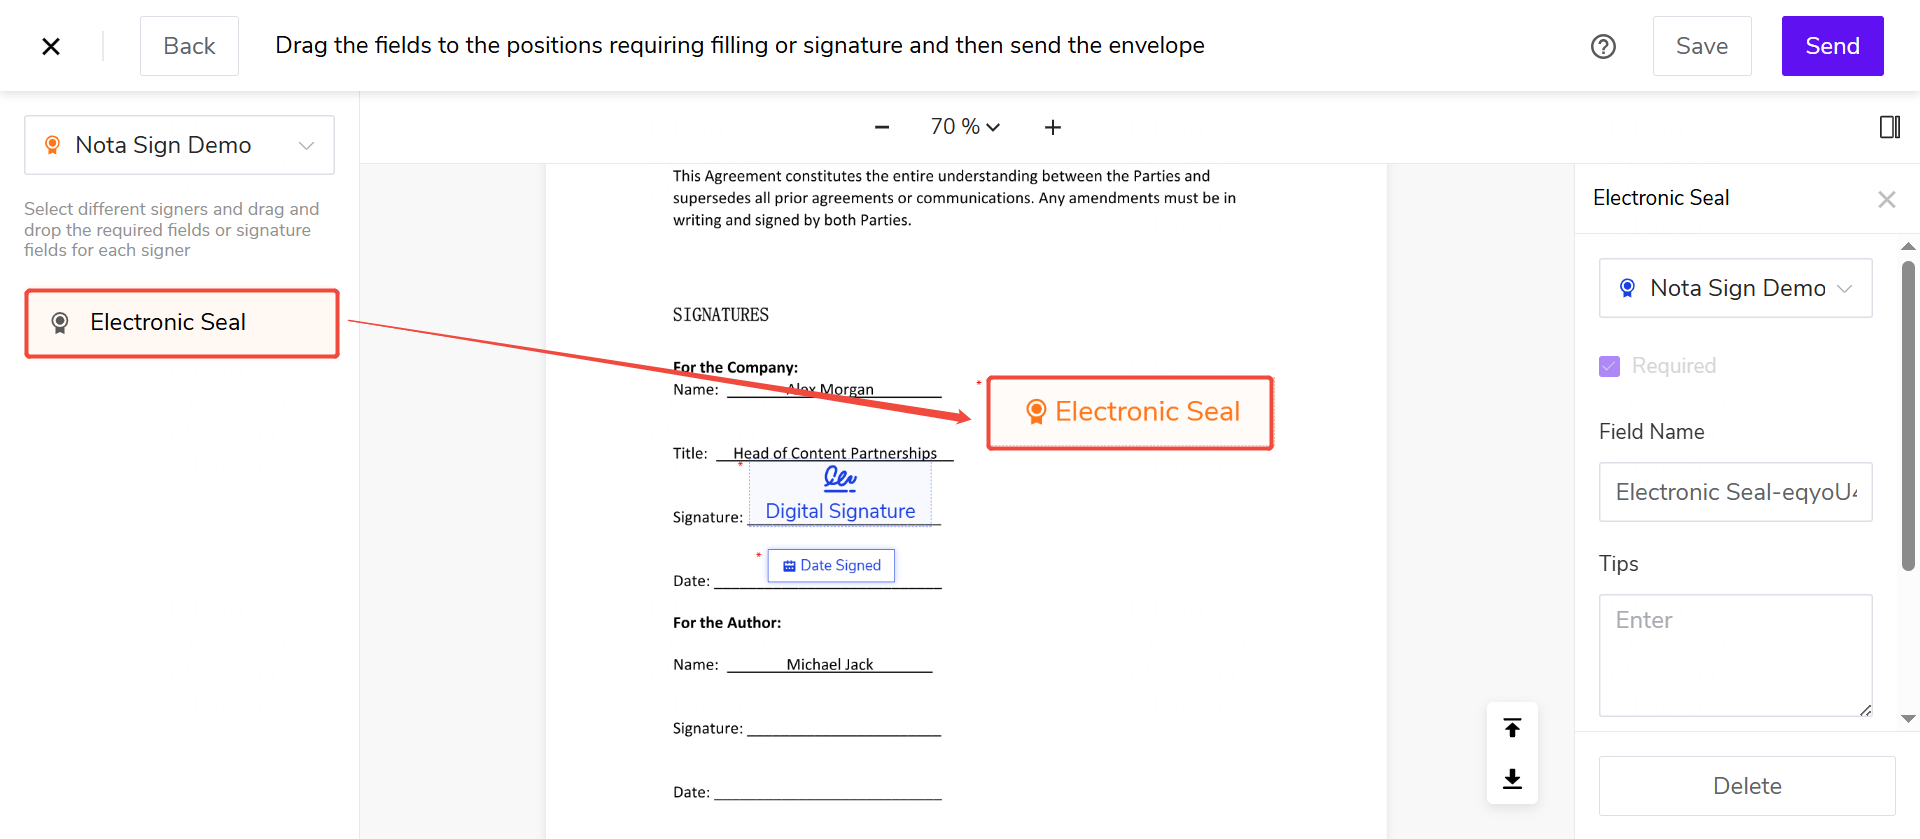
After the sender has configured the electronic seal, drag the Electronic Seal Control from the left control panel to the corresponding position in the document preview area.
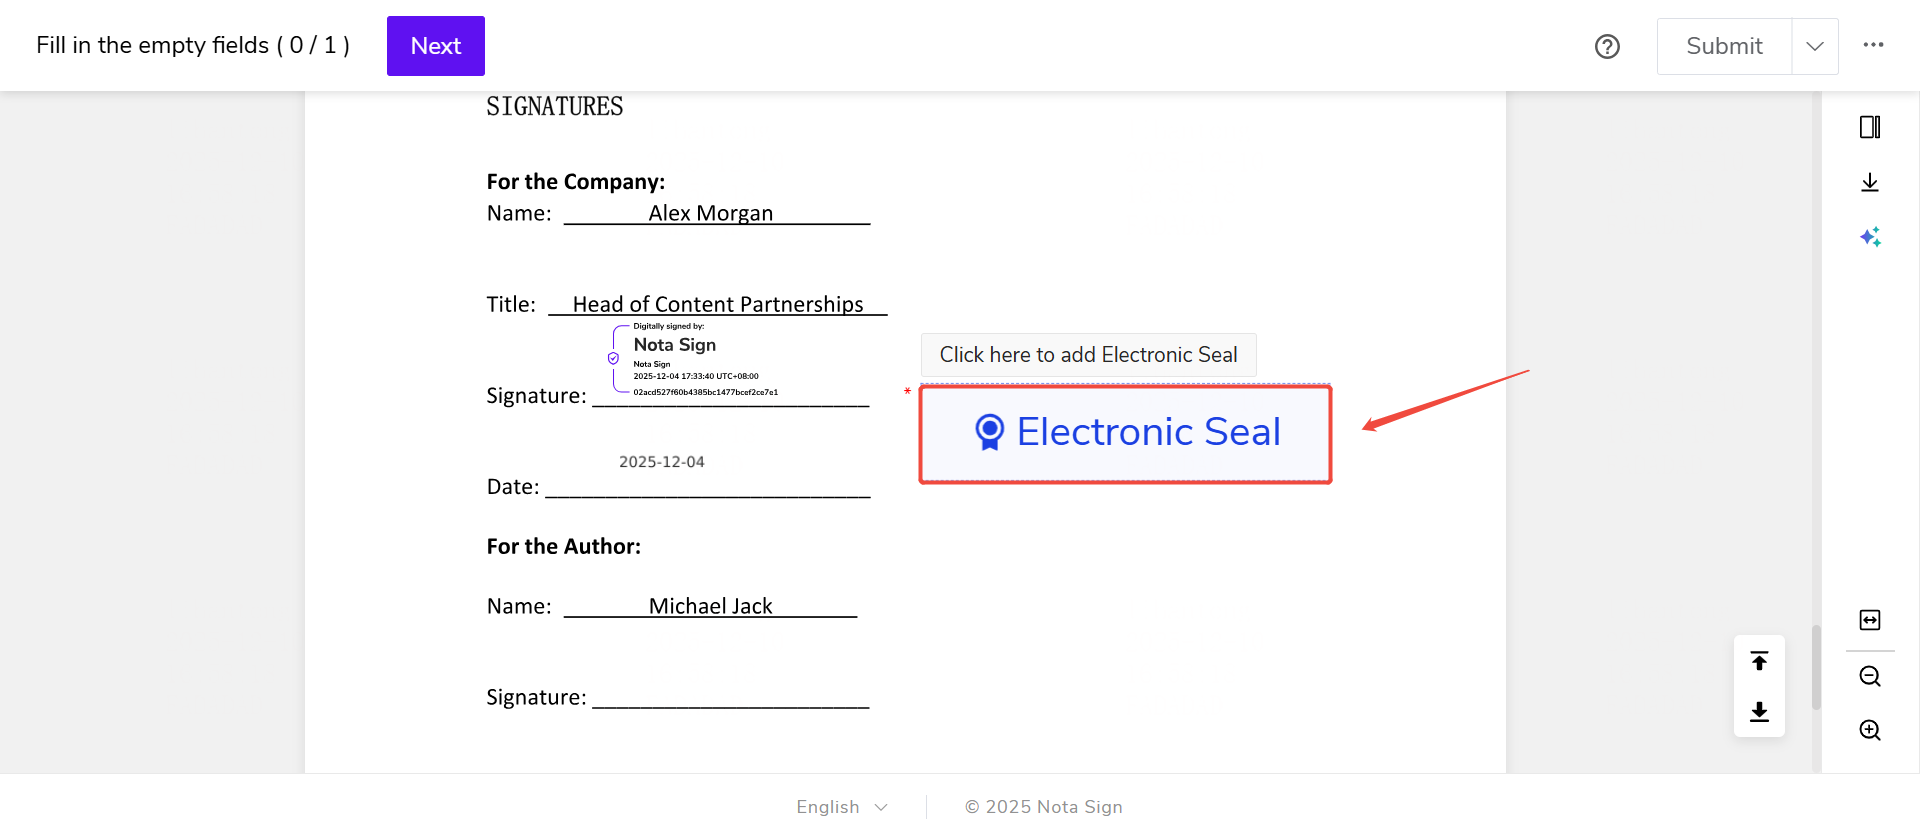
Recipients can click the Electronic Seal Control and select an authorized electronic seal for signing.
Use Case: Used for formal documents requiring corporate electronic seal signing.
Before use, [Enable Electronic Seal] must be checked in [Manage] - [Sending Settings].
2. Stamp Duty Control
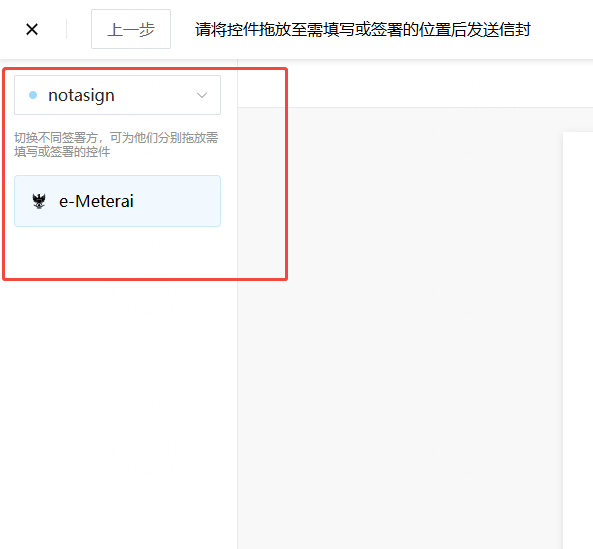
When creating an envelope, in the control settings page, select “Stamp Duty” from the recipient dropdown in the upper-left corner. After selection, only the “Stamp Duty” control will appear in the left-side control menu.
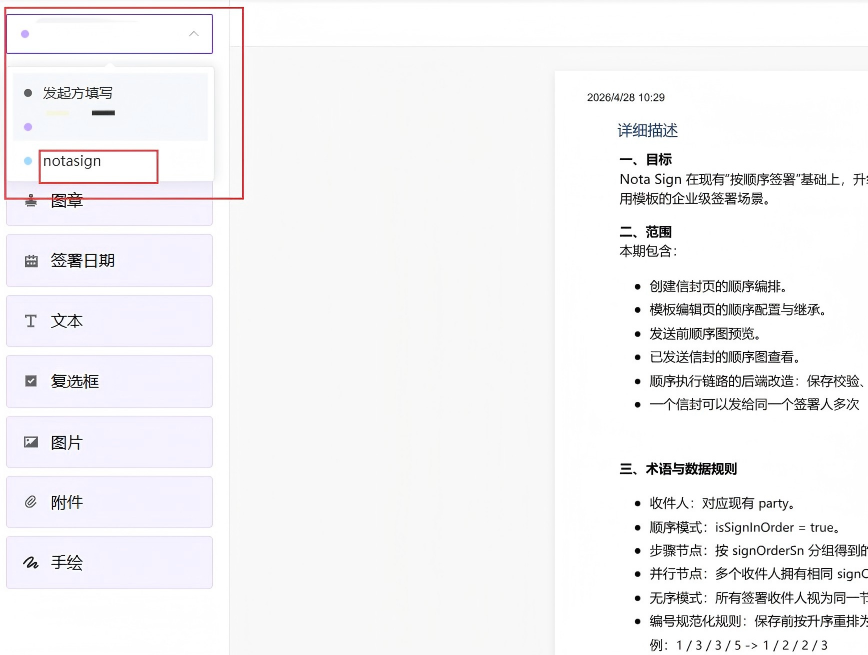
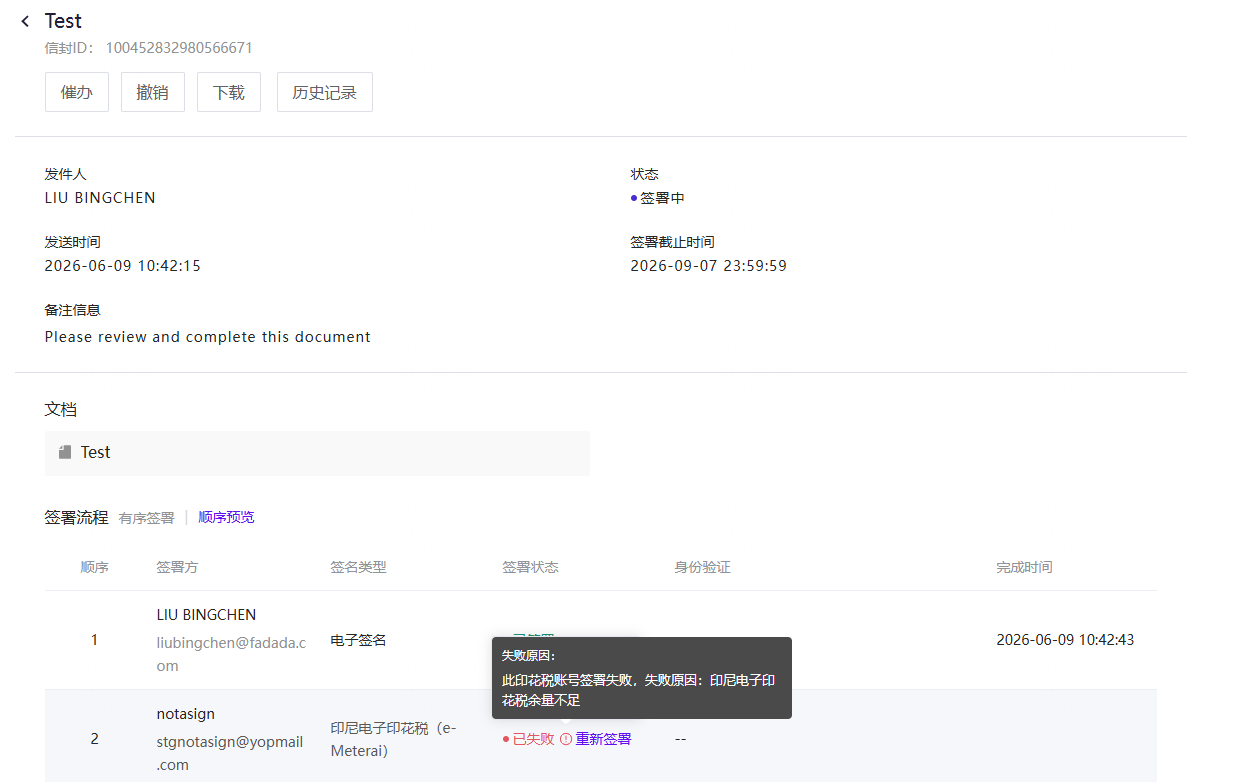
💡 Note: Stamp duty can only be applied after all recipients have completed signing.
💡 Note: When the stamp duty signing node is reached, the system automatically completes the stamp duty stamping without manual intervention.
Use Case: Used for documents that require electronic stamp duty under Indonesian law. Requires subscription to the Indonesian Electronic Stamp Duty service.
3. Singpass Signing Control
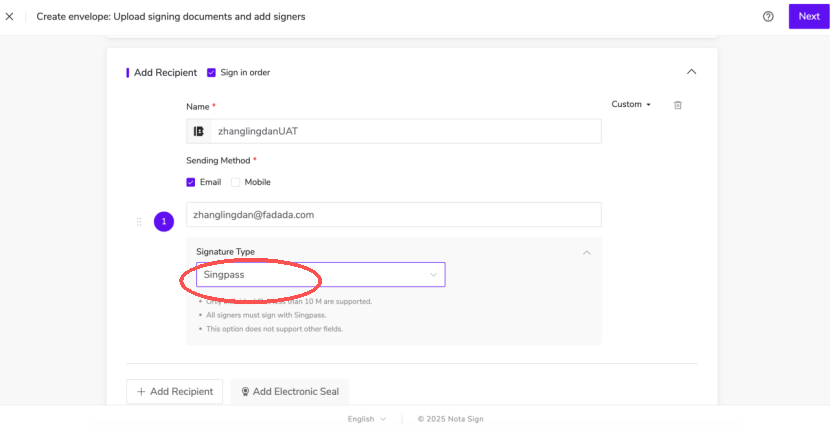
When initiating, select Singpass as the signing type and set the Singpass signing position for the signer.
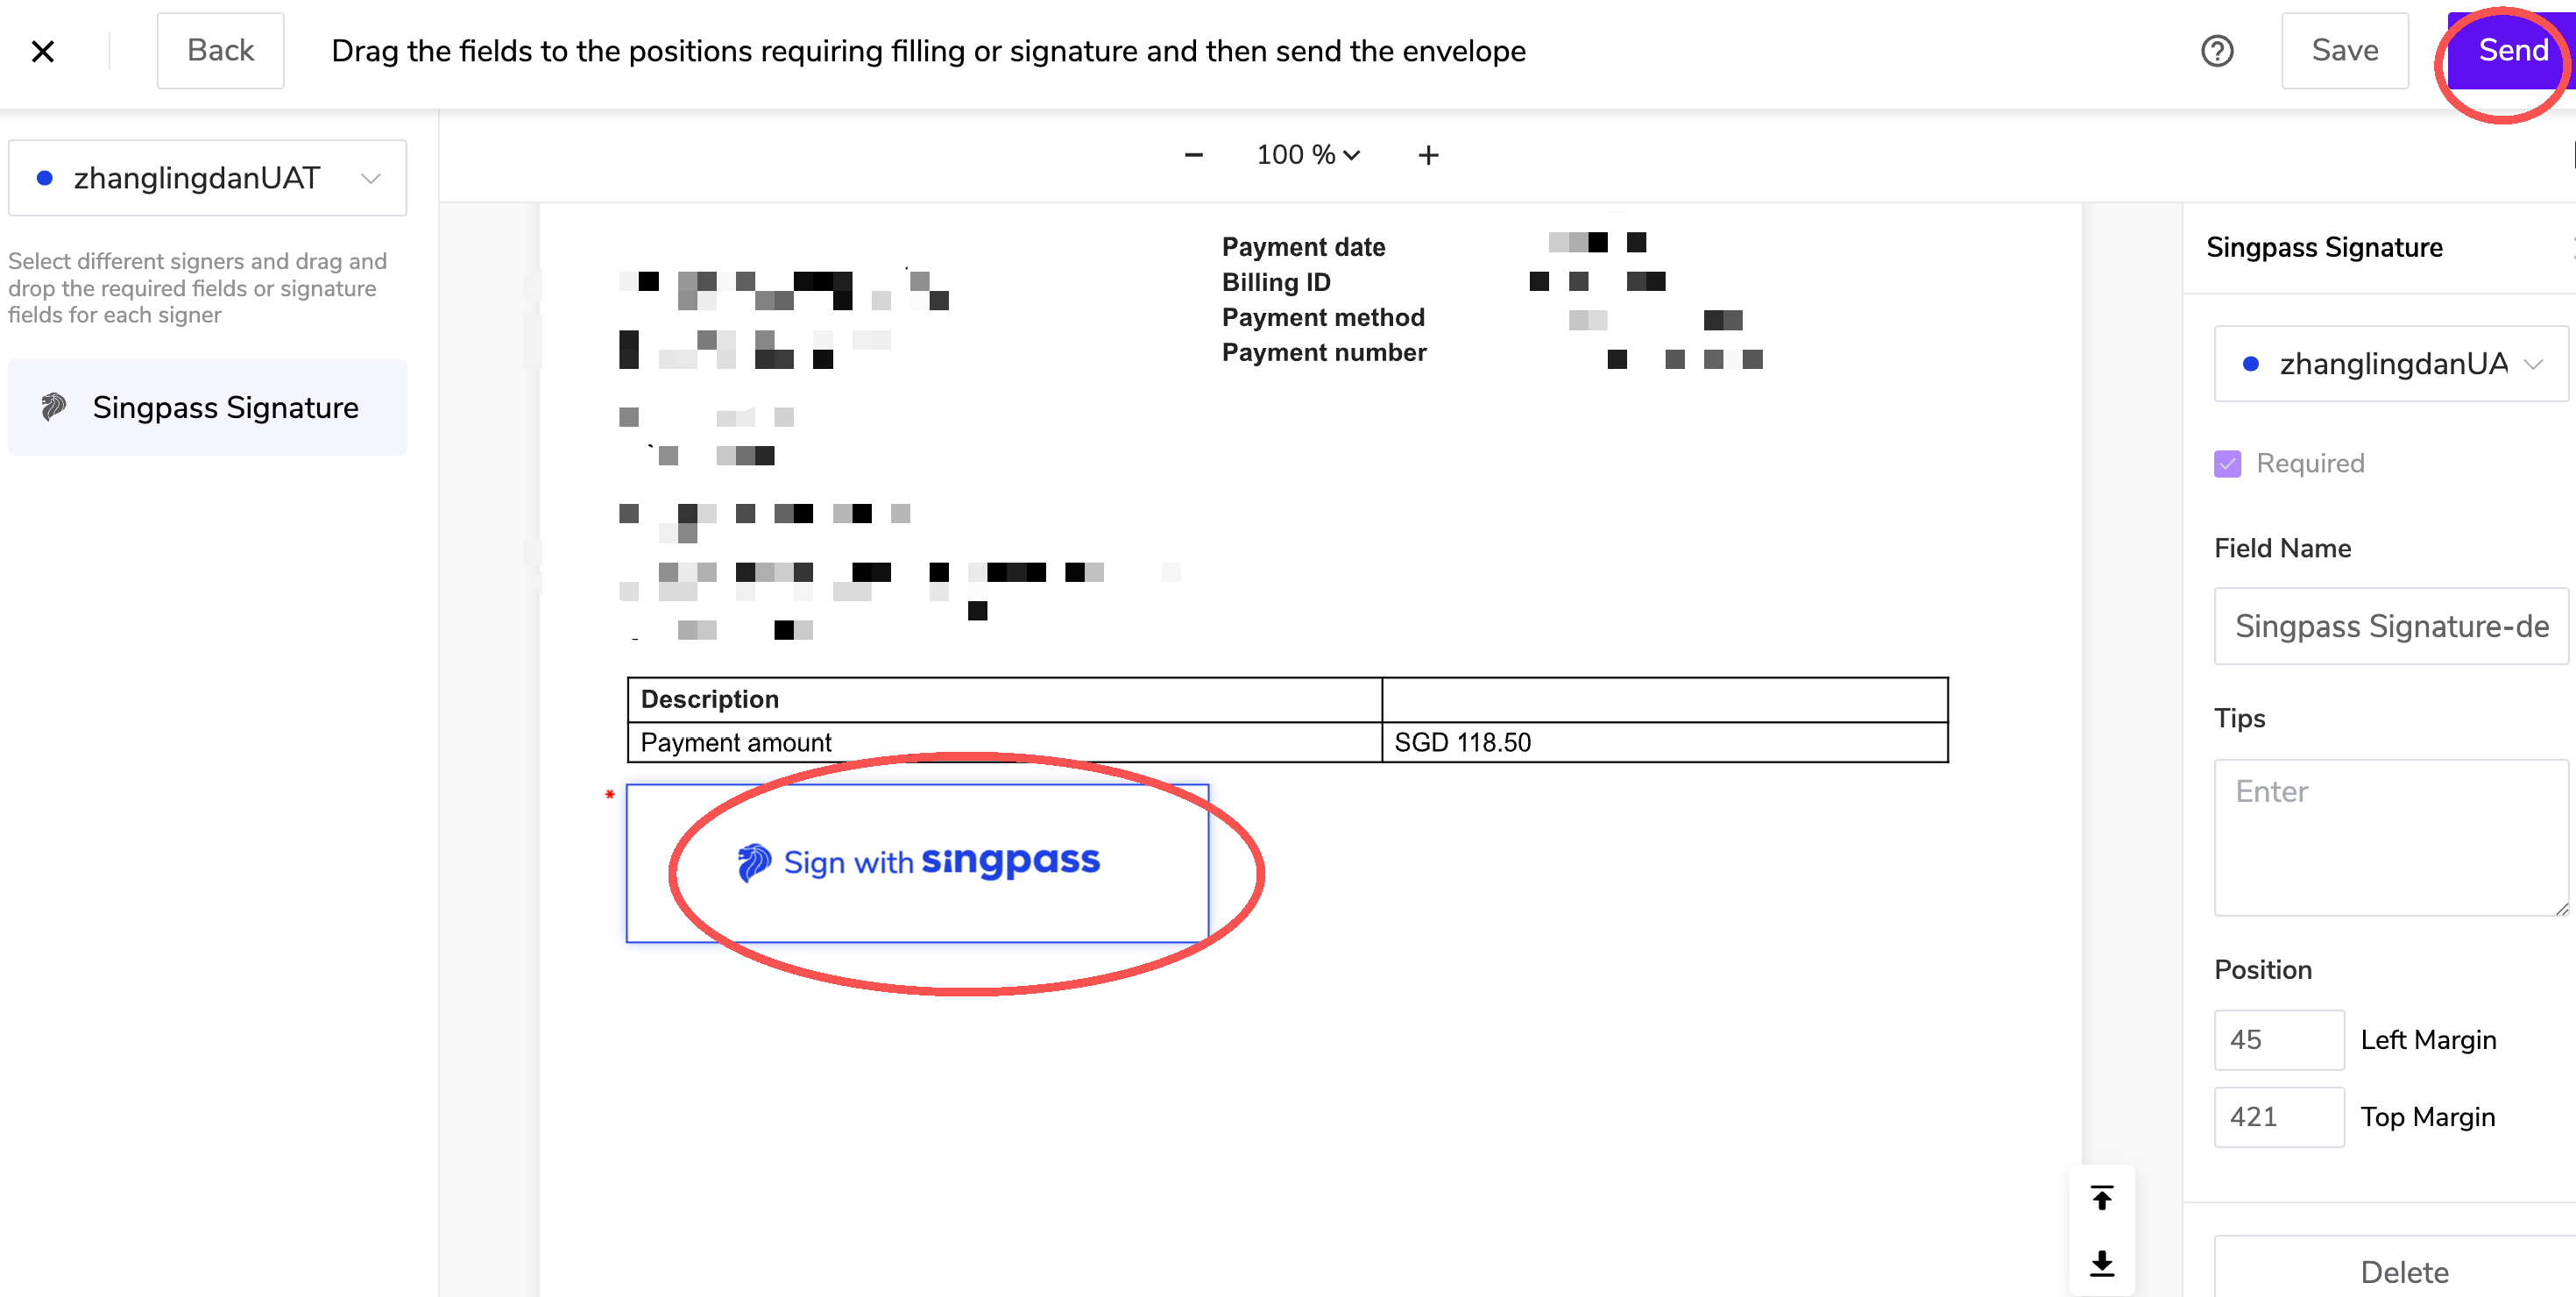
Use Case: Used when Singapore users sign using the Singpass digital identity system.
V. Auto-Signing Control Configuration
When using the API for auto-signing, control configuration has special requirements:
1. Configuring Signing Controls
When configuring signing controls, set the corresponding parameters according to the required signing form (signature or seal): If using a signature control, the system will automatically capture the recipient’s name to generate an auto-signature. If using a seal control, a unique and authorized seal ID must be explicitly specified.
2. Configuring Fill-in Controls
If a document contains a “Fill-in Control” designated as required, the fill-in value must be pre-populated when initiating the envelope.
Use Case: Used in enterprise integration scenarios where documents are auto-signed via API.